Intel’s 12th-gen H-series processors are the best that you can get in a gaming laptop, and the Core i9-12900HK really shows it off. It’s a 45W CPU that can go way farther, especially since it’s unlocked for overclocking. From our testing, we’ve seen in every benchmark that it outperforms the competition.
It’s worth keeping in mind, of course, that it’s also the newest thing. It comes out on par with Apple’s M1 Max in benchmarks, so when we get an M2 Max at some point, it will obviously beat this. That’s how these things work; it’s back and forth. AMD also hasn’t started offering its Ryzen 6000 H-series laptops for review yet.
But then again, you can’t play the same games on a Mac that you can on Windows. That’s why it makes it easy to say that this is absolutely the best gaming CPU right now. The only competitor is AMD.
Right now, Intel gets to just be king of the hill, especially when it comes to gaming. For creator applications, there’s still a whole family of 45W Alder Lake CPUs to choose from, and from what we’ve seen, Intel 12th-gen is a winner.
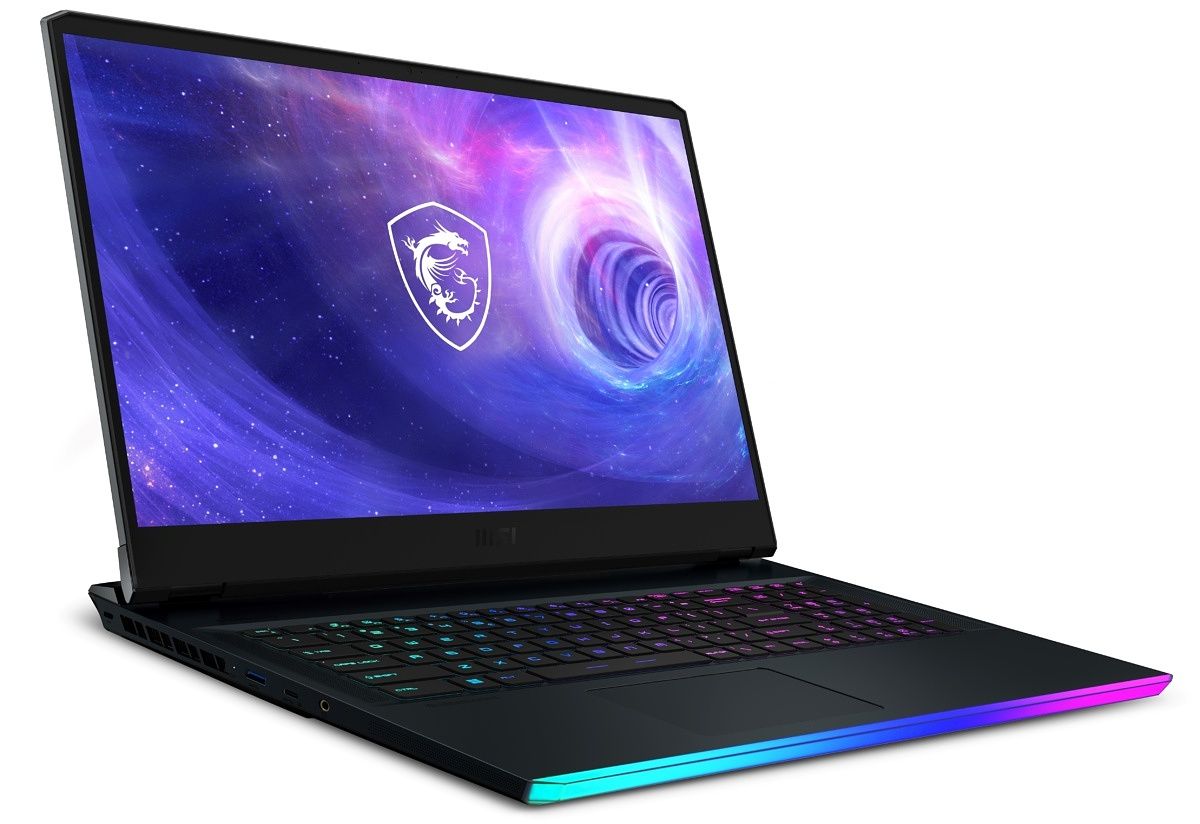
The MSI Raider GE76 is among the first laptops to ship with Intel's new 12th-gen processors, as well as NVIDIA's new GeForce RTX 3080 Ti graphics
Navigate this review:
Check out the specs of this unit:
MSI Raider GE76 Specs
| CPU |
Intel Core i9-12900HK |
| Graphics |
NVIDIA GeForce RTX 3080 Ti Laptop GPU 16GB GDDR6
Up to 1690MHz Boost Clock, 175W Maximum Graphics Power with Dynamic Boost. Max. 220W CPU-GPU Power with MSI OverBoost Technology. *May vary by scenario |
| Body |
397 x 284 x 25.9 mm, 2.9kg |
| Display |
17.3″ FHD (1920×1080), 360Hz, IPS-Level |
| Memory |
32GB DDR5-4800 Memory Type
2 Slots Number of SO-DIMM Slot
Max 64GB Max Capacity |
| Storage |
2x 2TB M.2 SSD slot (NVMe PCIe Gen4) |
| Webcam |
FHD type (30fps@1080p) |
| Keyboard |
Per-Key RGB Backlight Keyboard |
| Connectivity |
Killer Gb LAN (Up to 2.5G)
Intel Killer AX Wi-Fi 6E + Bluetooth 5.2 |
| Audio jack |
1x Mic-in/Headphone-out Combo Jack |
| Ports |
1x Type-C (USB / DP / Thunderbolt 4)
1x Type-C USB3.2 Gen2
2x Type-A USB3.2 Gen1
1x Type-A USB3.2 Gen2
1x RJ45
1x SD Express
1x (8K @ 60Hz / 4K @ 120Hz) HDMI
1x Mini-DisplayPort |
| Battery |
4-Cell
99.9 Battery (Whr) |
| AC Adapter |
330W adapter |
| Color |
Titanium Blue |
| OS |
Windows 11 Pro |
| Price |
$3,999 |
MSI Raider GE76: The laptop
- The MSI Raider GE76 has a 360Hz FHD display, but is also offered with 240Hz QHD and 120Hz UHD.
- It’s a laptop that’s focused on gaming, and if you’re looking for beautiful but accurate colors, look for something more creator focused like the MSI Creator 15.
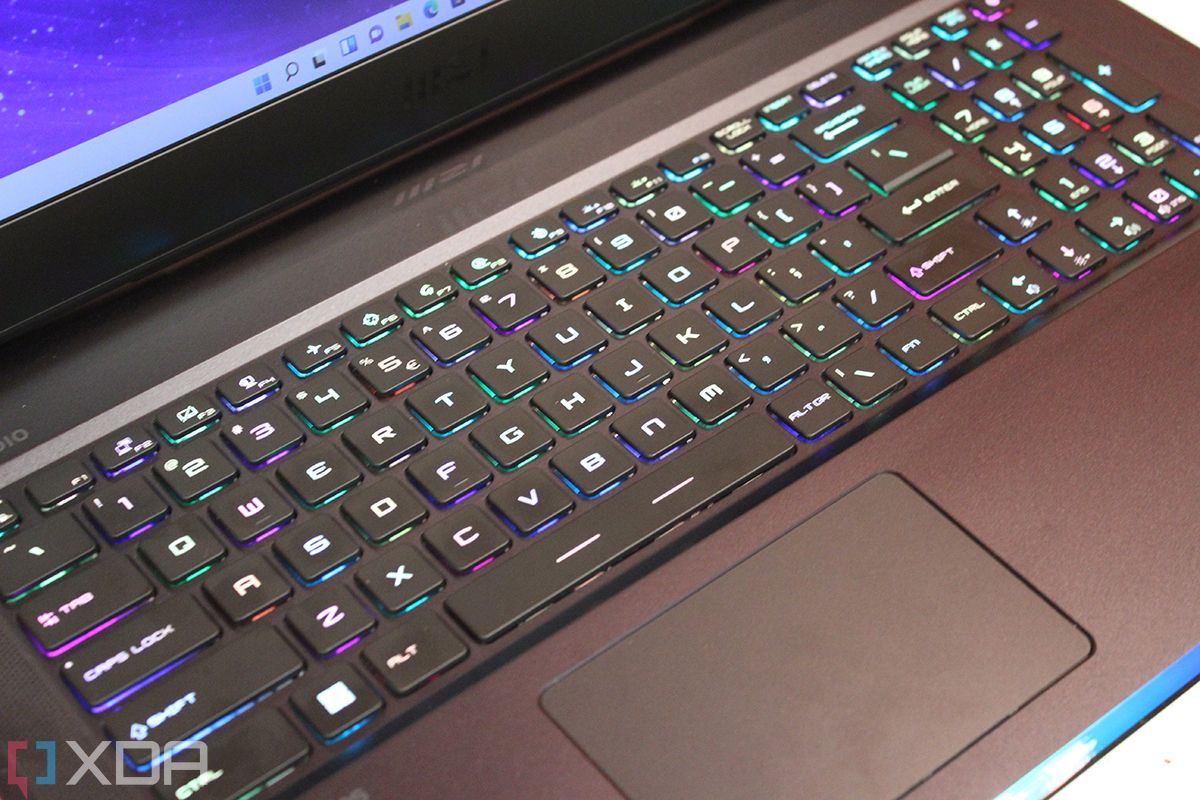
- The keyboard has per-key RGB lighting, and there’s an RGB light bar across the front.
Most of this review is going to be spent talking about performance. After all, we’re mostly here to talk about Intel’s Core i9-12900HK, along with the new RTX 3080 Ti GPU, DDR5 memory, and other internals. I do want to talk about the MSI Raider GE76 though, as it’s actually the first MSI laptop I’ve reviewed.

It’s quite nice, using a stylish design with the MSI logo on the lid. From the outside, it’s pretty straightforward for a gaming laptop.

Across the front is an RGB light bar, which is pretty cool. It adds a nice touch to the gaming rig. Of course, if you’re one of the many people that buy a gaming laptop for something that’s decidedly not gaming, you wouldn’t appreciate it. For those people, MSI has its Creator line of laptops.

There’s also per-key RGB lighting on the keyboard. By default, it’s set to what you see above, where it just sort of cycles through different colors. It’s definitely pretty, and you can change it if you want.

It’s also got a 360Hz display, which is awesome for gaming. The high refresh rate makes for smoother animations and most definitely better gameplay. I’ve seen the demoes, and I’ve played the exact same scenarios on a 60Hz screen and a 360Hz screen. The results are better on the latter.
The color gamut isn’t anything too exciting, with 97% sRGB, 68% NTSC, 73% Adobe RGB, and 73% P3. This isn’t uncommon for a gaming laptop, where the screen tends to be so optimized for having a high frame rate and being anti-glare that color gamut doesn’t tend to be a priority. In the past, people who edited videos and such would buy gaming laptops for their power, but now, there’s a whole range of creator laptops that focus more on that. In short, stay tuned, because I have a review of the MSI Creator 15, which has a stunning 4K OLED display, coming up.
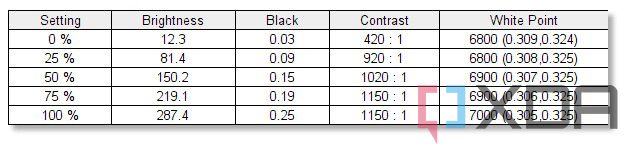
Brightness maxed out at 287.4 nits, which isn’t very bright. I assume that outdoor use isn’t a priority for a laptop like this. Contrast maxed out at 1,150:1.

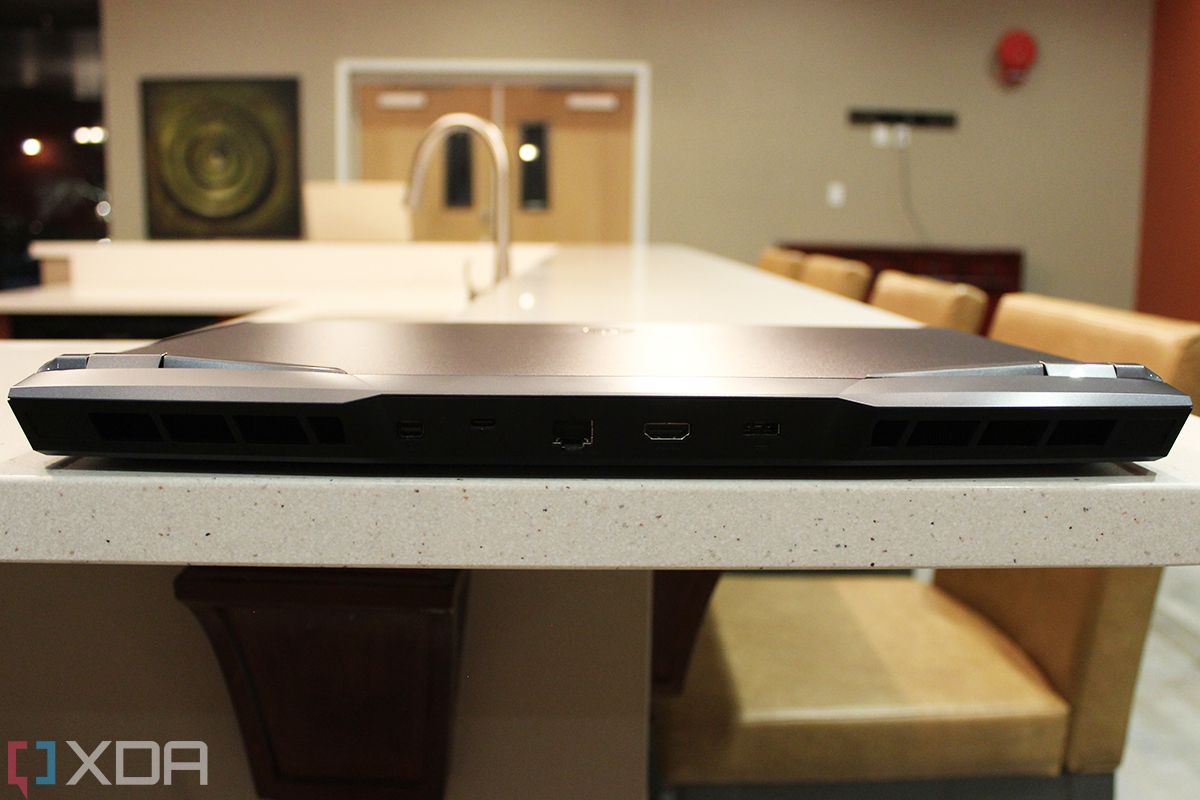
Most of the ports are on the back, including a charging port that hooks up to the 330W adapter. There’s also HDMI, Mini DisplayPort, and Thunderbolt 4. Any of those can be used for connecting high-resolution displays, making it nice and easy to take this laptop on the go, and dock it when you get home. There’s also an Ethernet port back there, which I had to make use of because Wi-Fi was tremendously unstable for me with this device. Presumably, there will be a driver update at some point before launch.
Ports on the back of gaming laptops are for those things that you’ll leave plugged in often, like monitors, docks, or the charger. On the sides, there’s where you’ll find ports that are more specifically for peripherals that you might plug and unplug frequently, like headsets, mice, and so on. You’ll find USB Type-A on both sides (two on the right side, one on the left), an SD card reader on the right side, a USB Type-C ports (not Thunderbolt) on the left side, and a 3.5mm audio jack on the left side.
- The Core i9-12900HK currently offers the best CPU performance in a laptop.
- DDR5 is better than DDR4, but has longer latency times.
- The GeForce RTX 3080 Ti is the next step up.
Here’s the summary: I’ve been using this laptop for a week, and I’ve played tons of games on it, such as Halo Infinite and Forza Horizon 5. By default, the graphics are set to the best they can be, and I set the frame rates to the full 360fps that you can use with this display. I didn’t have any issues at all. It was phenomenal. This is just one of those situations where you’re not going to be able to get better hardware.
Intel’s new 12th-gen ‘Alder Lake’ processors use a hybrid architecture. It’s across the whole family too, and we first got to see it in our review of the Core i9-12900K and Core i5-12600K, which are desktop CPUs. This is our first time seeing it in a mobile processor.
It uses a process that we’ve been seeing from ARM processors for years. There are big, powerful cores (P-cores), which are used for the most resource-demanding tasks. And then there are efficiency cores (E-cores), which don’t use as much power and can be used for tasks that don’t require as many resources. This is managed by a scheduler that Intel calls Thread Director. The P-cores are Hyperthreaded, while the E-cores are not, so since the Core i9-12900HK has six P-cores and eight E-cores, it adds up to a total of 14 cores and 20 threads. That’s way more than anything we’ve seen before in a consumer PC.
The P-cores max out at 5GHz clock speed, while the E-cores max out at 3.8GHz Turbo. The TDP is 45W, but the processor has a max power of 115W. This thing can get powerful, although that’s also why Intel says it’s the most powerful mobile gaming CPU on the planet.
I started off this section just by saying that gaming performance was as smooth as can be with the most demanding settings I could find, because that about sums up what you need to know. I could also tell you video and photo editing performance is great, but really, that all kind of just goes without saying. For benchmarks, I ran almost every test I could find, so we’re just going to run through those. Spoiler: the scores are high.
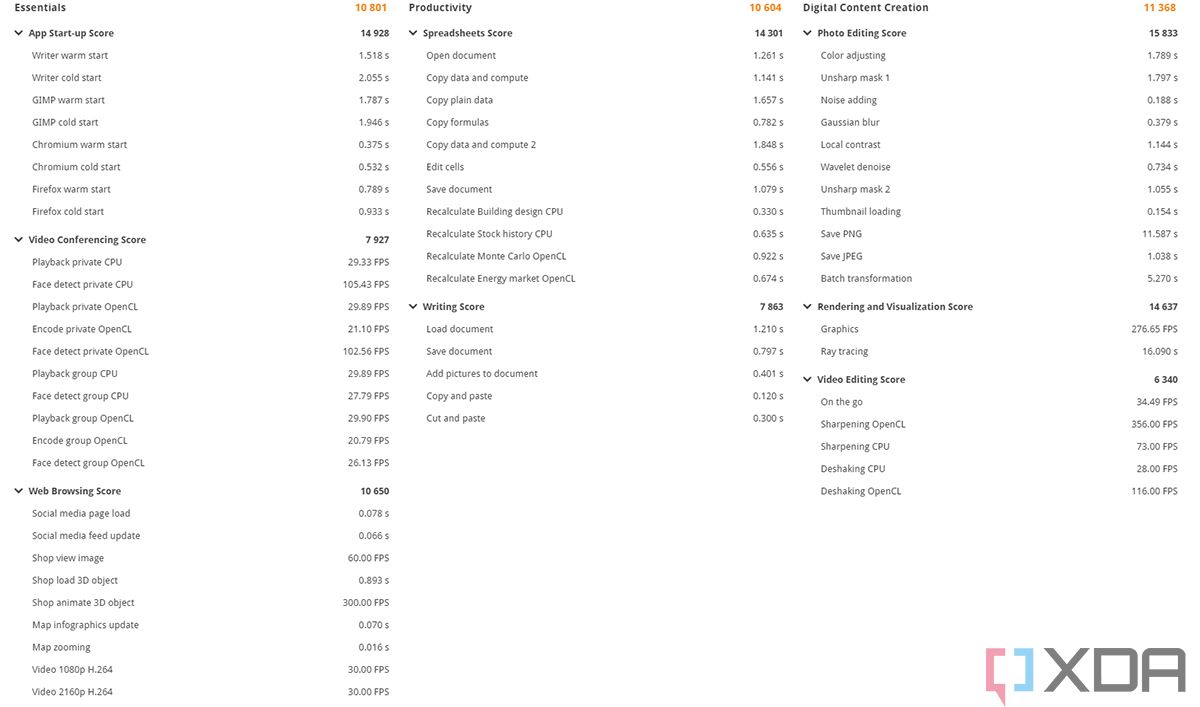
Intel Content Creation test
This was a test that was provided by Intel, making use of Adobe Premiere Pro and Lightroom Classic. It’s essentially a script that runs through a series of operations in each app.

Both the Premiere Pro export and Lightroom import times are pretty similar to what we saw with the desktop parts that I reviewed last year, which is impressive. Lightroom export rook much longer, with a median speed of 45.7 seconds on the Core i9-12900K and 56.1 seconds with the Core i5-12600K. With the mobile chip, it was 125.9 seconds. The other two tests came out in-between the Core i5-12600K and the Core i9-12900K.
Geekbench 5
Geekbench is a test that looks at straight-up CPU performance. To be clear, this is not a snapshot of overall PC performance, as it should produce the same scores whether we have an RTX 3080 Ti GPU, or if we were using a machine with integrated graphics.
| Product |
Specs |
Single-core |
Multi-core |
| MSI Raider GE76 |
Core i9-12900HK, RTX 3080 Ti |
1,774 |
12,630 |
| HP OMEN 45L |
Core i9-12900K, RTX 3090 |
1,921 |
15,723 |
| MacBook Pro |
M1 Pro |
1,755 |
9,954 |
| MacBook Pro* |
M1 Max |
1,780 |
12,720 |
| Lenovo ThinkPad P15 |
Core i9-11950H, RTX A5000 |
1,669 |
9,309 |
*The MacBook Pro with M1 Max score was pulled from the Geekbench database.
The big improvement over previous generations is going to be in multithreaded performance. That shouldn’t be surprising, since there are more cores. Specifically referring to CPU performance, we can see that the Core i9-12900HK is just about on par with Apple’s M1 Max, which goes in top-end MacBook Pro laptops.
Cinebench
Cinebench is another test that exclusively focuses on the CPU.
| Product |
Specs |
Single core |
Multi-core |
| MSI Raider GE76 |
Core i9-12900HK, RTX 3080 Ti |
1,833 |
14,675 |
| HP OMEN 45L |
Core i9-12900K, RTX 3090 |
1,894 |
23,659 |
| MacBook Pro |
M1 Pro |
1,530 |
9,552 |
| MacBook Pro* |
M1 Max |
1,529 |
12,258 |
| Lenovo ThinkPad P15 |
Core i9-11950H, RTX A5000 |
1,606 |
12,264 |
Being that this test is still just testing the CPU, the results are similar, except for how the desktop CPU really blows away everything else in multi-core scores.
3DMark
3DMark is the first one that’s going to give us an overall score, along with both CPU and GPU scores. It provides some additional insights, as well as several tests. I ran the CPU Profile test, Time Spy, and Time Spy Extreme.
| Test |
Total Score |
CPU Score |
GPU Score |
| Time Spy |
12,287 |
12,237 |
12,296 |
| Time Spy Extreme |
5,867 |
5,282 |
5,984 |
Also, according to that, this machine should get the following performance when gaming:
| Game |
Resolution |
Frame Rate |
| Battlefield V |
1440p Ultra |
115+ |
|
1080p Ultra |
140+ |
| Apex Legends |
1440p Ultra |
130+ |
|
1080p Ultra |
140+ |
| GTA V |
1440p Ultra |
70+ |
|
1080p Ultra |
105+ |
| Fortnite |
1440p Ultra |
125+ |
|
1080p Ultra |
170+ |
| RDR 2 |
1440p Ultra |
45+ |
|
1080p Ultra |
55+ |
Note that this is probably the biggest disparity from the desktop parts. If you’re deciding between a gaming laptop and a gaming desktop, this is something to pay attention to.
Finally, these are the CPU Profile results:
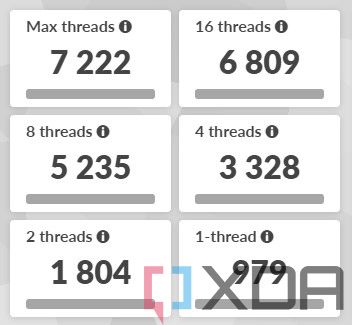
VRMark
VRMark is, well, it’s exactly what it sounds like. It tests virtual reality with three different tests. There’s the Orange Room, Cyan Room, and Blue Room. Orange Room is entry-level, while Blue Room is a test I’ve only seen a handful of PCs pass.
| Test |
Score |
| Orange Room |
11,452 |
| Cyan Room |
11,542 |
| Blue Room |
3,815 |
Out of all of the tests that I’ve run over the years, this is the top laptop score for the Blue Room test. Anything above that is a desktop, all of which have Core i9 processors from ninth- through 12th-gen, and graphics of either RTX 2080 Ti, RTX 3080, and RTX 3090. In other words, we’re in pretty good shape here.
PCMark 10
PCMark 10 is my favorite tests, because it really tests out a bit of everything. In fact, in most of my benchmark charts, I sort them by PCMark 10 score, and that’s how I decide what to compare a machine to.
| Product |
Specs |
Score |
| MSI Raider GE76 |
Core i9-12900HK, RTX 3080 Ti |
7,820 |
| HP OMEN 45L |
Core i9-12900K, RTX 3090 |
9,012 |
| HP OMEN 30L |
Core i9-10900K, RTX 3080 |
7,463 |
| Lenovo Legion 5 Pro |
Ryzen 7 5800H, RTX 3070 |
6,800 |
| Lenovo ThinkPad P15 |
Core i9-11950H, RTX A5000 |
6,788 |
For reference, here are some details:

The scores are really impressive. It beats a desktop from 2020 with an RTX 3080, so that’s saying something.
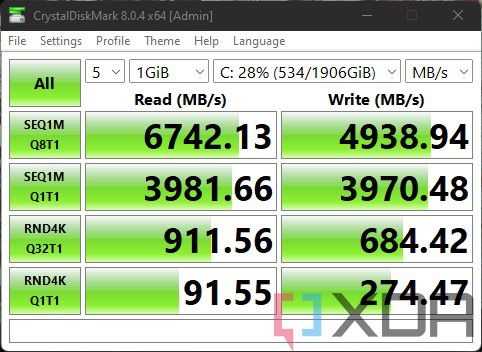
CrystalDiskMark
CrystalDiskMark is for testing storage, so out of all of the tests we’re doing, this one has the least to do with the new CPU and GPU. Really, it’s just for if you’re considering the MSI Raider GE76.
MaxxMem2
MaxxMem2 is a test for benchmarking RAM, and I haven’t used it much in the past. I’ve been using it more recently now that DDR5 is out, and more specifically, since DDR5 is too expensive to be mainstream. This test lets us see if DDR5 is worth the premium.

DDR5 is new to Intel’s 12th-gen CPUs, which is why this matters now. In my HP OMEN 45L review, it got 37,813MB/s on read, 41,851MB/s on write, and 32,440MB/s on copy, with 81.7ns latency. Right now, you could probably say that you could live without DDR5, given marginal improvements, longer latency, and higher prices. It’s something to keep an eye on though.
Video rendering
And now, it’s time for the old 8K video rendering test. That’s where we dump some video files into a video editing application, and export them. It’s about four minutes long, and I ran the same test on the Apple MacBook Pro with the M1 Pro processor.
| Product |
Software |
Rendering Time |
| MSI Raider GE76 |
Adobe Premiere Pro |
10:52 |
|
DaVinci Resolve |
6:17 |
| MacBook Pro |
Adobe Premiere Pro |
29:46 |
|
DaVinci Resolve |
2:25 |
Apple’s laptop still does a lot better in DaVinci Resolve, but the MSI smokes it with Adobe Premiere Pro. And before anyone says otherwise, Premiere Pro does run natively on Apple Silicon.
Who should buy a laptop with an Intel Core i9-12900HK?
While we’ve seen in numerous tests now that the Intel Core i9-12900HK is best-in-class, that class isn’t for everyone.
Who should buy a laptop with a Core i9-12900HK:
- People who want the best gaming performance from a portable PC
- Creators that do a lot of video editing
- Users that want to be able to overclock their laptop
Who should not buy a laptop with a Core i9-12900HK:
- Gamers who don’t plan on bringing their PC anywhere would be better off with a tower, as we’ve seen from Core i9-12900K scores, and even Core i5-12600K scores
- Users who don’t game. Intel has a whole suite of CPUs coming from the 12th-gen family soon, which will show up in laptops like the Dell XPS 13 Plus. These laptops are way better for productivity, portability, and battery life.
There’s a certain use case that’s filled by the Intel H-series. That’s the gaming laptop space, the creator laptop space, and the mobile workstation space, although even mobile workstations often use Xeon chips. If you’re thinking about a laptop with a Core i9-12900HK, you have to fit into one of these categories, and you have to want the best.
Even if you’re a gamer, but you’re OK with a more mainstream option, there are much better alternatives for you. And as mentioned above, if you’re just looking for a great productivity laptop, take a look at the new Intel P-series that’s coming soon.
The MSI Raider GE76 should start shipping in early February, as will other Intel 12th-gen H-series laptops.
The post Core i9-12900HK review: Intel has the best gaming processor, for now appeared first on xda-developers.
from xda-developers https://bit.ly/3ugEEV3
via
IFTTT