LightBlog

dimanche 18 septembre 2022

HP ZBook Firefly G9 (14 inch) Review: Lots of power, in a small package

There are a lot of powerful laptops you can buy for your money. Most are catered to gamers or those who are editing videos on the go. If you’re a mobile worker who is into product designing, STEM, or are a technical and creative manager, it’s often hard to find a laptop that’s designed just for your needs. You’ll often have to settle for something else that’s not quite right.

If you’re familiar with HP’s lineup, that’s where the ZBook Firefly comes in. The firm sent me the ZBook Firefly G9 for review. Coming with a 12th generation Intel Core i7-1265U processor, 64GB RAM, and the Nvidia T550 laptop GPU, this laptop is powered differently from any other consumer laptop I’ve used before.

The HP ZBook Firefly G9 packs a lot of raw power and performance in a really sleek package. Along with the lively DreamColor display, and some cool built-in security features like Tile tracking, this is a really well-capable machine, but there are some gripes that I had. The battery life is not the best, and the keyboard feels a little too shallow and small. Even the cooling isn’t the best, either. Still, though, it’s a machine that’s too hard to pass up, especially if you’re a creator dealing with 2D content or a mobile worker that needs a PC with lots of power on the go.

    HP Zbook Firefly G9
    The HP Zbook Firefly Z9 is a great laptop for 2D content creators thanks to the Nvidia T550 GPU, as well as the beautiful DreamColor display

      Features:

      Pros:

      Cons:

Navigate this review:

HP ZBook Firefly G9: Pricing and availability

  • There are three versions of the HP Zbook Firefly G9 that you can buy
  • The version I am reviewing doesn’t have an exact price just yet, according to HP, but you can get a model starting at $1,669.

The HP Zbook Firefly G9 14-inch is now available for purchase. It’s actually one of the most customizable ZBooks yet. However, the mode I got for review doesn’t appear to have a final price just yet. I asked about this and HP pointed me to three tiers of the HP ZBook Firefly 14 G9 instead. There’s an entry-level model that’s $1,659, a mid-range model that’s $2,099, and a high-end model that’s $2,600. Differences in configuration include RAM, storage, display type, and CPUs or GPUs.

HP ZBook Firefly G9: Specs

Specs Additional information
CPU 12th generation Intel Core i7-1265U (VPro optional) 1.8 GHz Base frequency, up to 4.8 GHz  Max Turboboost 12 MB L3 cache, 2 Performance cores, and 8 efficiency cores, 12 threads
Graphics Integrated: Intel Iris X

Discrete: Nvidia T550 Laptop GPU with 4GB GDDR6 memory

Display HP DreamColor 14-inch WUXGA (2560 x 1600), IPS, anti-glare, 120Hz refresh rate
Dimensions & weight 12.42 x 8.8 x 0.78 inches & 3.43 lbs
Memory 64GB DDR5
Storage 2TB PCIe Gen 4 x4 NVMe M.2 2280 SSD
Battery HP Long Life 3-cell, 51 Wh Li-ion polymer
Ports Left side: 1 SuperSpeed USB Type-A  1 HDMI 2.0, 2 Thunderbolt 4 with USB4  Type-C, 1 Smartcard reader

Right side: 1 headphone/microphone combo; 1 SuperSpeed USB Type-A

Fingerprint reader below keyboard deck

Audio & microphones Audio by Bang & Olufsen, dual stereo speakers HP World Facing Microphone dual array digital microphones
Connectivity Intel Wi-Fi 6E AX211 (2×2)  Bluetooth 5.2 M.2,

Intel XMM 7560 LTE Advanced Pro Cat 16; Intel 5G Solution 5000

Optional Near Field Communication (NFC) module

Camera 5MP Windows Hello IR Webcam
Color  Silver
Material Aluminum
OS Windows 11 Pro

Design: It looks like an HP Envy

  • The HP ZBook Firefly G9 is made out of aluminum and looks just like HP’s other mainstream Envy or Pavillion laptops from the outside, except in a darker silver color.
  • It’s quite compact for a laptop with a dedicated GPU.
  • There are a ton of ports that are helpful to creators and mobile workers.

When I unboxed the HP Zbook Firefly G9, I wasn’t immediately struck. The laptop looks almost just like an HP Envy from the outside. The first difference I noticed was the darker silver finish. The other dismmiliarlity is the big Z and Zbook branding on the lid, which has a cool reflective finish. Other HP laptops have the traditional HP branding on the lid.

And yes, this laptop is made of aluminum, some of which is recycled. HP says that 50% post-industrial aluminum is used in the C&D covers. This is quite durable, as bending the lid and pressing my hands hard on the keyboard deck didn’t cause it to flex. It’s one of my classic tests for durability.

Those are just the surface details. The highlight of the design is the overall compactness of the laptop. Gaming or creator laptops that have a GPU inside that are used by creators are typically heavy or thick. This one comes in at 0.78 inches in thickness and just under 3.43 pounds in weight. For a non-gaming laptop, the overall screen size is special. This is technically a 14-inch device, so it’s blending the screen size difference between 13 and 15 inches to be just right for those who need big screen space on the go. Gaming laptops like the Asus ROG Zephyrus have done this in the past.

Part of the design has some security features, too. The bottom cover has a tamper lock, so you’ll be alerted if someone tries to open the bottom of the system. There’s also a Tile tracking feature built-in, so you can track a lost laptop.


As a laptop that HP says creatives and mobile workers will end up using, I am also happy with the port selection. There’s Thunderbolt 4, as well as USB-A and HDMI. This means I was able to live a life free of dongles. For creatives who might hook up to a monitor, that’s a huge plus. Interestingly enough, HP also included optional NFC on my unit, though I didn’t find a way to use it. A smart card reader was on my unit, too, but I didn’t test it out as I don’t have a compatible accessory. These are more business features than they are for creatives.

Display and sound: Colorful, but not as good as OLED

  • HP’s DreamColor display is quite vibrant and bright, but still not as good as an OLED panel
  • The webcam is 5MP and there’s a privacy slider

Since this is a laptop focused on creators who deal with 2D content, the display is of a big focus. HP configured my unit with a DreamColor display, which is a special display type that’s designed for media & entertainment with a focus on color management. Combine that with the 120Hz refresh rate, a 16:10 aspect ratio, and WUXGA (2560 x 1600) resolution, and this display is colorful, responsive, crisp, sharp, and immersive.

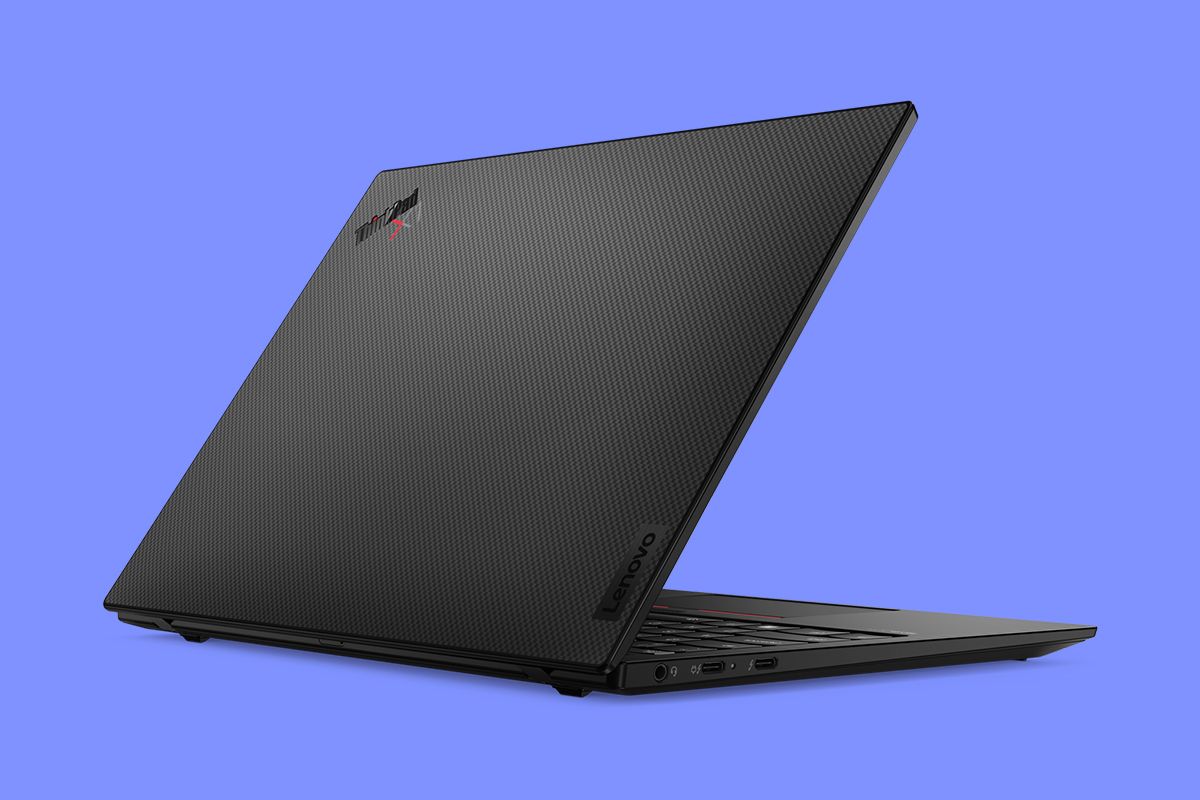
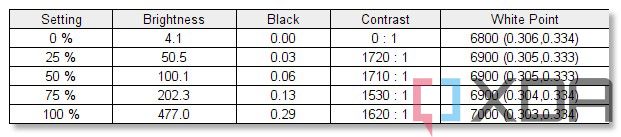
In web browsing, I really noticed how bright this DreamColor IPS display can get. I put my ThinkPad right next to it (it has a regular IPS 60Hz display) and realized how much sharper and more vibrant web pages looked on the HP. The HP also felt a lot more responsive when scrolling through web pages thanks to the 120Hz panel. Other than that, blacks in text stuck out a lot more and pictures of tech products on the XDA website look a lot more alive than they did on the ThinkPad. Even in watching YouTube nature videos, the scenes were quite lively. The insanely high contrast ratio and brightness my colorimeter recorded (26:770:1 and 542 nits of brightness) can account for that. This helps avoid reflections on the screen, even when I took the laptop outdoors.

I still don’t think it’s as good as an OLED display, though. I say that because of the numbers I got on my colorimeter. The HP Zbook Firefly G9 hit some really good spectrums but was not as great as a device with an OLED panel. It got to 100% sRGB, 87% of Adobe RGB, 91% of the P3, and 82% of the NTSC spectrums.

The 80% scores are good, but OLED is better. Compare that to an XPS 13 OLED model, for example. The numbers are 100% sRGB, 96% Adobe RGB, 100% P3, and 94% NTSC. The numbers put on the HP aren’t bad and are still accurate for content editing on an IPS display, but nothing can beat the color accuracy of an OLED panel.

At the top of that display is a 5-megapixel Windows Hello IR webcam. Most HP laptops have moved beyond 720p and 1080p, so this isn’t a surprise. HP includes some software that can boost the webcam with AI-auto framing, and I really enjoyed how accurate it was, and how clean I looked when on Google Meet calls. My review unit also had both a Windows Hello fingerprint reader and a Windows Hello webcam, so the security is doubled up. The added slider to hide the webcam when not in use helps with privacy, too. Most times I slid it to the off position. I prefer a physical slider to an electronic one, ad it adds to my confidence that I truly won’t be captured by my web camera when I don’t want to be.

As for the speakers, there are dual speakers tuned by B&O onboard. The speakers are at the bottom sides of the device. The sound is alright, but I’ve heard better on a laptop. The location doesn’t really make things sound immersive, and sometimes, sounds came out a bit muffled. It’s much rather HP have used the space on the keyboard deck for speakers.

Keyboard and touchpad: Not the best

  • The keyboard isn’t quite tactile
  • The touchpad has a nice soft feeling to it

While I was reviewing the HP ZBook Firefly G9, I was also reviewing the HP Envy 16. It’s interesting to me that with the size difference the keyboards can be so different. It might just be that I have fat fingers, but the keyboard on the HP ZBook Firefly G9 seems a little too cramped. I sometimes found myself pressing more than one key, especially when speed typing through this review. The keycaps themselves have a nice feeling and softly go into the chassis, though but aren’t quite as tactile as a MacBook’s or even a Surface.

HP includes the standard media keys and function keys on this keyboard. You can customize the F2 button as you see for a specific function. A mute microphone button is there, too, which is always appreciated in this era of working from home.

As for the touchpad, it’s quite big for a laptop that’s 14-inches. It’s actually a third of the size of the entire bottom part of the keyboard. That gave me plenty of room to scroll, drag and drop files with ease. It was very effortless, and I really like the softness of it as you click down. It’s hard to complain about this.

Performance: So much power, so little battery

  • The HP Zbook Firefly G9 has an excellent performing Nvidia GPU catered just for content creators, also paired with Intel’s U-series chip
  • That CPU and GPU combine for really bad battery life

The HP ZBook Firefly G9 comes with Nvidia’s special T500 GPU. This is catered just for professional mobile workers who are into product designing and engineering, STEM or are technical managers. I’m used to reviewing with laptops from the RTX mobile series and H-class chips, but after trying out a laptop T550, I must say it’s quite powerful and unique for creative tasks but not the best for gaming. This is even true when paired with Intel’s latest 12th-generation U-series chips and the 64GB of RAM on my unit. Most productivity tasks like browsing in Microsoft Edge, and rendering watermarked and background-less images in Photoshop, were fast and efficient.

Looking at the other benchmarks, you can the power of this chip and GPU combination. In a lot of my tests, this Intel U-series chip and T500 combo almost came half as close to a laptop with Intel’s higher-powered H-series chip, and Nvidia’s RTX graphics. It even comes close to what AMD has to offer, and destroys a laptop without a GPU. You can see that with the overall Crossmark creativity scores, which at 1,758 touch close to that of a Dell XPS 15 laptop with RTX graphics.

The Cinebench scoring also shows the power of the CPU, as it hits similar single-core numbers across the board for all comparative laptops. Only when multi-core comes into question do you see the U-series weakness against more powerful H-series chips. That’s because the 2 performance cores and 8 efficiency cores and 15 watts of power can only do so much. H-class chips from gaming laptops have more of both and run at higher wattage for better performance.

HP Zbook Firefly G9/ Intel Core i7-1265U/ Nvidia T550 Dell XPS 15
Core i7-12700H, RTX 3050 Ti
Lenovo Slim 7 Pro X
Ryzen 9 6900HS, RTX 3050
ThinkPad X1 Yoga Gen 7
Core i7-1260P
PCMark 10 5,167 6,640 5,658 5,168
3DMark: Time Spy 2,189 4,535 4,091 1,458
Geekbench 5 (single / multi) 1,717/8,552 1,774 / 11,580 1,341 / 8,296 1,419 / 6,915
Cinebench R23 (single / multi) 1,806/6,590 1,797 / 11,695 1,293 / 10,581 1,375 / 6,831
CrossMark (overall / productivity / creativity / response time) 1,550/1,467/1,758/1,257 1,855 / 1,735 / 2,053 / 1,671 1,306 / 1,298 / 1,409 / 1,059 DNR
VR Mark (Orange/Cyan/Blue) 3,126/2,102/634 4,745/2,753/ 1,325 DNR DNR
3D Mark: TimeSpy Extreme 1063 2,250 DNR DNR

Outside of common creative tasks for things like gaming, the T550 isn’t the best GPU for playing big games. This isn’t what the Zbook Firefly G9 is for. Yes, it did score well in TimeSpy, but the scores are nearly half that of a gaming laptop, and almost double that of what you get with standalone integrated graphics. I had to tune down the graphics settings when playing games.

I managed to get about 38 frames per second on Fornite on ultra 1080p settings. A more demanding game like GTA V played well too at 1080p, near 40 frames. Microsoft Flight Simulator though did not run well at all on ultra settings at 1080p. It froze a lot, and I had to sit through many plane crashes as a result. Tuning down the settings a bit to low and medium was a better experience and I hit a solid 30 frames on 1080p.

I do know a lot of other laptops with Intel’s U-series chips that have good power efficiency. The Lenovo Yoga 9i is a great example. Paired with power-hungry T550 graphics, though, I had two issues with this on the HP. One is cooling, and the second is battery life.

This laptop got hot quickly, particularly when under heavy loads and doing heavy web browsing. The fans kick in a lot and try to chill things down, and it helps keep the keyboard deck and palm rest cool to the touch However, the cooling still isn’t the best as an HP Envy is. My desk is warm to the touch when moving the laptop around when those fans kick in.

As far as battery life goes, I did do a few tests. With the screen at 120Hz and at 38% brightness, I only got 3 hours of battery life during my workflows of Google Meet calls, typing in WordPress, and web browsing. Tuned down to 60Hz, I got a slightly better battery result, closer to 4 hours. All of this was with Windows set to best power efficiency. I usually expect 5-6 hours out of my laptop, so this was a letdown.

Security & other features: Lots to keep your laptop safe

My laptop reviews typically end with performance, but since this is a Zbook, there’s a little extra to mention. HP includes a lot of things to keep this laptop safe. I already mentioned the tamper resistance, but there are two additional things. Tile tracking, as well as HP Wolf Security.

The Tile tracking isn’t new. HP’s other laptops have had this, particularly the Elitebook series. It’s pretty cool to see on the laptop though. Once I activated it, I was able to see the laptop on a map or follow the Tile signal to find where it was in my home. For businesses that like to keep track of laptop inventory, this could be huge.

HP Wolf Security isn’t new either, but it’s on this laptop and is of mention. This is basically endpoint security and a form of antivirus. It will scan your system for security issues, and scan files you’ve downloaded, too. It’s really great to see HP take security seriously.

Should you buy the HP ZBook Firefly G9

Unless you’re a content creator a mobile worker who is into product designing, or STEM or are a technical and creative manager, then no. There are other laptops with better CPU and GPU options that are better and can double down for gaming, too.

Who should buy the HP ZBook Firefly G9

  • Business folks, or those into STEM, or handling 2D creative content.
  • Anyone who wants a laptop with built-in security from the manufacturer

Who should not buy the HP ZBook Firefly G9

  • Everyday consumers who need raw power for gaming or video editing

In using the HP ZBook Firefly G9, I’ll say it’s a great laptop for the right person and market. I really enjoyed general day-to-day usage, but I hated the battery life and the poor cooling and thermals.

    HP Zbook Firefly G9
    The HP Zbook Firefly Z9 is a great laptop for 2D content creators thanks to the Nvidia T550 GPU, as well as the beautiful DreamColor display

      Features:

      Pros:

      Cons:

The post HP ZBook Firefly G9 (14 inch) Review: Lots of power, in a small package appeared first on XDA.


from XDA https://ift.tt/LBpDisZ
via IFTTT

How to enable and use ‘Flex mode’ on the Galaxy Z Fold 4’s massive folding screen

Samsung’s new foldables are most notable for their ability to fold down the middle like a pocket-sized notebook. The Galaxy Z Fold 4 is obviously the one that’s better suited to function as anything close to a notebook. It lets you relive the netbooks and miniature laptop nostalgia from the early days. Samsung has also put more effort to make the Galaxy Z Fold 4 feel like a conventional notebook by adding some new features to its Flex mode. But what exactly is this Flex mode and how can you enable and use it to take full advantage of the folding screen?

Navigate this article:

What is Flex mode?

Flex mode is a feature that’s built into the Galaxy Z Fold 4 and the Galaxy Z Flip 4. It kicks in every time you use the phone’s main screen folded halfway. It essentially capitalizes on Samsung foldable’s sturdy hinge and uses one half of the device to serve as the main screen while the other can be used as a trackpad, keyboard, and just to show some important information related to the content that’s being consumed on the top half. It comes in handy when you put down the phone on a flat surface to use it hands-free.

Flex mode, in case you are wondering, only works with select applications right now. So only a handful of applications can truly take full advantage of Flex mode. Supported applications like Camera, Gallery, and Calculator will automatically distribute relevant information and on-screen elements on both halves of the display. YouTube, for instance, is also a supported application and you can see how the top portion of the display is used to show the video itself while the bottom half is used to display other relevant content like the comments on the video, recommended videos, and more.

Samsung’s Calculator, on the other hand, also shows more functions on the bottom half of the screen while allowing you to check our inputs and show results on the top half.  You can also use Flex mode while capturing photos on the Galaxy Z Fold 4 and it’ll give you the camera controls along with a preview of your last image at the bottom while keeping the viewfinder on the top. Other supported applications have similar layouts to display relevant information.

How to enable Flex mode?

This particular feature is enabled by default on the Galaxy Z Fold 4, so all you have to do in order to use it is just fold the Z Fold 4’s screen halfway. Also, make sure you have disabled the orientation lock otherwise it won’t work. You can check this by locating a lock icon in the notification/quick settings menu and ensuring it’s disabled. Flex mode is exclusive to Samsung foldables, which means not all applications are optimized by default to take advantage of it. Samsung has a list of applications that support Flex mode by default. Here, take a look:

  • Calendar
  • Calculator
  • Camera
  • Clock
  • Gallery
  • Internet
  • YouTube
  • Zoom
  • Phone
  • Samsung Free
  • Samsung Health
  • Samsung TV Plus
  • Google Duo

How to enable Flex mode on unsupported applications?

More applications are being updated to take advantage of Flex mode and Samsung says the compatibility will increase over time. You can, however, enable the Flex mode for just about any app on your phone by following a few simple steps that are mentioned below:

  • Open the Settings page and look for an option named Advanced features.
  • Inside that, locate the Labs option and select it to see a bunch of experimental features.
  • Scroll down to the bottom of the page and choose the Flex mode panel.
  • On this page, you can select the switch next to the app you want to use with Flex mode to enable it.

How to enable flex mode for unsupported apps

Once done, you should now be able to fold the phone halfway and enable the Flex mode on just about any application. You’ll see the content move to the top half of the screen while a control pad will appear at the bottom.

Using Flex mode on unsupported applications

In the case of applications that don’t officially support the Flex mode, you’ll see a control pad at the bottom part of the display. This control pad, as you can see, has five buttons that you can interact with by tapping on them. Here’s what the buttons do:

  • Notifications: Tapping on this button will pull down the notification shade which you can send back by swiping up.
  • Screenshot: The next button allows you to grab a screenshot, which I think is very useful because it can be weird pressing the power and volume down buttons when the phone is set up on a flat surface like this in front of you.
  • Brightness & Volume: The next two buttons will bring the brightness and volume sliders, respectively.
  • Touchpad: Lastly, you have a touchpad button, which enables a PC-style touchpad and a cursor that moves around the top half of the display. The touchpad controls are fairly straightforward — use two fingers to scroll, pinch to zoom, tap, or double-tap on items on the screen to take necessary actions.
Galaxy Z Fold 4 with flex mode enabled

The control pad and the touchpad on Galaxy Z Fold 4

Flex mode will pull up the same interface for all the unsupported apps. I find it useful in the case of apps like Google Chrome in which you can use the cursor for various things. But it doesn’t do much for apps like Twitch, for instance. I just find it weird staring at an empty bottom half when that space could be used for showing the live chat. The lack of these features is understandable in case of unsupported apps but that’s not even my main concern.

screenshot of flex mode in unsupported apps

I personally found the touchpad to be a little finicky. I don’t like how the touchpad surface itself is quite small instead of letting you use the entire bottom half as a touchpad by momentarily hiding the control pad. I often find myself scrolling or trying to move the cursor outside the touchpad, only to realise that I am doing it wrong.

The overall experience of using the Flex mode isn’t convincing to me when it comes to unsupported apps. But that also has more to do with the fact that the OneUI software running on Android 12L isn’t exactly cursor-friendly. There’s also no way to adjust the sensitivity of the cursor itself, which I personally think would have made things a bit easier and useful.

    Samsung Galaxy Z Fold 4
    The Galaxy Z Fold 4 has fewer compromises, is more durable and overall a much better smartphone than its predecessors.

Well, that;’s everything you can do with the Flex mode on the new Samsung Galaxy Z Fold 4. It may not be the most useful feature to help up make the most out of your Galaxy Z Fold 4, but it works well for the most part. Is the Flex mode something that you’d be interested in trying out? Let us know by dropping a line in the comments below.

The post How to enable and use ‘Flex mode’ on the Galaxy Z Fold 4’s massive folding screen appeared first on XDA.


from XDA https://ift.tt/JZSMrs5
via IFTTT

Lenovo ThinkPad X1 Nano Gen 2 review: More power!

The idea behind the ThinkPad X1 Nano is innovative but simple. It was to make a business laptop that’s incredibly light, thin, and compact. With the Lenovo ThinkPad X1 Nano Gen 2, the goal is more power. The biggest upgrade here is from Intel’s 9W U-series processors to its mch beefier 28W P-series processors.

It’s also just a great laptop. It’s got a 1.35mm keyboard, which is my favorite on a ThinkPad. The display goes beyond the standard FHD+, so the resolution is just right. And of course, it weighs in at under a kilogram.

XDA Recommended Award Badge
Of course, while Intel’s 12th-gen P-series processors do come with a boost in power, that does take a toll on battery life. It’s also worth remembering that the display on this product is a bit small at 13 inches, so you should really take a look at the ThinkPad X1 Carbon if that’s not enough.

But if your use case is the right one for this laptop, then it’s fantastic.

    Lenovo ThinkPad X1 Nano Gen 2
    The Lenovo ThinkPad X1 Nano weighs less than a kilogram, and it comes in a compact form factor without sacrificing performance.

      Features:

      Pros:

      Cons:

Navigate this review:

Lenovo ThinkPad X1 Nano Gen 2 pricing and availability

  • The Lenovo ThnkPad X1 Nano Gen 2 starts at $1,511.40 on Lenovo.com
  • It’s available at other retailers as well

The Lenovo ThinkPad X1 Nano Gen 2 was announced earlier this year, and it’s widely available now. It starts at $1,511.40 on Lenovo.com, although those prices frequently fluctuate. That base model includes a Core i5, 16GB RAM, and a 512GB SSD. If you choose the option to customize your PC, that actually comes with 256GB of storage, but it’s $60 more expensive. Don’t ask me to explain ThinkPad prices on Lenovo.com. Like I said, they do fluctuate, and there is quite literally always a deal running on them.

There are other retailers that carry it as well. Best Buy still seems to be carrying the Gen 1 model, albeit at a $200 discount at the time of this writing. The unit that Lenovo sent me is available from Walmart for $1,699, a fair bit less than the $2,147.40 that it’s currently listed as on Lenovo.com. It includes a Core i7-1280P, 32GB RAM, and a 1TB SSD.

If you’re buying this for a business, you probably already have sales channels you’ll go through, and you’ll have a sales rep that will give you pricing.

Lenovo ThinkPad X1 Nano Gen 2 specs

Processor Intel Core i7-1280P with vPro
Graphics Intel Iris Xe
Body 293.2 x 208.0 x 14.4 mm (11.54 x 8.19 x 0.57 inches), 966.5 g (2.13lb)
Display 13.0″, 2K (2160×1350), IPS, 450 nits, Anti-glare, 16:10, 100% sRGB, Touch optional
Memory 32GB LPDDR5-5200
Storage 1TB M.2 2242 SSD
Battery 49.5 Wh, Rapid Charge (up to 80% in 1 hour)
Ports 2 x Thunderbolt 4, Type-C (Power, DP 1.4, Data, Always on)
1 x 3.5mm Headphone/Mic Combo Audio Jack
1 x Optional Nano-SIM card slot (WWAN model)
Connectivity Intel Wi-Fi 6 AX201 + Bluetooth 5.0
Optional: WWAN LTE 5G CAT 20 or LTE 4G CAT9
Audio Dolby Atmos Speaker System certification (2W x 2 woofers and 1W x 2 tweeters)
Four array microphones, 360° far-field, Dolby Voice
Camera Up to IR + FHD 1080p MIPI with Privacy Shutter & Computer Vision
Input 6-row, spill-resistant, multimedia Fn keys, LED backlight
Glass surface multi-touch touchpad 56 x 110mm (2.20 x 4.33”), TrackPoint
Security Discrete TPM 2.0, TCG certified, Kensington® Nano Security Slot, 2.5 x 6 mm, Touch style fingerprint reader on palm rest, match-on-chip
BIOS Security: Power-on password, Supervisor password, System management password, NVMe password, USB FIDO (Fast Identity Online) device integration, Certificate based BIOS authentication, Firmware Resiliency 3.0
Other Security: Camera privacy shutter, (Optional) IR camera for Windows Hello, (Optional) Computer Vision-based User Presence Sensing including lock on leave, Mirametrix Glance, Tile ready
Color Black or Carbon Fiber Weave
Material Top: Carbon Fiber
Bottom: Magnesium Alloy
OS Windows 11 Pro
Price $1,699

Design: It weighs under a kilogram

  • At 2.13 pounds, the ThinkPad X1 Nano Gen 2 is a bit heavier than it was last year
  • It has two Thunderbolt 4 ports

The Lenovo ThinkPad X1 Nano is unmistakable as a ThinkPad. It comes in any color that you want, as long as it’s black, although there is a carbon fiber weave option. It’s also made out of traditional materials for a premium ThinkPad, a mix of carbon fiber in the lid and magnesium alloy in the base. The difference is that this is engineered to be light and compact.

Top down view of ThinkPad X1 Nano

The part about it being compact is key. Last year, when the first X1 Nano was introduced, my question was, why? The ThinkPad X1 Carbon is supposed to be the lightweight model in the lineup, coming in at 2.49 pounds. But this is ultra-light, and like I said, it’s small.

The ThinkPad X1 Nano Gen 2 is thin, light, and compact

It weighs in at 2.13 pounds, which is about 7.5% heavier than last year’s 1.99-pound model. A lot of times, companies set a barrier to reach, and it’s clear that for the original model, that barrier was to be under two pounds, at least for the non-touch Wi-Fi only variant. Don’t worry though. 2.13 pounds is still ridiculously light, especially for a laptop that doesn’t feel plasticky as many ultra-light products do.

Side view of ThinkPad X1 Nano

It’s also 0.57 inches thin, so it’s no surprise that there aren’t any USB Type-A ports. In fact, aside from the headphone jack, there are just two Thunderbolt 4 ports. The USB Type-C only approach has become common with newly-designed laptops. We’ve seen it in the ThinkPad Z13, the Dell XPS 13, and more. Thunderbolt 4 is just so versatile that you can do whatever you want with it. You’ll just need a dongle if you want to plug in a USB Type-A cable.

I do keep such a dongle in my bag, but if you use a mouse, it’s becoming more and more common to just use Bluetooth. Having used many laptops without USB Type-A, it’s pretty easy to do when on the road, and if you’re looking at a laptop like this, you’re presumably looking to spend a lot of time on-the-go.

Thunderbolt 4 also opens the door for expansion, and given the more powerful CPU in this laptop, there are some interesting options. You can connect an external graphics card and play games on it, something I really wouldn’t do with the U9 processor on the last-gen model. Of course, you can use a Thunderbolt dock at home for proper expansion into a desktop setup as well.

My big takeaway from the design is that this is the perfect laptop to take on the road. When you put it in your bag, it feels like there’s nothing there. Seriously, I end up double-checking to make sure I didn’t forget my laptop.

Display: The 2K screen hasn’t changed

  • The display is 13 inches with 2,160×1,350 resolution
  • The webcam has been upgraded to 1080p

The display on the Lenovo ThinkPad X1 Nano Gen 2 is the same as it was on the Gen 1 model. The resolution is 2,160×1,350 with a 13-inch screen size and a promise of 450-nit brightness. It’s pretty solid. I’m really happy that Lenovo is using a better resolution than the more traditional 1,920×1,200 that you’d find in a 16:10 laptop. The slight boost makes for a much better experience, and it doesn’t have the impact on battery life that you’d get from 2,560×1,600 or 3,840×2,400.

Close up of ThinkPad X1 Nano display

The only issue is the size. It’s 13 inches, whereas most 13-inch laptops are actually 13.3 inches. that third of an inch may not sound like a lot, but when it gets to be too small, you’re looking at using full-screen apps. Having two apps side-by-side isn’t very practical. Remember, it’s a 16:10 aspect ratio, so it’s not even as wide as a 13-inch 16:9 display.

Lenovo ThinkPad X1 Nano Gen 2 Display Test

In my display tests, the color gamut was pretty average. It tested at 99% sRGB, 71% NTSC, 77% Adobe RGB, and 76% P3. It’s a productivity machine, so this probably doesn’t affect you too much.

Lenovo ThinkPad X1 Nano Gen 2 Display Test

Brightness maxed out at 477 nits, which is excellent considering that Lenovo only promised 450 nits. With a screen that bright, it makes it great for outdoor use. Indeed, there’s no low-end 250-nit option here.

Close up of ThinkPad X1 Nano webcam

The webcam has been boosted to 1080p, a welcome change from last year’s 720p camera. Most ThinkPads have received this upgrade this year. In the age of working from home, it’s an important one.

It’s worth noting that prior to the working from home boom, people really didn’t care about webcam quality. That’s why innovation on that front had stagnated, and we even saw so many laptops with cameras under the display. When it did become popular to work from home, it took the market some time to catch up. Most PCs spend a good 12-18 months in the pipeline. That and the fact that Intel added FHD cameras to its Evo spec means quality webcams in more laptops.

Keyboard: The 1.35mm keys should set the standard for ThinkPads

  • It has a full-size keyboard with 1.35mm keys

The Lenovo ThinkPad X1 Nano Gen 1 was actually launched around the same time as the ThinkPad X1 Titanium Yoga, and if you compared the Nano to the Carbon, you’d compare the Titanium Yoga to the X1 Yoga. Unlike the X1 Titanium Yoga and other newly minted ThinkPads like the Z13, the X1 Nano doesn’t sport fancy new features like a haptic touchpad, but it does have a keyboard with 1.35mm keys, and it’s awesome.

Top down view of ThinkPad keyboard

ThinkPads are renowned for keyboard quality; we all know that. But having reviewed a lot of laptops, the depth of the keys on some of them is just too big. The X1 Carbon and X1 Yoga come in at 1.5mm, and some others are 1.8mm. I find the 1.35mm keyboard on the ThinkPad X1 Nano Gen 2 to be refreshing.

The typing experience on the 1.35mm keyboard is exquisite.

I’ve actually talked to Lenovo about this at length. The ThinkPad team put a lot of work into engineering a shallower keyboard that requires the same amount of force to press the key as its 1.5mm keys. The result is an exquisite typing experience, and I’d really like to see Lenovo adopt this on its other products.

Having just reviewed the ThinkPad Z13, I’m a bit spoiled for modern ThinkPad features. The Z13 has a haptic touchpad where the top of it can either function as buttons to be used with the TrackPoint, or as an extension of the touchpad itself. It also places the Ctrl button to the left of the Fn key, like it is on every other laptop.

The ThinkPad X1 Nano Gen 2 is more traditional in this area. You’ll still find a mechanical Precision touchpad, physical buttons, and of course, the Fn key is to the left of the Ctrl button, unfortunately. You can, however, change the layout of those two keys in the Lenovo Commercial Vantage application.

Performance: Intel’s P-series is a big step forward

  • Intel’s 28W processors are great, but probably shouldn’t be in a laptop this thin
  • There’s a cost to battery life

The big change gen-over-gen is that the ThinkPad X1 Nano Gen 2 has Intel’s 28W P-series processors. The Core i7-1280P has 14 cores, including six performance cores and eight efficiency cores for a total of 20 threads. For comparison, the Gen 1 model used Intel’s 9W U-series chips, which aside from being substantially less powerful, had four cores and eight threads. There’s a big difference here.

Angled view of ThinkPad X1 Nano

The boost is in CPU performance. Intel’s Iris Xe changes gen-over-gen are trivial, although you do get a bit more over the more powerful tier. In other words, you’re really not getting better graphics performance with this unit than with last year’s, or at least not in any meaningful way.

The 28W processor means that the X1 Nano isn't a compromise anymore.

While Iris Xe is great for editing photos, I still consider this to be a productivity machine. That’s why even the existence of the new P-series is something I tend to question. I actually feel like this laptop would be better off with a 15W U-series processor, which is just as good for productivity tasks. And of course, the more power-hungry 28W processors use more battery life, which we’ll get to in a bit.

My work flow consists of having about a dozen tabs open in a Chromium browser at any given time, and then using other productivity apps like Microsoft To Do, OneNote, Slack, and Skype. The ThinkPad X1 Nano Gen 2 didn’t miss a beat. I also edited my photos in Adobe Photoshop, and it was great at that too. That’s the key takeaway here. The more powerful processor means that this compact design isn’t a compromise anymore.

ThinkPad X1 Nano Gen 2
Core i7-1280P
ThinkPad X1 Nano Gen 1
Core i7-1160G7
ThinkPad X1 Carbon Gen 10
Core i7-1260P
PCMark 10 5,345 4,586 5,178
3DMark: Time Spy 1,754 1,761
Geekbench 5 (single / multi) 1,753 / 10,243 1,346 / 4,891 1,622 / 8,207
Cinebench (single / multi) 1,624 / 8,221 1,296 / 4,052 1,309 / 7,115
CrossMark (overall / productivity / creativity / responsiveness) 1,766 / 1,610 / 2,072 / 1,443 1,547 / 1,436 / 1,771 / 1,292

I was impressed with the benchmark scores, because I actually expected the X1 Carbon to beat it, even though it uses a lesser CPU. In my experience with this year’s ultrabooks, which can contain a variety of processors ranging from 9W to 45W, the ones that do the best are the ones that use processors best for their design. A thin and compact laptop like this shouldn’t really handle a 28W chip so well.

As far as battery life goes, it’s not great, and that’s where my issue with the 28W processor really comes into play. The best I got was 290 minutes, or four hours and 50 minutes. This is with the power slider set to balanced (indeed, using it as balanced when not connected to power didn’t have a meaningful sacrifice to performance, unlike on some laptops). Still, my average results were more like 242 minutes, which is just over four hours. That’s not great. The 49.5WHr battery should have enough capacity to do better than that.

Who should buy the Lenovo ThinkPad X1 Nano Gen 2?

Lenovo has a variety of ThinkPads to choose from. Let’s see if the X1 Nano is right for you.

You should buy the Lenovo ThinkPad X1 Nano if:

  • You’re frequently on-the-go
  • Your tasks are productivity related
  • You type a lot and want a great keyboard experience

You should NOT buy the Lenovo ThinkPad X1 Nano if:

  • You work with split-screen apps
  • You really care about battery life
  • You use a lot of USB Type-A peripherals on the road

Like I said right away, Lenovo already has a light ThinkPad; it’s the ThinkPad X1 Carbon Gen 10. It weighs in at 2.49 pounds, has a 14-inch screen, and has a wider variety of ports. If the ThinkPad X1 Nano isn’t right for you because of limitations with ports or screen size, the X1 Carbon might be the right choice.

    Lenovo ThinkPad X1 Nano Gen 2
    The Lenovo ThinkPad X1 Nano weighs less than a kilogram, and it comes in a compact form factor without sacrificing performance.

      Features:

      Pros:

      Cons:

The post Lenovo ThinkPad X1 Nano Gen 2 review: More power! appeared first on XDA.


from XDA https://ift.tt/JMXneF5
via IFTTT

How to create and edit custom themes for Gboard on your Android device using Rboard apps

In the never-ending customizable world of Android, hobbyists and modders alike are on a constant journey to make our devices better match our personalities. We like to tweak anything and everything we can get our hands on, whether it be a new wallpaper, the hottest new icon pack, or a fully customized theme. This is the reason why many users prefer Gboard as their keyboard app, as you can mod the stock UI using custom themes via projects like Rboard Theme Manager.

Although Google offers a plethora of themes for Gboard out of the box, there exists a whole community out there for homebrew themes and other mods for the keyboard app. However, customizing an existing theme package or creating a custom theme from scratch isn’t a straightforward job. To fill the void, two veteran Gboard themers — XDA Senior Member RKBD and XDA Member DerTyp7214 — have come up with a pair of apps: Rboard Theme Creator and Rboard Patcher.

  • Rboard Theme Creator lets you create rudimentary Gboard themes.
  • Using Rboard Patcher, you can further edit different aspects of the themes.
  • The customized themes can be applied via Rboard Theme Manager.

Navigate this article:


Internal structure of a Gboard theme

In the Gboard theming scene, a themepack can be identified by its “.pack” extension. Essentially, the file is a collection of image assets, style sheets, and metadata – all compressed under a special container format.

Inside a Gboard theme pack

Since most of the theming components are unencrypted, one can also write additional patches to mod specific portions of a theme on the fly. The patches are usually distributed as ZIP files.


How to create a Gboard theme using Rboard Theme Creator

The Rboard Theme Creator is a lightweight Android app that allows anyone to create a basic Gboard theme right on their phone. You don’t even need access to a PC to compile the themepack, as the app takes care of everything for you.

Rboard Theme Creator (Free, Google Play) →

In order to design your own Gboard theme, do the following:

  1. Install the app from the aforementioned Google Play Store link.
  2. Open the app and locate the rotating dial for color selection.
    Rboard Theme Creator
  3. Next, select the coloring scheme (e.g. Dark or Monet) and the corresponding UI component (e.g. AMOLED or Tertiary Accent). The app lets you try out every possible combination.
  4. Now adjust the color dials until you get your desired themed UI in the preview section.
  5. To save your custom created theme, tap on the Share icon at the lower left corner, choose the file picker, and save it after giving it a suitable name and author information.

Alternatively, you can directly transfer the newly created theme to Rboard Patcher (if installed) for further editing. To do so, tap on the Add theme button and follow the wizard.

For any app developers that read this, Rboard Theme Creator is completely open source. You are free to explore the code, submit new patches, or compile the app yourself.

Rboard Theme Creator GitHub Repository

Notably, the developer also hosts a web version of the app, which could be handy for designing Gboard themes from your PC/Mac.


How to patch a Gboard theme using Rboard Patcher

Rboard Patcher is a versatile tool for Gboard theming. To start, the app lets you customize the base theme package (*.pack) produced by the Rboard Theme Creator app. Moreover, you can also edit existing community-made themes and mod different aspects of them using the publicly hosted theme patches. The patcher has yet to support third-party patch repos, but the feature is expected to land soon.

Rboard Patcher (Free, Google Play) →

Here’s how you can customize any Rboard-compatible theme through Rboard Patcher:

  1. Install the app from the aforementioned Google Play Store link.
  2. Open the app and open a valid Gboard theme *.pack file using the file picker.
    • For instance, you can point the app to a themepack produced by Rboard Theme Creator.
  3. Rboard Patcher will fetch the publicly hosted theme patches and list them categorically.
    Rboard Patcher
  4. Tap the ones you want to apply (e.g. a font or a rounded icon).
  5. To save the customized theme, tap on the Share icon at the lower left corner, choose the file picker, and save it after giving it a suitable name and author information.

In case you want to immediately prepare the customized theme for flashing via Rboard Theme Manager, you can do so by tapping on the Add to Manager button and follow the wizard. Of course you need to have the Rboard Theme Manager app installed on your device beforehand, otherwise the option won’t work. Moreover, you need root access to install the themes.

Rboard Patcher is open source as well, which means you are welcome to fiddle with the codebase. In case you want to try out the bleeding edge builds without compiling the app on your own, opt for the continuous integration releases.

Rboard Patcher GitHub Repository


Conclusion

That’s all there is to it. As you can see, creating custom themes for Gboard is not that hard, especially when you can utilize the awesome tools offered by the Rboard community. How much granular you get with Gboard theming is entirely up to you, but if you are not satisfied with Google’s offerings, then building your desired theme from scratch is the best thing to do.

Do you regularly customize your keyboard app with different mods, or is such theming not of interest to you? Let us know in the comments section below.

The post How to create and edit custom themes for Gboard on your Android device using Rboard apps appeared first on XDA.


from XDA https://ift.tt/UT4nV71
via IFTTT

The iPhone 14 highlights the value of the one true budget iPhone

Another yearly iPhone event is in the books and it’s another year where Apple has a smorgasbord of new phones for people to go crazy over. But this year also isn’t like every other year, at least not in some parts of the world. It’s been a tough couple of years and various global calamities have made big spending decisions such as a new phone a lot tougher.

Of course, iPhone is iPhone and Apple rarely struggles to sell a mountain of its latest and greatest. And as ever, previous models stick around with lower prices for those looking to spend a little less. With the iPhone 14 and iPhone 14 Pro now on sale, the iPhone 13 and iPhone 12 have also remained on sale. But they’re no budget offering. One can even argue that the iPhone 14 is a minimal upgrade over its predecessor at best.

What the iPhone 14 does do, however, is highlight the value of the one true budget iPhone. The iPhone I use and love, admittedly, but that doesn’t change facts. The iPhone SE 2022 is looking pretty good right now for those who actually want a budget iPhone.

The iPhone is getting more expensive for a lot of us

iPhone 14 Plus featured

Outside the U.S., buying a new iPhone is a more expensive proposition. Most of the XDA team are in locations where at least one of the new iPhones now costs more than it did a year ago. The iPhone 14, for example, is about £70 more expensive at the entry level in the UK than the iPhone 13 was, and it’s not even that different of a phone. The iPhone 14 Pro has seen a larger price increase here as well. It’s not necessarily Apple’s fault — though you could argue the iPhone is expensive enough already — since everything is getting more expensive.

As inflation bites and prices go up, companies such as Apple will move to cover their increased costs and protect their profit margins. That means we have to pay more. We don’t have to like it, but it is what it is. Business will always be business. That in turn makes buying a phone outright from Apple less appealing. There is the iPhone Upgrade Program, at least, but more expensive phones mean more expensive monthly payments. Same for a two-year carrier contract.

By contrast, the iPhone SE 2022 is actually what you could call still call “affordable”. In the UK, it starts at £400 less than the cheapest iPhone 14. It’s also still cheaper than the iPhone 13 and even the now two-year-old iPhone 12. It is, of course, not entirely comparable to the iPhone 14, but in some key areas, it is. And you can almost buy two of them for the same outlay.

iPhone 14 using last year’s chip helps validate the iPhone SE

iPhone SE 3 2022 setup 28

A lot of people, fans and writers alike, love to poke fun at the “old-fashioned” iPhone SE. Yes it has bezels, yes it has the home button, and yes it only has one camera. But I would argue none of that truly matters considering Apple managed to price it as it has.

Most average consumers probably don’t know or care what chip is in the iPhone SE. But we know it’s the same as the chip in the iPhone 14, albeit with a solitary GPU core less. That and the fact it also launched this year allow for a pretty confident feeling that it will be supported by iOS updates as long as the iPhone 14 family will be. You probably can’t say the same about the older, more expensive iPhone 12.

The iPhone 14 is ‘better’ for sure. The display is larger, higher resolution, and being OLED, much nicer to look at. The camera system is also much better on the front and the back. And it should have the legs on battery life. But here’s the thing: do most iPhone buyers outside of tech enthusiasts even really care?

I settled on an iPhone as my main personal phone for a few main reasons when Windows phones finally died. They’re easy to live with, they get supported for longer than I’ll ever plan to keep the phone, and while iOS is a little uninspiring, the experience usually stays comparably good year on year. My only recently retired iPhone 8 Plus still feels perfectly fine to use to this day. I can’t say the same about some of the Android phones I’ve tried in that time.

All this is important for the masses that are buying smartphones. Especially in a time when finances are getting tighter for all of us. Do you really need that OLED display or the newer camera? I’d wager if the camera is the most important feature you’re probably already a Pro buyer.

Buy the right budget iPhone

iPhone SE 2022

I’m not here saying everyone should ignore the iPhone 14 and buy an iPhone SE instead– far from it. If anything, I want people to really think about what they’re buying, and why. A lot of people wait for the new iPhone to be launched so the previous models drop in price. But based on what they still cost in markets like the UK, I’d say they are a pretty poor purchase.

The iPhone 14 and iPhone 13 are virtually identical. The Mini has been killed off and you shouldn’t buy the iPhone 12 for its current price when it’s two years old. In the U.S. it’s not quite as clear cut, perhaps, with carrier deals and trade-ins, but in locations like my own, there are savings to be had. I’m passionate about encouraging people to make sensible tech purchases, not rushing in and spending more than they really have to.

The iPhone SE 2022 is not a bad phone by any stretch. The single camera might be old, but it’s still serviceable for those of us who only take pictures of our kids or post on social media. The battery life isn’t as bad as some would have you believe and the performance is ridiculous. And it’s a personal thing, but I still prefer a fingerprint sensor over the Face ID system that never did work out what I looked like with sunglasses on. There’s always a case to buy the more expensive models, but I’m not convinced a lot of people really need to spend the extra.

A basic iPhone experience it may be, but it’s a current iPhone experience at almost half the price for a lot of us. I think more people should consider it as their next iPhone.

    iPhone SE 2022
    Getting past the design the iPhone SE is a modern iPhone inside with the A15 chip at a significant discount over the iPhone 14

The post The iPhone 14 highlights the value of the one true budget iPhone appeared first on XDA.


from XDA https://ift.tt/EGMyVqw
via IFTTT

This app lets you list the Camera2 and CameraX extensions supported by your phone

Android users have numerous options when it comes to devices, with a diverse combination of specifications, features, and of course, budgets. Not only the regular customers are spoiled by choice, but this also confuses veteran users when it comes to features that cannot be easily measured and compared. Take, for instance, the camera performance. Thanks to improved hardware and computational photography, the Android side has earned a reputation for having some of the best smartphone cameras on the market. That said, the current state of Android’s camera processing is far from an open standard, and the situation becomes even more complex across different OEMs.

In case you had to compare two different OEMs on how well they expose the stock camera features to third-party camera apps across their portfolio, the answer may not be easily found. Now, Zachary Wander, aka XDA Recognized Developer Zacharee1 has taken it upon himself to remedy this situation by building a database of camera data from different Android devices focusing on their overall capabilities. Meet CameraX Info, a lightweight app to enumerate the supported Camera2 and CameraX extensions as well as other camera related features.

CameraX Info main screen CameraX Info camera features

For the uninitiated, the CameraX library from Google aims to streamline the camera app development process on Android. Under the hood, it wraps Camera2, an API that allows apps to probe the camera features on a device, provided the OEM exposes those camera features to the API. In order to reduce the camera feature fragmentation, device manufacturers can opt to ship CameraX-compliant extension libraries with their phones that allow third-party developers to seamlessly leverage native camera features.

What if you’re not a developer, but still like to know whether the bokeh effect of the stock camera app of your phone works on third-party camera apps as well? This is where CameraX Info comes in handy. No need to fiddle with any code, as the app will list all the supported CameraX/Camera2 extensions and other capabilities (e.g. ARCore) exposed by the primary and selfie cameras. What’s more interesting is that the app also offers an online database, where users can anonymously upload, browse, and download camera support data for different devices and Android versions in JSON format.

CameraX Info database Samsung

Below you can find the list of features offered by CameraX Info:

  • View Camera2 extension support.
  • View CameraX extension support.
  • View detected logical and physical cameras and their basic specs.
  • Upload your camera data anonymously.
  • View camera data anonymously.
  • View ARCore support.

If you are interested in exploring the camera features of your Android phone, give CameraX Info a shot. The app itself is open source, and the source code is available on the developer’s GitHub profile.

CameraX Info (Free, Google Play) →


Featured image: The rear cameras of the OnePlus 10 Pro and the Samsung Galaxy S22 Ultra.

The post This app lets you list the Camera2 and CameraX extensions supported by your phone appeared first on XDA.


from XDA https://ift.tt/hjYbw3c
via IFTTT

Huawei Nova 10 Pro review: A unique hardware combination that’s as cool as it is pricey

The Huawei Nova series is an interesting series from the Chinese company aimed primarily at younger people, coming in at a more affordable price tag. It typically packs some flagship-level features but downgrades on some others, and the Huawei Nova 10 Pro sticks to that philosophy with some added bling.

For what it’s worth, this is the same old Huawei situation as it has been with every other device before it. You don’t get the Play Store, you get AppGallery, and any of the same difficulties you may have had with AppGallery in the past continue to apply here. That’s not to say there aren’t improvements — in fact, AppGallery is starting to become usable for me as a pretty decent alternative. However, for most people, it’s still not at the level that’s worth switching to yet. It works pretty well for most things, but it’s not perfect and I still find myself struggling with certain tasks quite frequently.

I like the Nova 10 Pro as a smartphone, but as usual, the software situation can be difficult to overcome at times, especially with the price.

    Huawei Nova 10 Pro
    The Huawei Nova 10 Pro is a stylish upper mid-range smartphone from Huawei that packs some pretty cool photography tech inside.

      Features:

      Pros:

      Cons:

Huawei Nova 10 Pro display


Huawei Nova 10 Pro: Specifications

Huawei Nova 10 Pro
CPU Snapdragon 778G 4G
Dimensions and weight
  • 164.2mm x 74.5mm x 7.9 mm
  • 191g
Display
  • 6.78 inches OLED 1200×2652
  • 1.07 Billion colors, HDR10
  • 120Hz
Camera
  • 50MP f/1.8 PDAF
  • 8MP ultra-wide, f/2.2, 112-degrees
  • 2MP depth sensor
  • 60MP front-facing camera 100-degrees
  • 8MP 2x telephoto front-facing
Memory 8GB RAM, 128GB/256GB
Battery 4,500mAh
Network LTE, 4G only
Sensors Optical in-display fingerprint sensor, Accelerometer, Barometer, Gyro sensor, Geomagnetic sensor, Hall sensor (analog), Proximity sensor, Light sensor
Ports USB-C 2.0
OS Android 12 with EMUI 12
Colors Black, Silver, Green, Violet
Price Starts at €699

About this review: I received the Nova 10 Pro for review from Huawei on my recent trip to IFA in Berlin. While the company sponsored my travel to attend the event alongside other media persons, it did not have any input into the contents of this review.


Design

The front of the Huawei Nova 10 Pro, showing the home screen

The Huawei Nova 10 Pro’s design is pretty, though it’s a bit over-the-top. The front of the phone is pretty nice, with a large 6.78-inch 120Hz AMOLED display. There’s a pill-shaped cut-out for the camera on the top left, and it contains two front-facing cameras. However, it’s not for face unlock — one of them is a 60MP front-facing camera for selfies that supports up to a 100-degree field of view, and the other is a 2x telephoto.

On the back, though, is where things get really bling. The camera module is surrounded by a gold ring, and the primary sensor in the center of the camera island is also surrounded by gold. The back of the phone has a slightly-textured metal of some kind, with the company’s nova logo emblazoned at the bottom… also in gold. It looks good for the most part, but I think that the camera module is a little bit tacky.

Huawei Nova 10 Pro

It’s a “youthful” design I guess, which is obviously what Huawei has been going for here. It feels premium in the hand, and I don’t have a whole lot of criticisms aside from how over-the-top it all is. If it weren’t for the crazy gold rings, I think this would be one of my favorite designs in a budget phone released this year. The included case does cover the gold quite a bit, so you can just use that if you’d like.

There are dual speakers at the top and bottom, pretty decent haptics, and the display is curved. There’s also an optical under-display fingerprint sensor at the bottom. All of these add to the premium feel of the phone, especially as curved displays (practicality aside) are typically only reserved for flagship smartphones. We’ve seen more and more mid-range options arrive with one, but the Huwaei Nova 10 Pro’s entire job is to come across as flagship-like as possible.


Huawei Nova 10 Pro: Camera

To be fair to Huawei, the company hasn’t really lost its touch when it comes to cameras. The Nova 10 Pro has a pretty good camera system in tow. Some of the most powerful camera hardware here goes to the front-facing camera system though, packing a 60MP ultra-wide. It’s a pretty high-quality sensor that looks good, and I think that it makes sense for the target market this device is aimed at.

Another feature that’s pretty cool as well is the front-facing camera’s 2x telephoto. Have you ever seen a video on a social media platform where it shows the user zooming into something behind them? That’s exactly what it’s for. It’s not exactly my cup of tea, but it makes total sense to include it in a phone aimed at younger people. The quality isn’t bad either, and the wideness of the ultra-wide is great for fitting lots of people into a single photo. The selfies below are compressed, but you can find the uncompressed versions in the Flickr album.

Finally, the cameras on the back are pretty good as well. I noticed in particular that they did well in low light, and I got some pretty impressive shots when out on a night-time walk. Oddly, I ran into some weirdness when taking photos during the day of the sky, but I imagine that these can be ironed out over time. You can view uncompressed photos in the Flickr album that’s embedded below.

Huawei Nova 10 Pro


Huawei Nova 10 Pro: EMUI

The Huawei Nova 10 Pro comes pre-loaded with EMUI 12 based on Android 12. There are no Google Play Services as you already know, so you’ll need to make use of Huawei’s own AppGallery for getting applications. As time goes on, it does improve for sure. There are regional-specific applications that you can find on the store, and more and more apps are being added every day. Some Irish and German banks still aren’t accessible on it, but it’s certainly a better situation than it used to be.

Sadly, though, for most people, it’s still hard to recommend a Huawei phone, despite all the effort and progress on it. It’s getting there, and I finally understand where the company is coming from in its HMS endeavors, but it’s not far enough that simply anyone can use a Huawei phone. There are budget options out there that will do a lot of what Huawei can do, but with Google Play Services in tow that makes it as easy as ever to switch and get all of your favorite apps. I do find that Curve Pay helps bridge some gaps though, as it was a big reason why I couldn’t make the switch previously.

The problem is, switching to a Huawei phone is switching to an entirely new ecosystem. In the same way, a user may switch from Android to iPhone, for the purposes of argument, a user could switch from “Android” (as we know it) to Huawei’s EMUI. It’s all Android, but the jump to EMUI is a lot larger of a leap and requires getting acquainted with an all-new ecosystem with its own quirks. When you switch to iPhone, you won’t have access to all of your apps either, but there are plenty of alternatives on the App Store.

However, that would work if it weren’t the case that not every essential app is on AppGallery. If my banking apps were on AppGallery, if I could consistently use my phone to pay in stores, and if I could easily get my emails on my phone, then I’d be interested. However, none of that is the case, and installing another app for email like Blue Mail (which Huawei recommends) isn’t a perfect replacement for Gmail, either. I’ve also found that sometimes, AppGallery search/Petal Search is awful, and I need to go to my browser to search for an app there instead. A prime example of this that I ran into was 3DMark.

I understand now what Huawei is going for, and it’s the creation of an entirely different ecosystem. It’s not Android (well, it is, but it’s not the same ecosystem), and it’s obviously not Apple, either. Huawei wants to be a third player. It’s getting there, but until the kinks are ironed out, it’s hard to justify a switch to most people thus far. I think a third player in the space is good competition though, and as they say, Rome wasn’t built in a day. Maybe it’s not good yet, but who knows what the future may hold for AppGallery.

One thing I will say though is this: why on earth is there a splash screen advertisement when I open AppGallery?


Huawei Nova 10 Pro: Performance

The Huawei Nova 10 Pro packs a 4G version of the Snapdragon 778G, and it’s a pretty great performer. In normal usage, you won’t notice any problems whatsoever, and it’ll handle pretty much everything you can throw at it. The only lag I’ve faced when using this device has been in the camera viewfinder when taking photos and switching apps, but it’s rare and momentary.

As is the case with this chipset, though, it packs a pretty underpowered GPU. You won’t be gaming on this phone, as the Adreno 642L trails behind much of the competition and won’t survive through a lot of gaming. When I tested this chipset in the Honor 70, it struggled to even achieve stable framerates in Genshin Impact on its lowest settings. If you want a phone for gaming, then this phone should be avoided, unless you’re a casual gamer. You’ll be able to play games like PUBGCall of Duty, or Temple Run, but you’ll have to dial back on the graphics settings a bit.

Nevertheless, you’ll not have any problems using your phone in normal use cases. Browsing the internet, texting friends, taking photos, it’ll all work pretty much without a hitch. This is a great chipset for people who just use their phones normally without anything super intensive.


Charging and battery life

Another headline feature of the Huawei Nova 10 Pro is its charging speed. Packing a 100W charger in the box, it’ll take 20 minutes to charge this phone from 0% to 100%. For the target market, a fast charging speed like this makes sense as it’s aimed at people who are on the go and who may need to charge their phones in short bursts at a time.

On top of that, Huawei’s own EMUI software is pretty good with battery life, and the chipset is too. This phone’s battery was decent in the couple of days that I used it as a daily driver, capable of getting me through a day. It was far from my normal use case though that I would have on other phones, as I couldn’t use all of my apps. As a result, your mileage will definitely vary.


Should you buy the Huawei Nova 10 Pro?

Huawei Nova 10 Pro front-facing camera zoom

The Huawei Nova 10 Pro suffers from the same problems as every Huawei device before it over the past two years, and that is that it’s hard to recommend to just about everyone. I reviewed the Huawei P50 Pro earlier this year and absolutely loved it, and I’m really getting a sense of what the company is doing when it comes to AppGallery. Despite all of that, currently, it’s extremely difficult for me to switch over full-time. It doesn’t have everything that I need, and even though it’s getting there, it’s not there now.

In other words, until it gets there, it’s hard to recommend it. The cameras are excellent, but between the pricing of this device (€699 is quite expensive for what’s on offer here) and the difficulty some may have as an average consumer, I don’t really know how to recommend this phone. If Revolut was your main bank and you didn’t care about getting email notifications always on time, then maybe this phone would be an easier sell. Currently, though, it isn’t. As much as I’d love it to be.

    Huawei Nova 10 Pro
    The Huawei Nova 10 Pro is a stylish upper mid-range smartphone from Huawei that packs some pretty cool photography tech inside.

For what it’s worth, this phone is a good omen that Huawei is really listening to and that things are moving along. AppGallery is improving day by day, and with localized approaches to each application service (there are Irish versions of apps on AppGallery, which is pretty impressive to me), it’s beginning to reach a point where I think I can recommend it. That day isn’t here yet, but a viable competitor in the space is, at the very least, always good for consumers. This is also a unique-enough phone in the features that it has cobbled together that I think Huawei is starting to figure out that to thrive, it needs to find a niche that works. This may well be the start.

The post Huawei Nova 10 Pro review: A unique hardware combination that’s as cool as it is pricey appeared first on XDA.


from XDA https://ift.tt/dNT5GOb
via IFTTT