LightBlog

vendredi 15 juillet 2022

Nothing Phone 1 Review: Good phone, better marketing

I am not sure if this is the case all around the world, but in American sports culture, fans love to argue not just which athlete is better, but also which has been properly rated. The gist is that being good isn’t enough, the athlete has to be at least as good or better as the hype bestowed on them (usually by media or apparel companies like Nike). Not living up to the hype results in the dreaded “overrated” moniker, and the athlete usually receives criticism or mockery.

That’s sort of what’s happened with the Nothing Phone 1. It’s been hyped so much that I’ve been seeing snark from tech media peers on the phone, even though it’s an absolutely fine phone that’s not overpriced. And to be honest, at its £399 ($470) starting price, there are not many complaints to be had in my opinion. Are there better value offerings? Sure, Xiaomi’s 12 Lite is arguably a better phone at an even lower price, but Nothing’s phone is available in more markets right now, and it has a cleaner Android software and a different, original design. The Indian market is more hotly contested, which is where Nothing Phone 1 sees a whole lot more competition, so depending on your needs, you can swing this way or that.

Nothing Phone 1

Nothing Phone 1: Price and Availability

The Nothing Phone 1 is available for purchase starting July 21 in select markets including UK, France, Germany, Japan, Hong Kong, India, Malaysia, Finland, Portugal, among a half dozen more countries. Prices, in British pounds, Indian rupees, and Hong Kong dollars, are as follows.

  • 8+128GB: £399/₹32,999/HK$3,699
  • 8+256GB: £449/₹35,999/ HK$3,999
  • 12+256GB: £499/₹38,999/HK$4,399
    Nothing Phone 1
      Nothing's first phone brings a flashy hardware design with minimal software and a good main camera.

        Pros:

        Cons:


    Nothing Phone 1: Specifications

    Specification Nothing Phone 1
    Build
    • IP53 dust and water resistance
    • Colors:
      • white
      • black
    Dimensions & Weight
    • 159.2 x 75.8 x 8.3mm
    • 193.5g
    Display
    • 6.55-inch OLED
    • Gorilla Glass (did not specify which version)
    • 2400 x 1080
    • 120Hz
    • 1,200nits peak brightness
    • HDR10+
    SoC Qualcomm Snapdragon 778G Plus
    RAM & Storage
    • 8GB + 128GB
    • 8GB + 256GB
    • 12GB + 256GB
    Battery & Charging
    • 4,500mAh
    • 33W wired fast charging support
    • 15W wireless fast charging support
    • Charger not included
    Security In-display optical fingerprint scanner
    Rear Camera(s)
    • Primary: 50MP IMX766, f/1.9, 1/1.56-inch
    • Ultra-wide: 50MP JN1, f/2.2, 114-degree field-of-view
    Front Camera(s) 16MP selfie camera
    Port(s) USB Type-C
    Audio Stereo speakers
    Connectivity
    • 5G
    • 4G LTE
    • Wi-Fi 6
    • Bluetooth 5.2
      • BLE Audio support
      • Snapdragon sound support
      • AAC/LDAC/LHDC/aptX Adaptive
    Software Nothing OS over Android 12
    Other Features Glyph lighting interface

    About this hands-on: Nothing sent me a Phone 1 to test. This review was written after about seven days with the device. Nothing had no input in this article.


    Nothing Phone 1: Design Overview

    • The overall shape and in-hand feel is very similar to iPhone 12/13 Pro Max, but slightly smaller
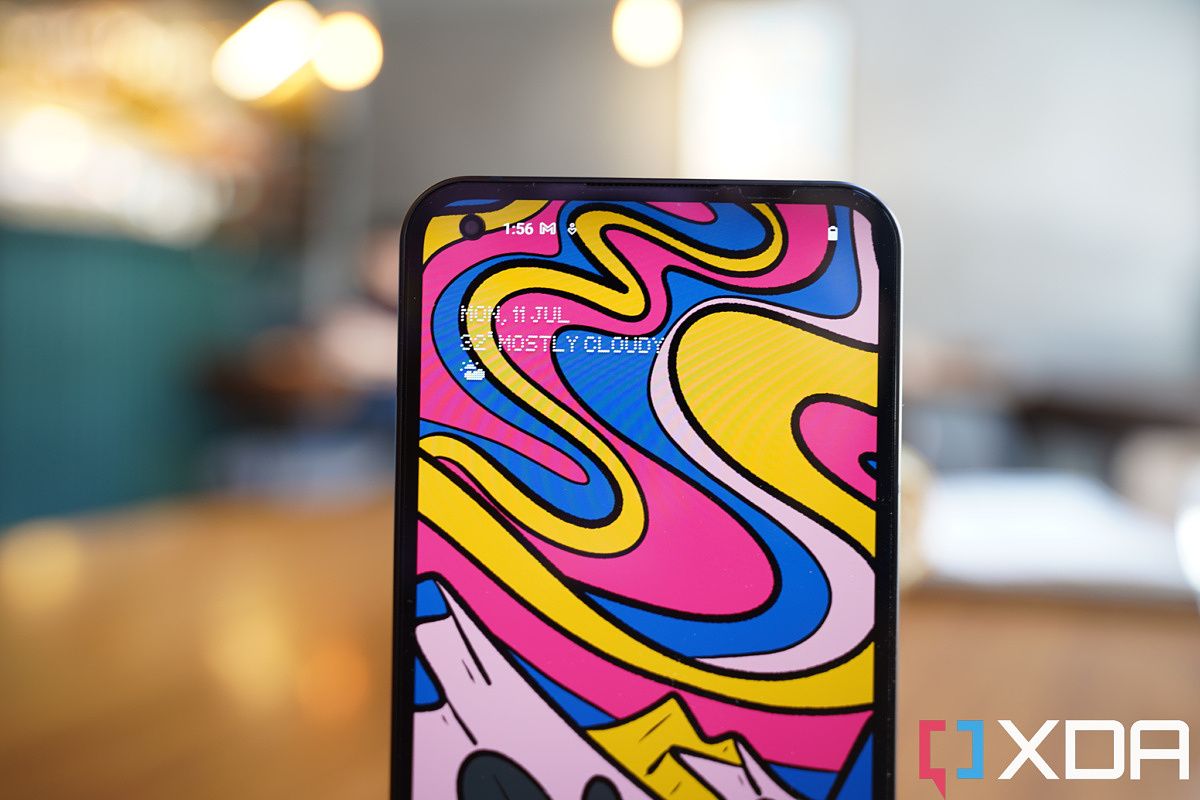
    • Symmetrical bezels on all four sides — a rarity in Android phones
    • Transparent back with light strips that seem cool or gimmick depending on opinion

    Nothing Phone 1

    The overall shape and in-hand feel of the Nothing Phone 1 is very similar to the iPhone 12 and 13 series, particularly the Pro Max phones, with very flat sides and rounded corners. When you hold this phone, your palm feels mostly the aluminum frame, as the hard angles stop the phone’s back from sitting on your palm. The Nothing Phone 1 is less wide horizontally and quite a bit lighter, which makes it slightly more comfortable to hold.

    Nothing Phone 1 and iPhone 13 Pro Max

    I have been vocal in saying I don’t find the iPhone 12/13 design language comfortable to hold and it’s the same story here. The flat sides give the phone a mature, powerful machine vibe, but it just doesn’t nestle in the palm as softly as curved sides do. I am not necessarily talking about curved screen phones, even the older iPhone X/11 type design had sides that were rounded. It’s worth mentioning that Xiaomi and Oppo also recently released phones with flat sides, but those brands added subtle chamfered corners to soften the sharp edges. The Nothing Phone 1 doesn’t do this, going the entire iPhone route in which the sides of the phone end at an abrupt 90-degree angle.

    This design looks cool but is not as comfortable to hold as phones with curvier sides

    I suppose a big reason for my gripe is because I tend to use my phones naked, while a case will significantly soften the sharp corners of these flat-sides designs.

    nothing phone 1

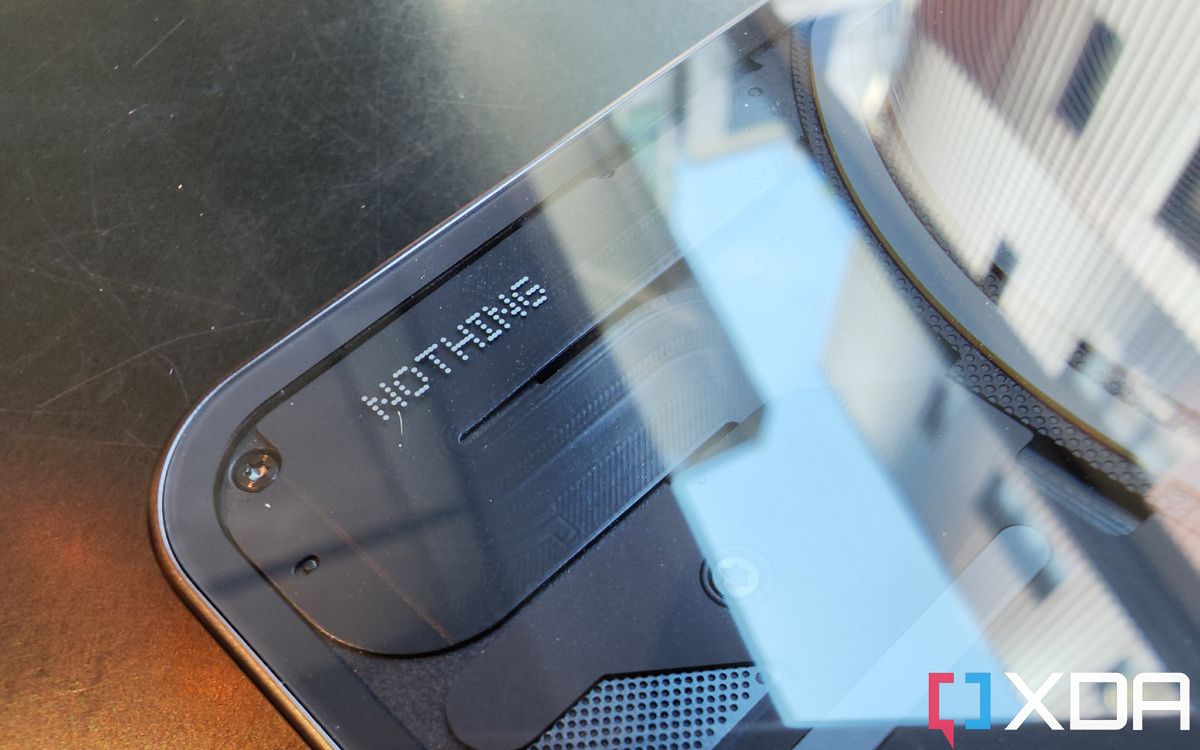
    The most attention-grabbing feature of the Phone 1 is obviously the back design: a semi-transparent look that seemingly offers a glimpse at the phone’s internals. Most of what we see is actually a design piece covering the actual guts of the phone, but we can see the wireless charging coil and some carefully placed screws.

    Nothing Phone 1 bottom

    The bottom left part of the phone’s back design is meant to resemble Manhattan in the New York City subway map.

    The bottom part of the back plate design looks like an elephant to some people, but Nothing tells me it was actually patterned after the New York City subway map, particularly Manhattan (the lower left corner part definitely resembles Manhattan). I personally really like this look, with the center-placed wireless charging coil’s spiral design adding a nice bullseye-like aesthetic that draws eyeballs.

    Nothing Phone 1 renders

    Nothing Phone 1 camera module Nothing Phone 1 back

    The Glyph Interface

    There are four strips of lights on the backside of the phone, including two that wrap around the camera module and the wireless charging coil respectively. This is what Nothing calls the “glyph interface” and the lights aren’t entirely for decoration. Nothing has designed the lights to flash specific patterns for various smartphone tasks, like when the phone is ringing, receiving a notification, or when Google Assistant is being summoned. The sound effects that play along with the flashing lights are, according to Nothing, inspired by the classic Nintendo Entertainment System and Casio electronic watches, meaning they have this retro electronics vibe. If you are wondering why they chose this specific “C, Forward Slash, G, Exclamation Point” design, we don’t actually know why.

    Nothing Phone 1 glypth

    I can see the so-called glyph interface being useful for some people. Being able to set a specific light pattern for a specific contact can be useful for people who get a lot of calls. There’s also the option to turn off notification sounds when you flip the phone face down yet still have the light strips flare up (Nothing calls this “flip to glyph”). The idea is you can decide if the notification is worth checking before picking up the phone.

    None of these situations apply to me, however. I almost never call anyone anymore, and the only voice calls I take are from my work supervisors. All my family and friends contact me via WhatsApp text or voice messages. I also never feel the need to put my phone face down, because I rarely attend events where it’d be “rude” to check my phone.

    The lights’ brightness can be adjusted in settings, and can also be used as a fill light for taking photos in low light situations, because the lights are more spread out than a typical smartphone flashlight, it does illuminate a human face slightly less harshly than a typical smartphone flashlight. Still, you should avoid using any smartphone flashlight when snapping pics of human faces in my opinion — it is never flattering unless the subject has flawless skin texture.

    Nothing Phone 1 in black

    Processor

    The Nothing Phone 1 is powered by the Qualcomm Snapdragon 778G Plus, which is a tried-and-trusted mid-range SoC that’s more than capable enough for 99% of smartphone users. Nothing says they chose this chip because it offers enough performance without running too hot, which I agree with. This “plus” version of the chip is a relatively new iterative update to allow it to support wireless charging.

    Display

    The 6.55-inch OLED screen is vibrant, with a typical max brightness of 500 nits and a peak max brightness of 1,200 nits. The screen looks great most of the time, with a 120Hz refresh rate providing smooth animations, colors looking punchy, and aesthetically pleasing symmetrical bezels on all four sides. Maximum brightness is a bit lower than most 2022 flagship phones, but unless I’m using it on a very harsh sunny day, this screen brightness is fine.

    Nothing Phone 1

    It’s worth noting the display is not an LTPO panel, meaning the refresh rate can be either 60Hz or 120Hz. This means the screen isn’t as battery efficient, but it’s also to be expected at this price range. There is an optical in-display fingerprint scanner located very low on the screen (similar to the location of the scanner in the OnePlus 9 or 2020-era BBK phones). The location isn’t ideal but not a big deal, instead, I am annoyed by its slow speed. The phone just takes a beat longer to unlock. Do note I’m comparing to Chinese mid-rangers like the Xiaomi 12 Lite or Oppo Reno phones, which all have excellent scanners. Some non-Chinese phones, like the Samsung Galaxy A53, or even the Google Pixel 6 series, have terrible in-display fingerprint scanners that are even slower.

    Nothing Phone 1 bezels Nothing Phone 1 bezels

    Haptics, Speakers, Battery, and Memory

    Good haptics aren’t always guaranteed in phones cheaper than $500 or $600, and thankfully the Nothing Phone 1 has a good haptic engine that offers strong and precise haptics. I enjoy typing on this phone with vibrations turned on.

    Also good are the dual speakers and UFS 3.1 memory, again, not always guaranteed in phones at this price point. The 4,500 mAh battery, IP53 water and dust resistance rating, and just 15W wireless charging are a bit less than what you could get from other brands at a similar price point, but it’s fine.


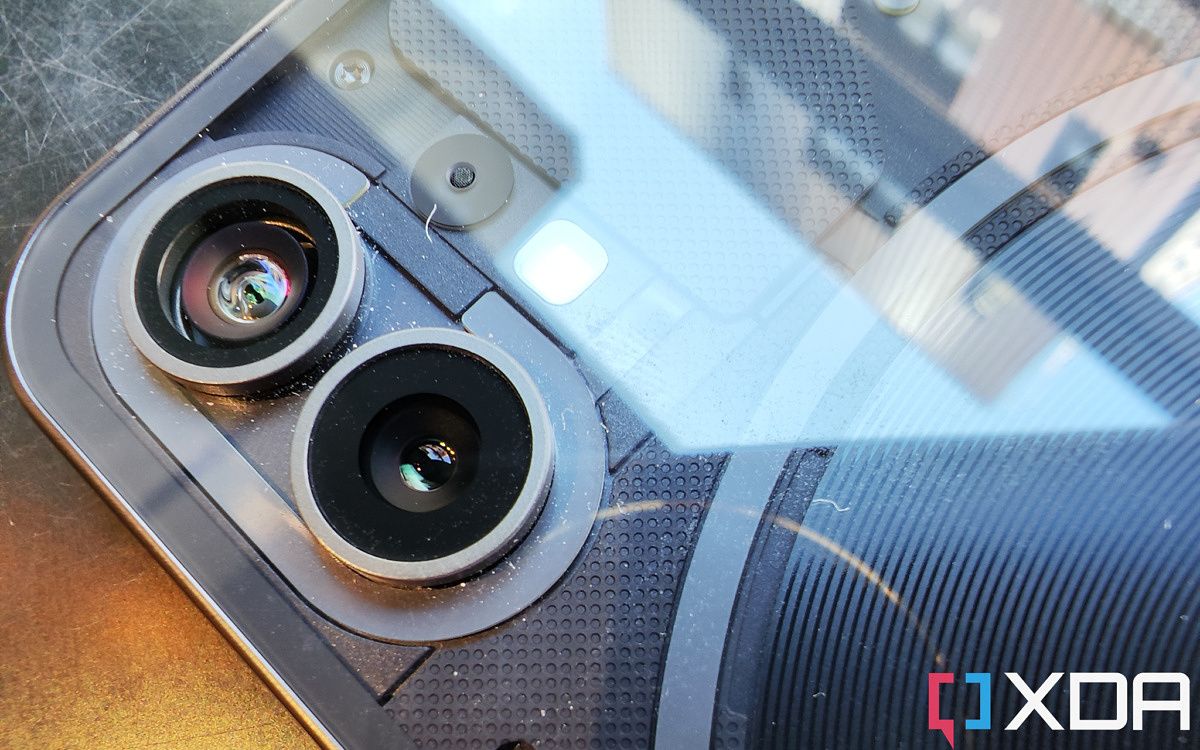
    Nothing Phone 1: Cameras

    • 50MP Sony IMX766 main camera and 50MP Samsung JN1 ultra-wide
    • The main camera is capable, but ultra-wide is just okay
    • Videos have a weird orange tint to them right now

    Nothing Phone 1 cameras

    The Phone 1 packs very familiar cameras to phones from Carl Pei’s former company, OnePlus. The rear camera system comprises of a 50MP Sony IMX766 sensor with an f/1.9 aperture and a 50MP Samsung JN1 ultra-wide. The former was used in the OnePlus Nord 2T, and the latter was used most recently in the OnePlus 10 Pro, and a bunch of other BBK phones like the Iqoo 9 Pro too.

    These are capable, proven sensors, but also firmly mid-tier components. The image sensor size of the IMX766, for example, is just a pedestrian 1/1.56-inch, far smaller than what’s in, say, the Galaxy S22 Ultra or Xiaomi 12S Ultra. But again, we must remember, this is a sub-$500 phone. And Nothing’s software image processing is quite good.

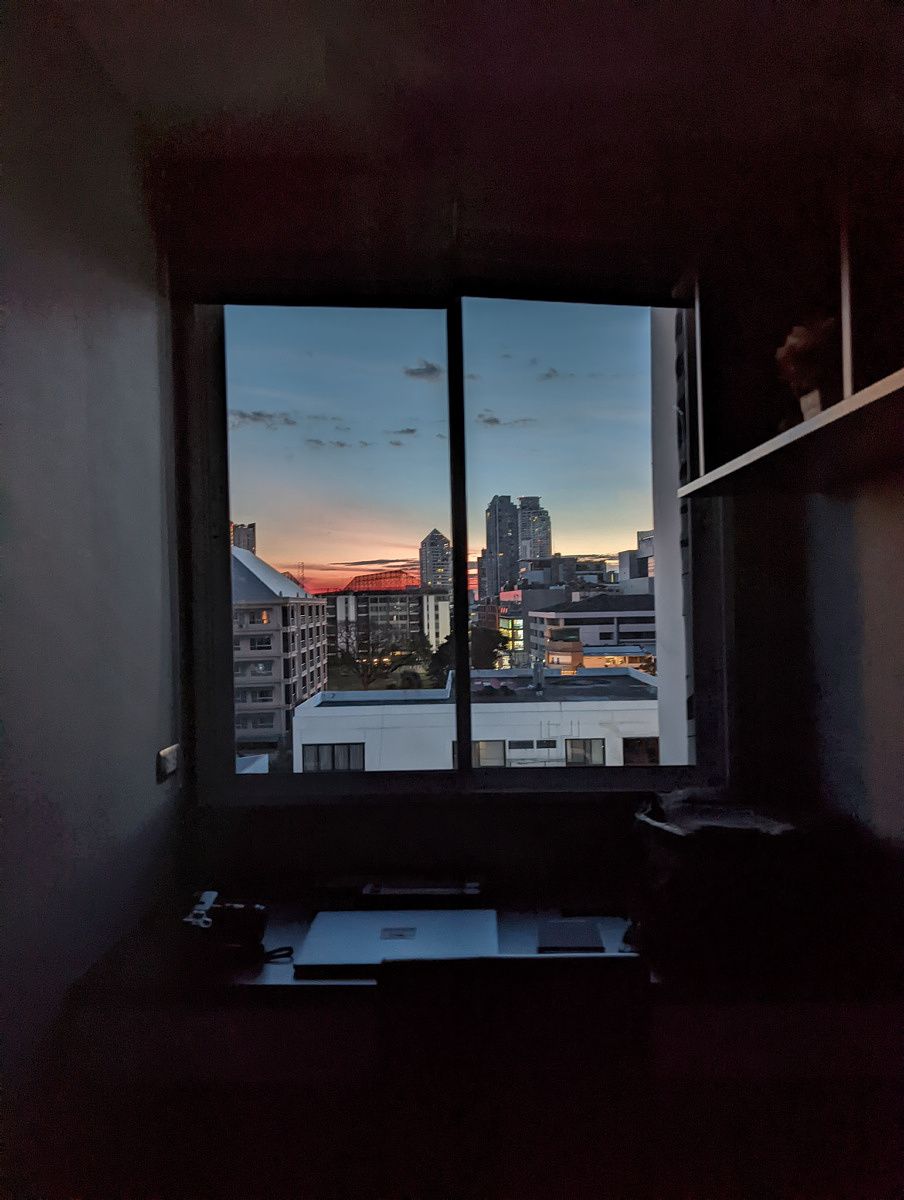
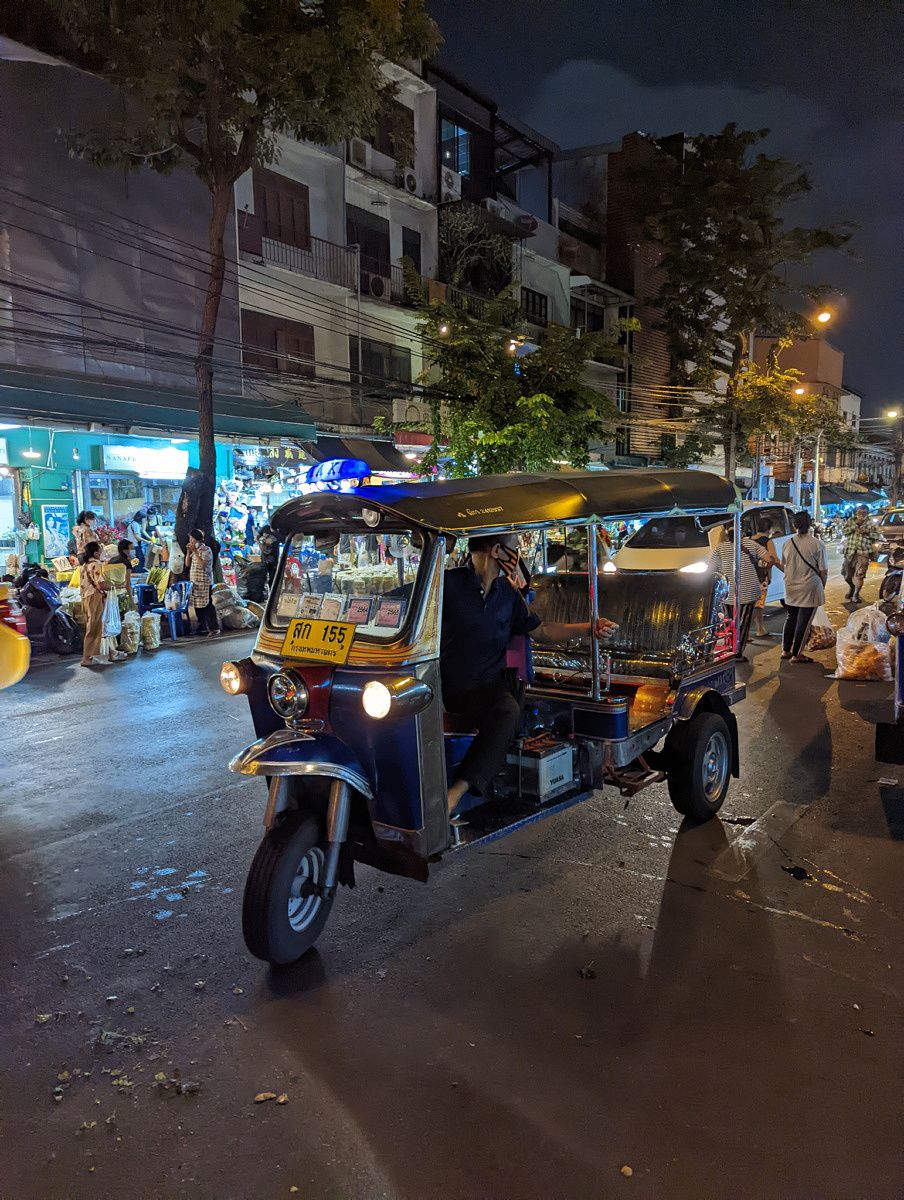
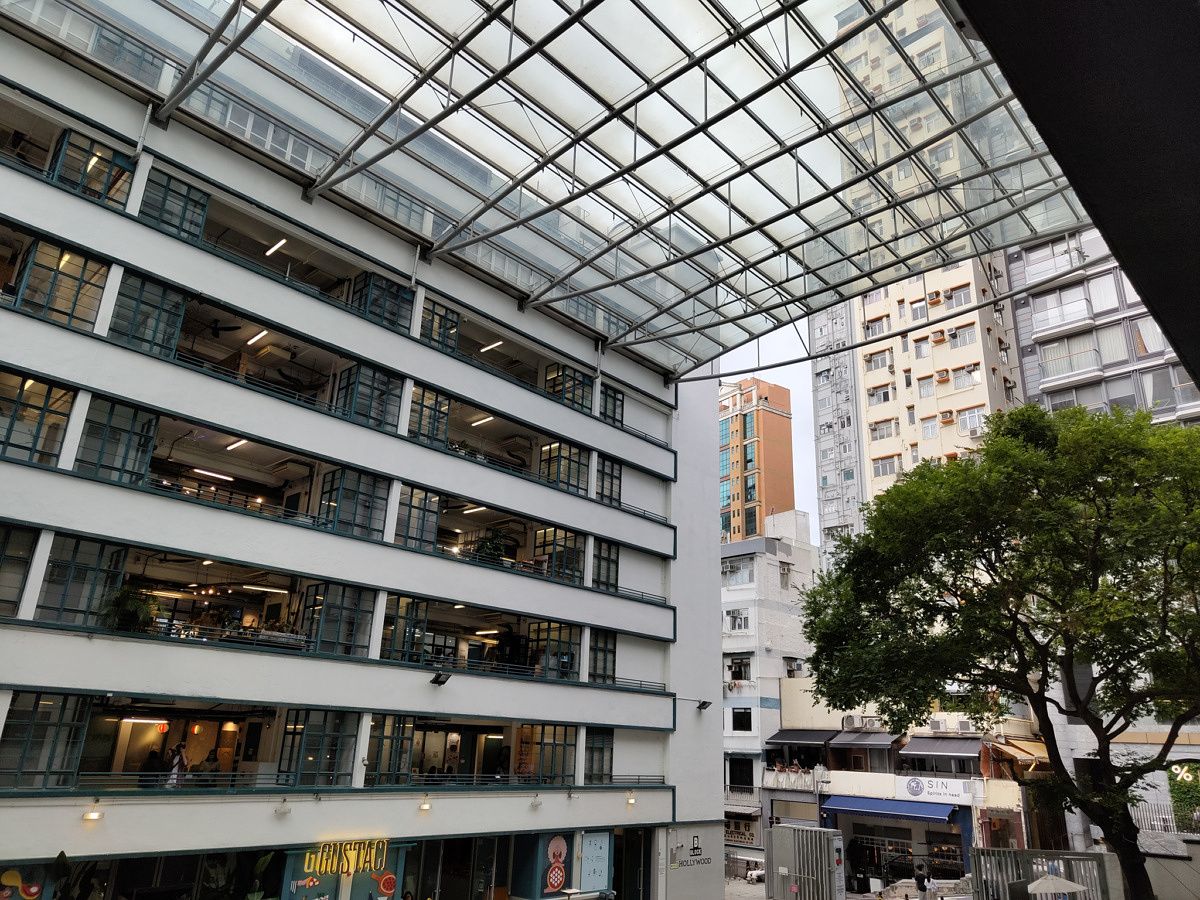
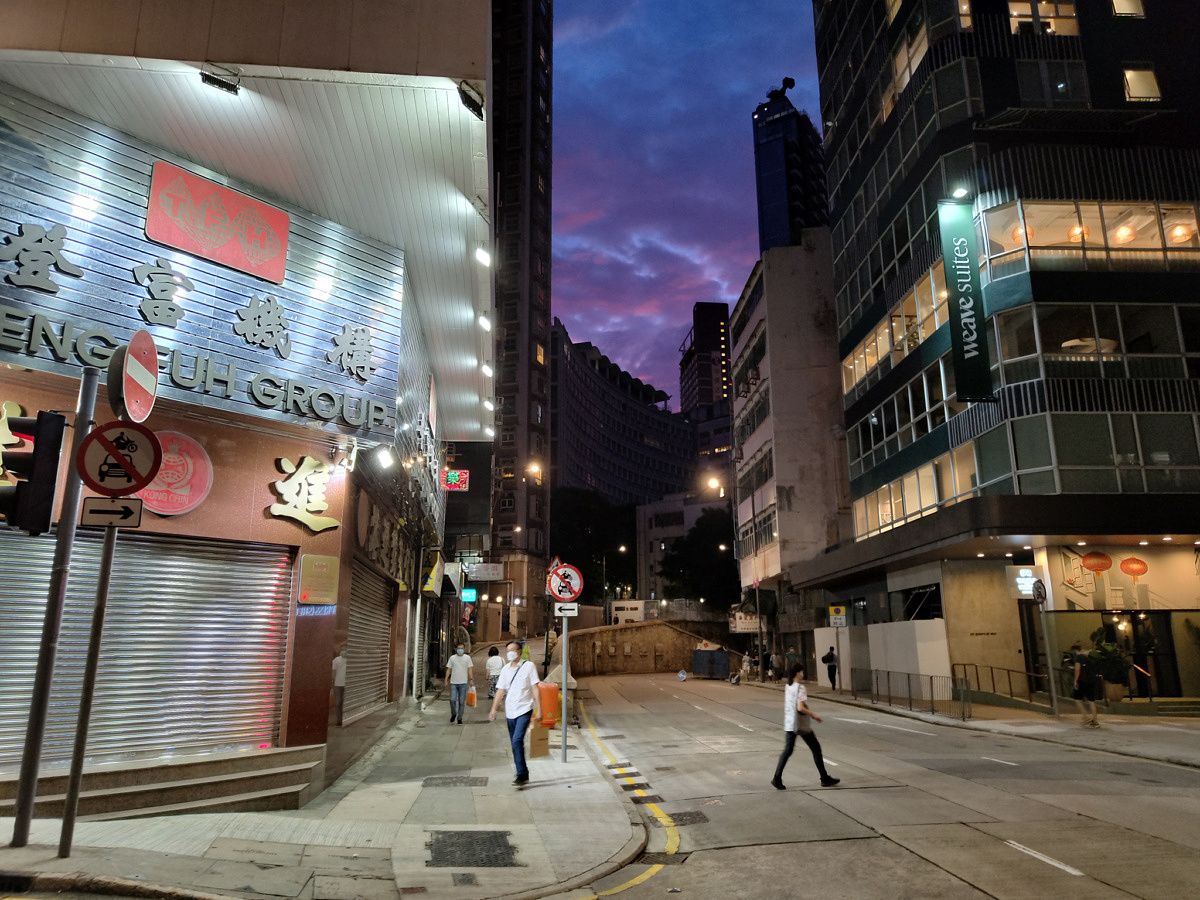
    Check out these shots: not bad at all for a $470-ish phone from a first-time company.

    Nothing Phone 1 photo sample Nothing Phone 1 photo sample Nothing Phone 1 photo sample Nothing Phone 1 photo sample Nothing Phone 1 photo sample

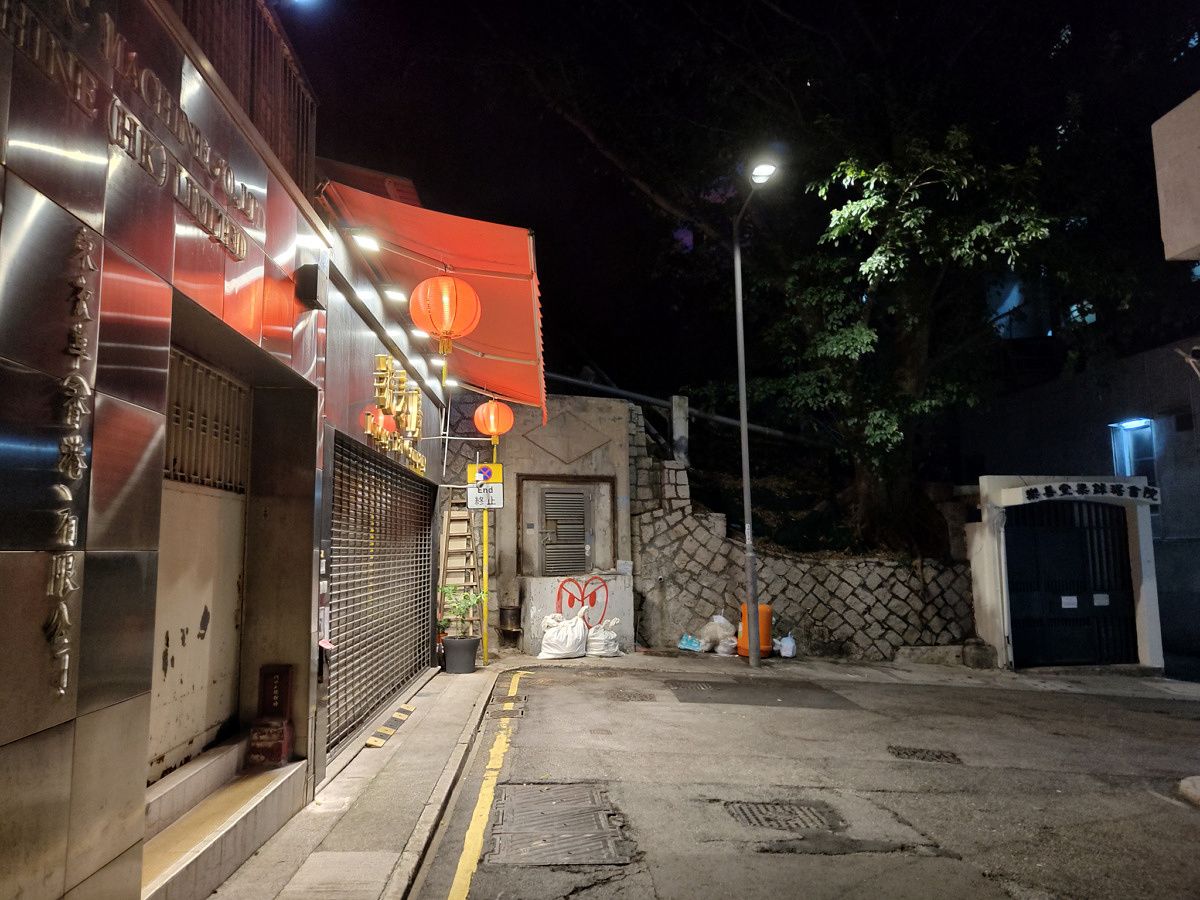
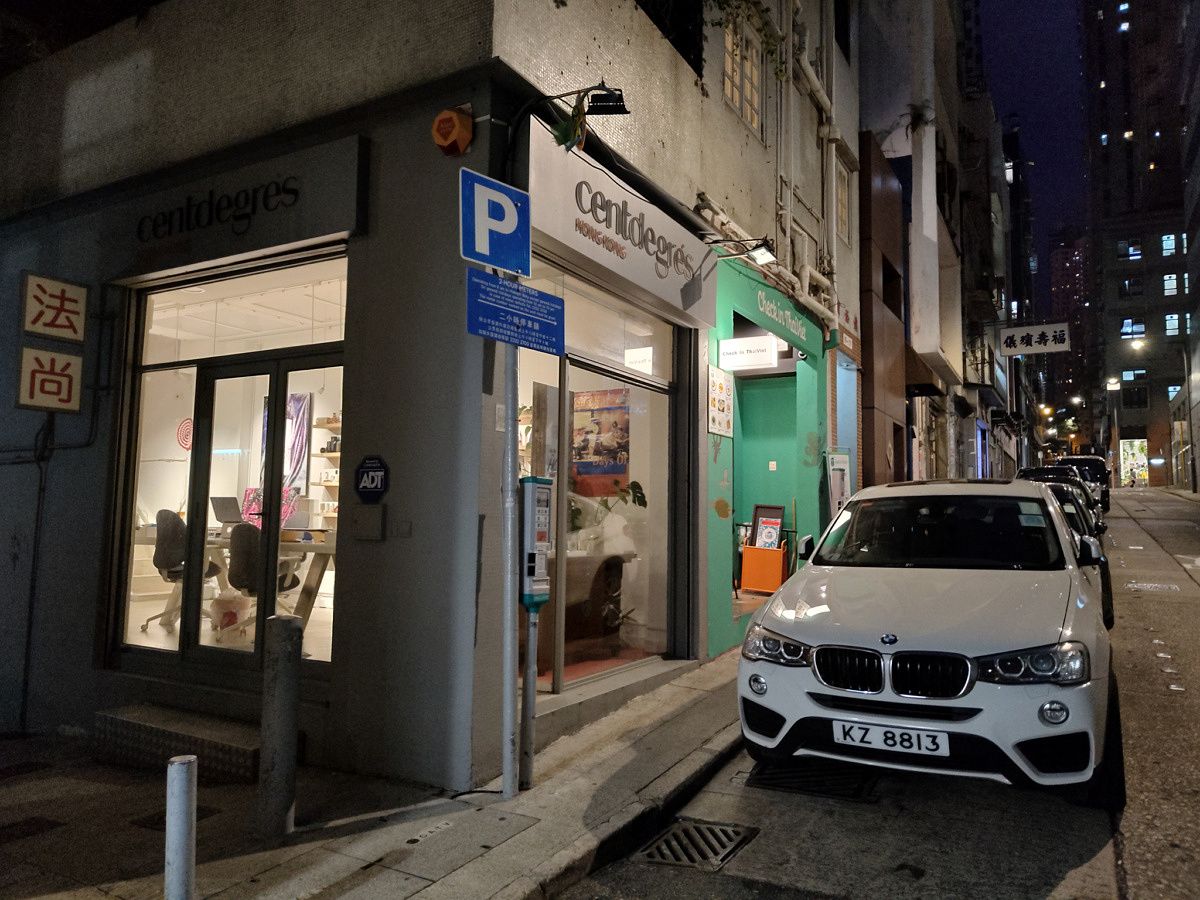
    The last two shots in the above set, in particular, are not easy shots — they’re high contrast shots with bright lights blasting through the window, for a mid-ranger, this is really good dynamic range and exposure.

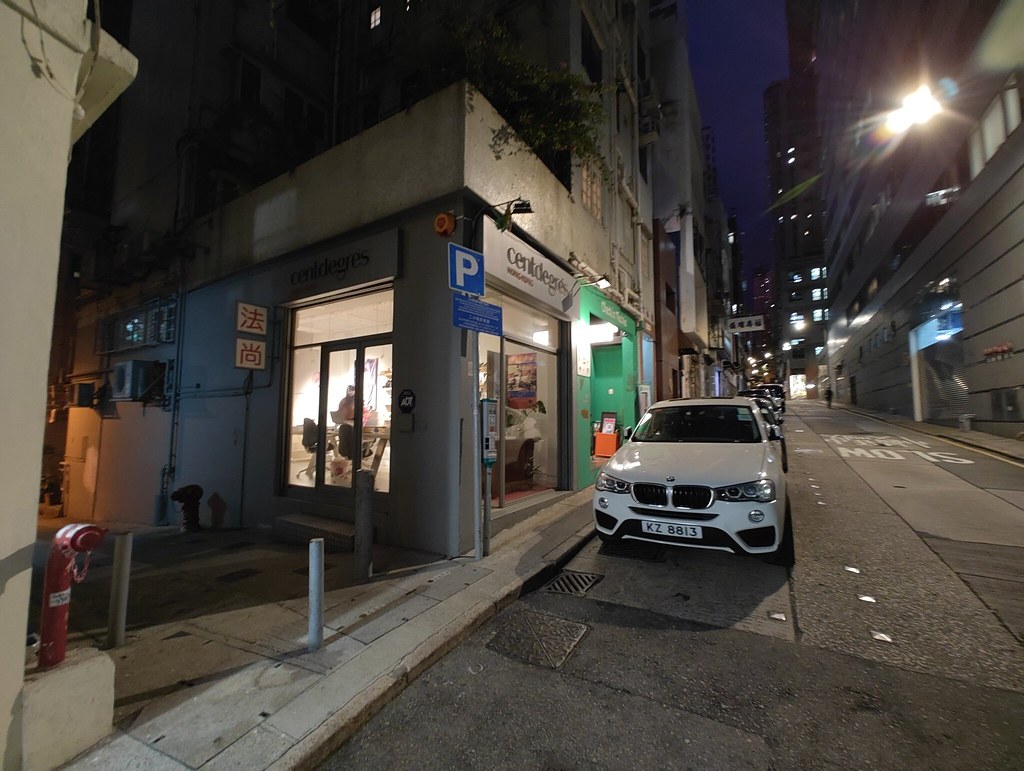
    As is usual with mid-range phones, it’s when we move to ultra-wide where the camera shows that it is, indeed, not a flagship. Ultra-wide shots during the day are fine in a vacuum but noticeably softer than what the main camera produces. And at night, the quality gap widens significantly. There is also a major shift in colors.

    Speaking of colors, some of the videos I’ve shot with the Nothing Phone 1 has also exhibited very wonky colors, such as an extremely warm tone that makes my skin tone look orange. Stabilization is good (for its price range) with the main camera, but ultra-wide has very poor electronic image stabilization. There’s also a bit of jelly effect as I pan. You can see all the issues in the video sample below. I must mention I am reviewing a pre-release model of the phone and Nothing has already sent two software updates in the week I’ve had the device, so perhaps these issues can be fixed with more updates. But as of right now, the video performance is below par even for a mid-ranger, as something like a Xiaomi 12 Lite can shoot better videos. Video resolution also maxes out at 4K/30fps, not 60fps or 8K options, but that’s absolutely fine.

    If you want to see full sized versions of all photo samples I shared here, I’ve uploaded them to the Flickr album.

    Nothing photo samples


    Nothing Phone 1: Performance and Software

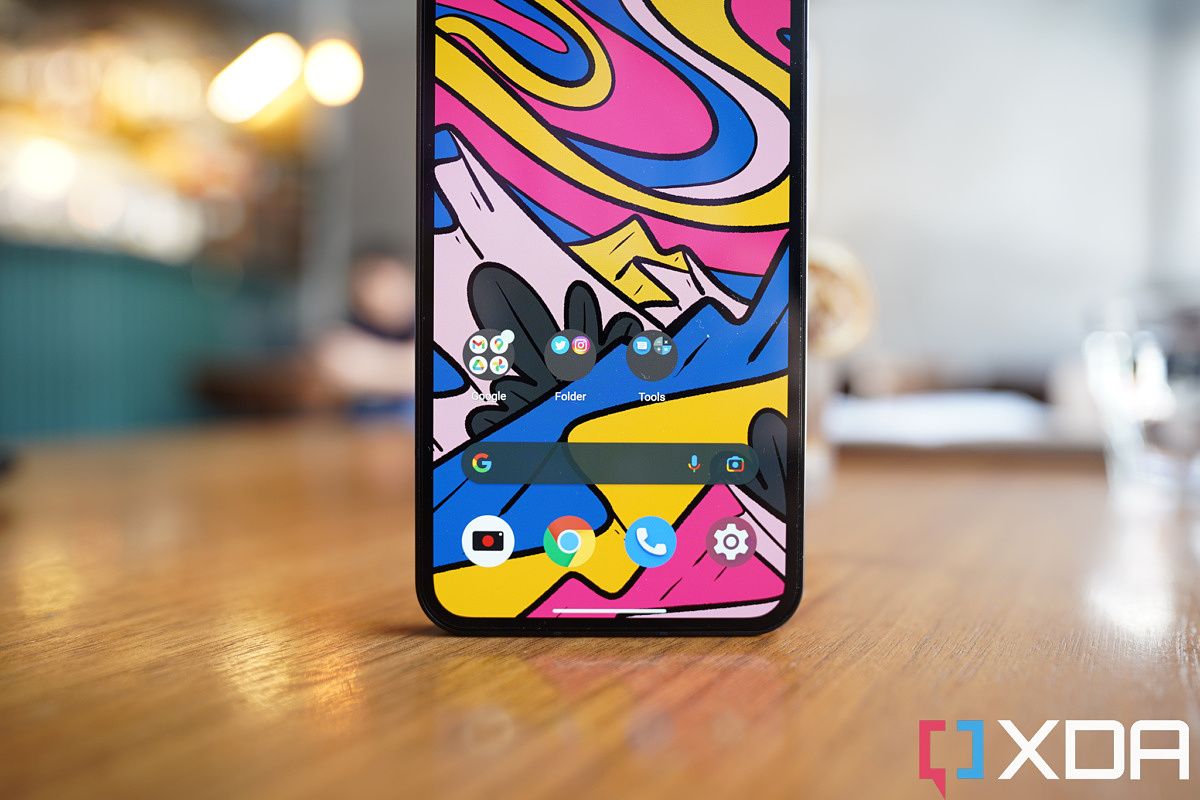
    • Super clean Android skin with no third-party bloatware
    • Fluid animations (except in the Twitter app)
    • Good performance overall

    Nothing Phone 1

    Software

    The Nothing Phone 1 runs a very light, but stylish, Android skin named Nothing OS over Android 12. The first thing I noticed that stood out about Nothing OS is the initial phone setup interface was entirely black, including the Google sign-up screen. I have gone through this Android setup process probably like 100 times in the last few years and the Google sign-in screen is always white. I think this all-black aesthetic is specific to my black model, I think the white model will likely have a more conventional white setup screen.

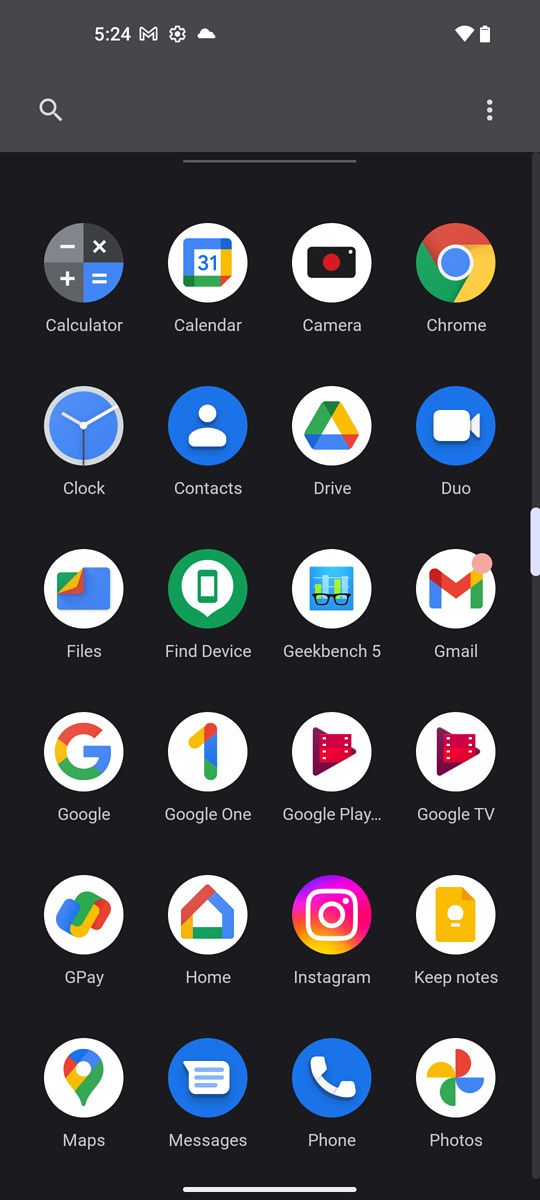
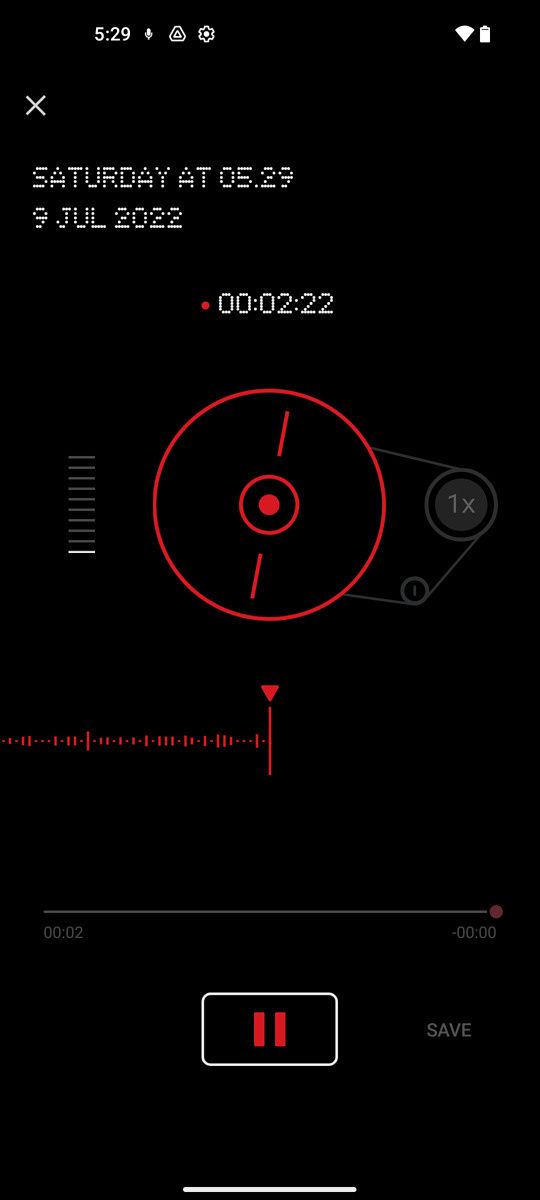
    Once finished with setup and you’re in Nothing OS, the next thing you’ll likely notice is the phone only ships with Google’s core apps, with no bloatware — or at least, the conventional definition of bloatware (third-party apps that are pre-installed). I actually find Google’s increasingly large suite of apps overbearing and annoying. Sure, it makes sense to have Google Play, YouTube, Chrome, Google Contacts, and Maps pre-installed on all Android phones. But I do not give a damn about Google TV, Google Play Music, YouTube Music, Google One, Google Home, Google Pay, and Google Duo, and the fact these apps are now all crammed into recent Android phones, most of them can’t be uninstalled, means these are still bloatware. This is a GMS issue and not a Nothing issue, so no complaints on Phone 1 on this end. After all, the Nothing Phone 1 ships with the fewest pre-installed apps than any phone I’ve ever tested. The only non-Google apps pre-installed are the camera, calculator, and recorder apps.

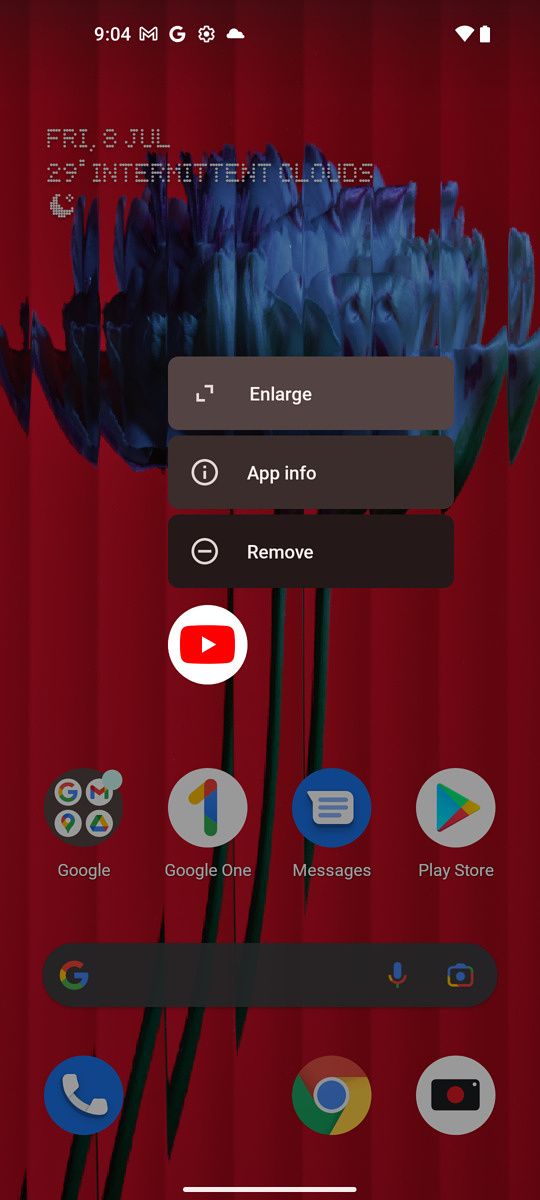
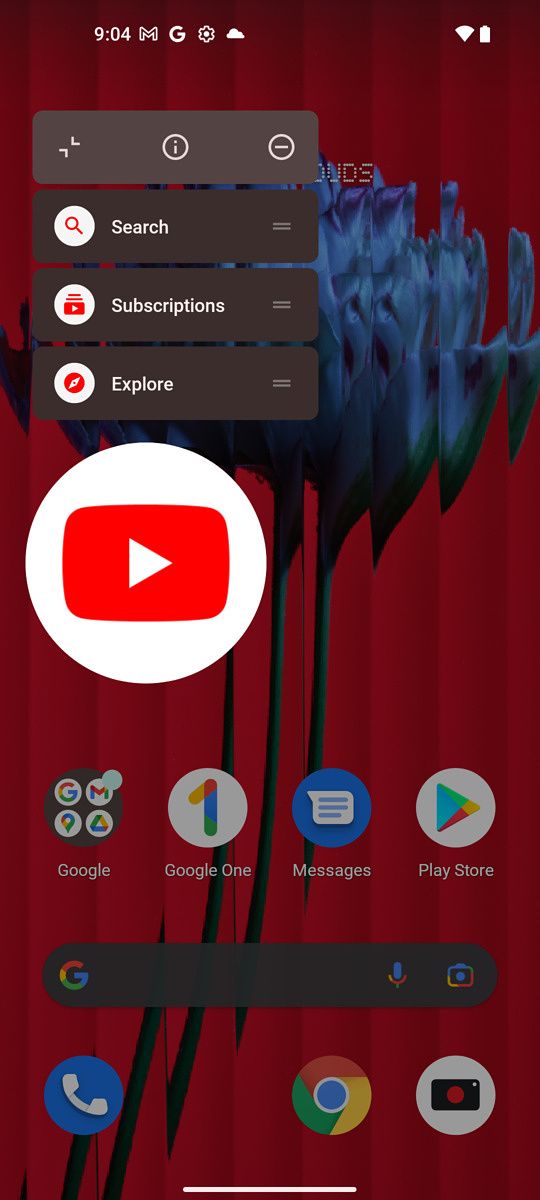
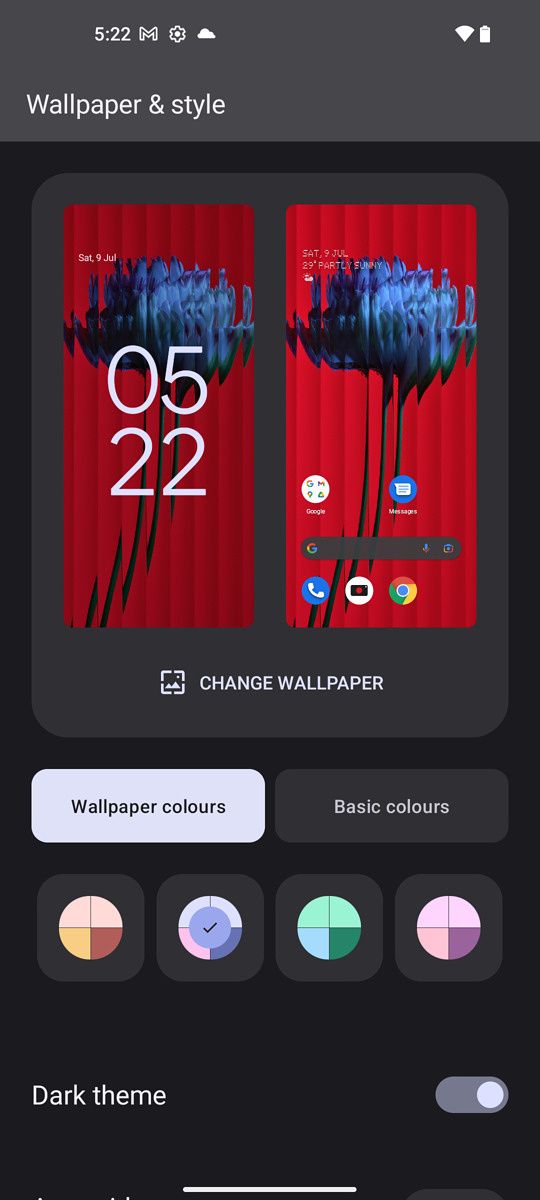
    The main interface feels very similar to typical stock Android, with only two changes. The first is the ability to make an app icon look giant on the homescreen (see the second image in the below set), which could be useful for those who want one or two apps to stand out from the pack on the homescreen for easier access or accessibility reasons.

    The other is that the shortcut toggle buttons in the notification shade have been simplified. In almost all Android phones, there are separate buttons for WiFi, cellular data, and mobile hotspot. Nothing combines all three of these into one larger-than-usual button (see the third pic in the above set) through which the user can cycle via horizontal swipes. This makes sense to me, as these are all related to getting an internet connection on the phone. I reckon some others may disagree here.

    The Nothing Phone 1 ships with the fewest apps on the phone of any phone I've ever tested

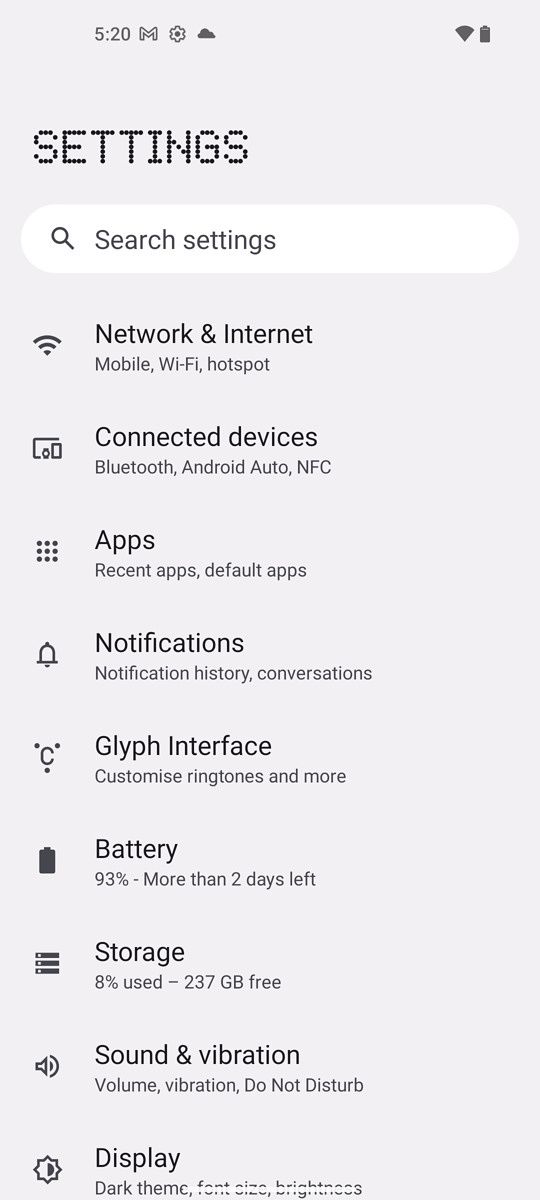
    Dive into the settings page and it, too, looks just like a stock Android settings, with the exception of Nothing’s dot-based font being used for each settings page header. As far as I can see, there are two Nothing-exclusive settings pages that aren’t on most Android phones: “Glyph Interface” and “Experimental Features.” The first is where you customize the interface (assign contacts, change light brightness, etc); the latter will let the phone connect to Tesla cars. I don’t think this feature is ready yet, and even if it were, I don’t have a Tesla to test.

    General Performance

    The Nothing OS has very fluid animations that zip around the phone with noticeable faster speed and more animation flare than something like Samsung’s OneUI. It reminds me a lot of OxygenOS or Oppo’s ColorOS, in that even a simple pull of the notification panel brings buttery smooth animations.

    Just like Samsung’s Galaxy S22 Ultra, however, the animations stutter occasionally when scrolling through Twitter. I’m not sure what the problem is with Twitter specifically, but it happens enough to be visually jarring. But as I said, Samsung’s $1,200 phone has the same issue. Another bug is the phone’s auto-brightness setting often leaves the phone screen too dark, particularly when I’m in the camera mode. And as I said, the fingerprint scanner is slower than most other optical scanners.

    The auto-brightness issue, along with the very orange tint in videos, are major bugs that need to be addressed. Otherwise, I didn’t encounter any issues using the phone for several days out, navigating on Google Maps, streaming Spotify, and sending messages in Slack and WhatsApp.

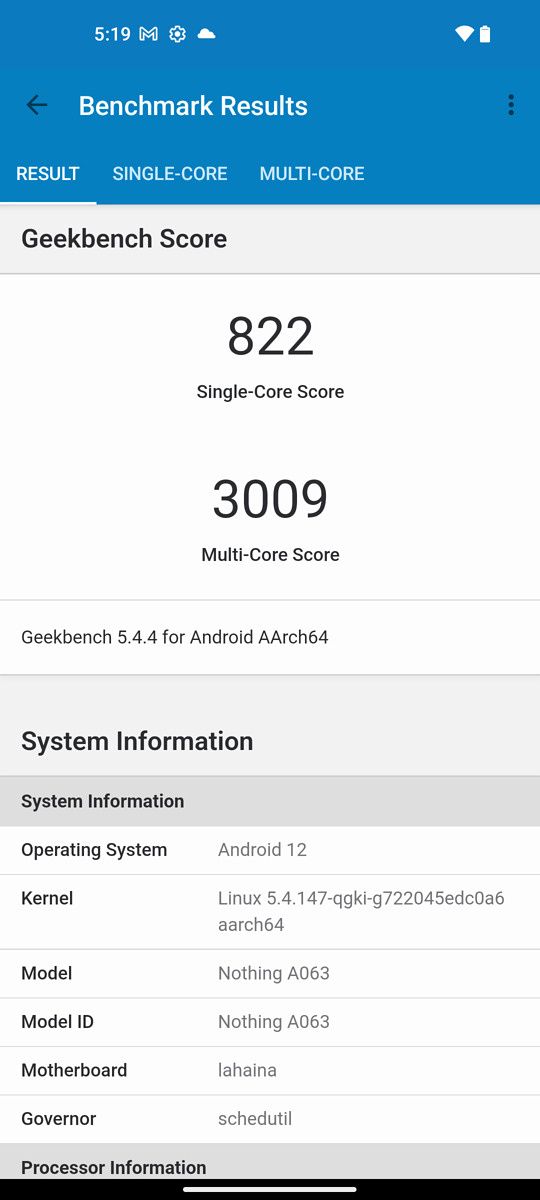
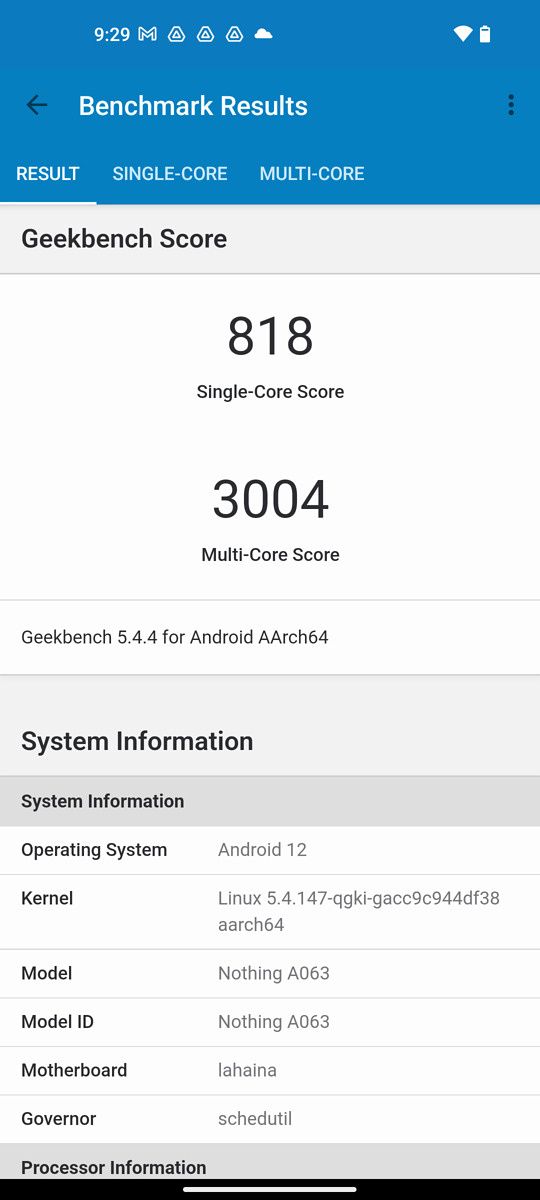
    As for benchmarks, the XDA team had concerns initially because our senior technical editor Adam Conway found a line of code in the software that hinted the software considered manipulating benchmarks — essentially, a phone deciding to throttle performance for real-world apps but not benchmark apps to achieve a higher score — but after running tests including running two versions of GeekBench (one official, one modded) and the scores were close enough that means no such benchmark cheating shenanigans are in place. Great!

    Standard daily performance has been fine, I’ve been using the phone at home and out around town, and apps have been launching fine, I haven’t encountered crashes or anything out of the ordinary.

    Battery life has been okay, with the 4,500 mAh cell able to finish a typical work day easily, but tapping out at around the 12-hour mark on weekends when I’m using the phone much more heavily. It’s an acceptable battery that’s not great, not bad.


    Should you buy the Nothing Phone 1?

    Nothing Phone 1 in the hand.

    You should buy the Nothing Phone 1 if:

    • You like the design and find the Glyph Interface cool or useful.
    • You don’t want to pay more than the equivalent of $500 for a phone and you don’t like using (or don’t have access to) Xiaomi’s various mid-tier phones.
    • You want a phone with clean software that has more character than the typical vanilla stock Android phones.

    You should not buy the Nothing Phone 1 if:

    • You shoot a lot of videos with your phone and don’t have time to wait for a potential software patch to fix the current orange tint issue.
    • You want the absolute best value and the Xiaomi 12 Lite is available in your region. If you are in India, you have other options for value-for-money.
    Nothing phone 1

    Nothing Phone 1 in the hand.

    As I said, the Nothing Phone 1 is a perfectly fine mid-range phone with some interesting ideas. I like the transparent back design and the minimal software. And even if I get no practical benefits from the light strips on the back, I do think they look good.

    But is it the revolutionary, different and unique device that Pei and Nothing’s marketing have been hinting at for months? No. Xiaomi’s 12 Lite is cheaper, with the same SoC, better fingerprint scanner, and video performance.

    If you ignore the glyph interface, the Phone 1 is almost just like any other Xiaomi/Poco/Iqoo/Realme mid-ranger. There is nothing wrong with that — those brands make good phones — but it’s completely fair for the more jaded/cynical/snarky part of techies to scoff and call the phone overrated.

      Nothing Phone 1
      The Nothing Phone 1 is a stylish looking phone with a cool semi-transparent back and fast, zippy UI.

    The post Nothing Phone 1 Review: Good phone, better marketing appeared first on XDA.


    from XDA https://ift.tt/H8bOuzY
    via IFTTT

    You’ll soon be able to install major Windows 11 updates during setup

    Microsoft is rolling out a new cumulative update for the original release of Windows 11 to Windows Insiders enrolled in the Release Preview channel. This update brings the OS to build number 22000.829, and the highlight here is that you’ll soon be able to install new major updates for Windows 11 during the initial setup process.

    When you first set up your Windows 11 PC, there are a few steps, and at one point, the PC checks for updates. However, that currently only installs smaller updates to keep your PC secure. Starting with this build, you’ll also be given the option to update to the next version of Windows 11, so you can be fully up to speed right out of the box. With Windows 11 version 22H2 inching ever closer, it looks as though Microsoft is preparing for that and making it easier for everyone to install it out of the box. This makes some sense since many laptops will probably still be sold with the original release of Windows 11 when version 22H2 is out, so this makes it possible to get all those new features without having to wonder if you have the latest updates.

    Of course, that’s not all that’s new in Windows 11 build 22000.829, and the changelog is actually fairly extensive. There are a lot of fixes, plus the ability to consent to receive urgent notifications when your turn on focus assist. Here’s the full list of changes:

    • New! We provided the ability for you to consent to receive urgent notifications when focus assist is on.
    • New! We provided the option for eligible devices to update to a newer Windows 11 version during the out-of-box experience (OOBE) when you first sign in. If you choose to update to a newer version, the update process will begin shortly after the update is installed on the device.
    • New! We restored functionality for Windows Autopilot deployment scenarios that are affected by the security mitigation for hardware reuse. This update removed the one-time use restriction for self-deploying mode (SDM) and pre-provisioning (PP). This update also re-enabled any User Principal Name (UPN) display in user-driven mode (UDM) deployments for approved manufacturers.
    • We fixed an issue in UIAutomation() that causes an application to stop working.
    • We fixed an issue that prevents the Startup Task API from working as expected for certain apps.
    • We improved the reliability of a push-button reset after an OS upgrade.
    • We fixed an issue that makes the tenant restrictions event logging channel inaccessible if you remove the EN-US language pack.
    • We fixed an issue that causes certificate-based machine account authentication to fail in some circumstances after you install the May 10, 2022 security updates on domain controllers.
    • We fixed an issue that affects the Arm64EC code you build using the Windows 11 software development kit (SDK).
    • We updated the Remove-Item cmdlet to properly interact with Microsoft OneDrive folders.
    • We fixed an issue that prevents troubleshooters from opening.
    • We fixed an issue that causes port mapping conflicts for containers.
    • We fixed an issue that causes Code Integrity to continue trusting a file after the file has been modified.
    • We fixed an issue that might cause Windows to stop working when you enable Windows Defender Application Control with the Intelligent Security Graph feature turned on.
    • We deployed search highlights to devices. To access the policy for search highlights (on a device that has installed the June 2022 Cumulative Update Preview or July 2022 monthly quality update), go to C:\Windows\PolicyDefinitions and locate admx. For your convenience, we will be publishing an updated version of the Administrative Templates (.admx) for Windows 11, version 21H2 to the Microsoft Download Center soon.
    • We fixed an issue that causes exe to stop working when you use the play and pause keyboard buttons on certain devices.
    • We fixed an issue that causes exe to stop working when you use the Start menu’s context menu (Win + X) and an external monitor is connected to your device.
    • We fixed an issue that displays a blank window that you cannot close when you hover over the search icon on the taskbar.
    • We reduced the overhead of resource contention in high input/output operations per second (IOPS) scenarios that have many threads contending on a single file.
    • We fixed an issue that causes the Windows profile service to fail sporadically. The failure might occur when signing in. The error message is, “gpsvc service failed to sign in. Access denied”.

    Microsoft actually does highlight one known issue, which is that the Widgets panel may crash in the background, and the taskbar icon may revert to the default icon instead of showing current weather information.

    Windows 11 build 22000.829 or newer will likely be available to the general public in a couple of weeks as an optional update. Then, these changes and more will become mandatory with next month’s Patch Tuesday, which will be on August 9th.


    Source: Microsoft

    The post You’ll soon be able to install major Windows 11 updates during setup appeared first on XDA.


    from XDA https://ift.tt/fuRbFg5
    via IFTTT

    jeudi 14 juillet 2022

    Android 13 Developer Preview builds are now available for these non-Google devices

    It’s raining Android 13 Beta builds! Now that the keynote event of Google I/O 2022 is over, we are all very excited about the launch of the second beta for Android 13. As usual, Google’s Pixel line of smartphones will be the first to gain access to the new beta software. However, other OEMs have also announced their own Android 13 beta initiatives in the form of “Developer Preview” programs.

    Keep in mind that OEM-specific Developer Preview releases don’t exactly align with Google’s beta program. You might not get periodic OTA updates on the preview channel like the Pixels, and the stable-to-beta transition (or vice-versa) might require a clean flash. Furthermore, the pre-release builds are usually quite barebones compared to the respective OEM skins. Still, if you see your phone on this list, it’s very likely you’ll be one of the first to get the stable Android 13 update when it finally launches.

    Below you can find the list of non-Google devices that have joined the Android 13 party. For Google Pixel smartphones, take a look at our Android 13 Download index to grab the download links.


    ASUS

    ASUS has opened up an Android 13 beta program for the ZenFone 8 (sold as the ASUS 8Z in India).

    Sr. No. Phone (Codename, Forum Link) Android 13 Update Status Added On/Status Last Updated
    1. ASUS ZenFone 8 (I006D/sake) July 11, 2022

    Lenovo

    If tablets are your thing, then you can now give Android 13 a try on the Lenovo P12 Pro.

    Sr. No. Phone (Codename, Forum Link) Android 13 Update Status Added On/Status Last Updated
    1. Lenovo P12 Pro May 11, 2022

    Nokia

    The Nokia-branded phones released by HMD Global run on a close-to-stock version of Android, hence it’s not very surprising to see a Nokia device in this beta initiative.

    Sr. No. Phone (Codename, Forum Link) Android 13 Update Status Added On/Status Last Updated
    1. Nokia X20 (QKS_sprout) June 20, 2022

    OnePlus

    Just like every year, owners of the latest OnePlus flagship are set to get an early taste of the upcoming Android release.

    Sr. No. Phone (Codename, Forum Link) Android 13 Update Status Added On/Status Last Updated
    1. OnePlus 10 Pro (negroni) June 17, 2022

    OPPO

    OPPO is no stranger to offering early access to the latest versions of Android. For several years, the latest OPPO phones have worked with early Android betas, and there’s no exception with this year.

    Sr. No. Phone (Codename, Forum Link) Android 13 Update Status Added On/Status Last Updated
    1. OPPO Find N May 11, 2022
    2. OPPO Find X5 Pro June 17, 2022

    Realme

    The only Realme phone that will have access to the beta is the Realme GT 2 Pro. If you’ve got one, you can give Android 13 a try.

    Sr. No. Phone (Codename, Forum Link) Android 13 Update Status Added On/Status Last Updated
    1. Realme GT 2 Pro (RMX3300/RMX3301) June 17, 2022

    Sharp

    Sharp might not be a well-known brand around the world, but it has also participated in the beta program.

    Sr. No. Phone (Codename, Forum Link) Android 13 Update Status Added On/Status Last Updated
    1. Sharp Aquos Sense6 June 22, 2022

    Tecno

    Tecno isn’t going to be left out of the Android 13 beta party. As per the trend, though, only its Camon 19 Pro 5G will be eligible.

    Sr. No. Phone (Codename, Forum Link) Android 13 Update Status Added On/Status Last Updated
    1. Tecno Camon 19 Pro 5G May 11, 2022

    Vivo

    Due to the fact that Vivo shares the BBK Electronics bloodline with OPPO, OnePlus, and Realme, it also has an Android 12 beta program of its own.

    Sr. No. Phone (Codename, Forum Link) Android 13 Update Status Added On/Status Last Updated
    1. Vivo X80 June 17, 2022
    2. Vivo X80 Pro June 17, 2022

    Xiaomi

    Unlike most other OEMs on this list, Xiaomi isn’t limiting access to the beta to just one of its devices. Instead, it’s offering eligibility to one tablet and two of its phones.

    Sr. No. Phone (Codename, Forum Link) Android 13 Update Status Added On/Status Last Updated
    1. Xiaomi 12 (cupid) May 11, 2022
    1. Xiaomi 12 Pro (zeus) May 11, 2022
    1. Xiaomi Pad 5 (nabu) May 11, 2022

    ZTE

    As with ASUS and Realme, ZTE is limiting the preview program to just one phone — one that hasn’t even landed in stores.

    Sr. No. Phone (Codename, Forum Link) Android 13 Update Status Added On/Status Last Updated
    1. ZTE Axon 40 Ultra July 1, 2022


    That’s all we’ve got so far. Make sure to bookmark this page as we will update it whenever we hear a new Android 13 Developer Preview announcement!


    Source: Android Developers

    The post Android 13 Developer Preview builds are now available for these non-Google devices appeared first on XDA.


    from XDA https://ift.tt/ielYgNT
    via IFTTT

    Samsung Galaxy A53 5G vs Google Pixel 6: Battle of the affordable Android phones

    We here at XDA usually compare smartphones that are in the same tier — flagship vs flagship, budget vs budget — but it’s worth exploring the idea of an older base model flagship vs a new mid-tier phone, because both are more affordable than the standard top flagship fare, and it’s a good gauge to see whether flagship phones hold their status a year on. Today we’re taking look at the Samsung Galaxy A53, a mid-tier 2022 phone, against Google’s base model 2021 flagship, the Pixel 6.

    We must note there is a $250 price gap between the two — the Galaxy A53 retails for $350, and there are constant deals to be found, while the Pixel 6 can be had for $600, albeit you could get it for cheaper during sales season. So for some on a tighter budget, this may have already eliminated the Pixel 6 from contention. But if you are okay with potentially paying $600, then we hope this guide can help you decide on your next smartphone purchase.

      Samsung Galaxy A53 5G
      The Galaxy A53 is Samsung's newest mid-tier offering and it offers a great screen and solid main camera at a low price.
      Google Pixel 6
      The Google Pixel 6 is a flagship phone with an excellent camera and unique design, plus Google's first ever SoC -- Tensor.
    pixel 6 and a53 for versus basic

    Galaxy A53 and Pixel 6

    Navigate this article:

    Samsung Galaxy A53 5G vs Apple iPhone 11: Specifications

    Samsung Galaxy A53 5G Google Pixel 6
    Build
    • Plastic body
    • Gorilla Glass 5 front panel
    • IP67 water/dust resistance
    • Gorilla Glass 5 front panel
    • Standard glass back
    • Aluminum chassis
    • IP68 water/dust resistance
    Dimensions and Weight
    • 159.6 x 74.8 x 8.1mm
    • 189 g
    • 158.6 x 74.8 x 8.9 mm
    • 207 g
    Display
    • 6.5-inch Super AMOLED
    • 120Hz refresh rate
    • 1080 x 2400 pixels
    • 6.4-inch OLED
    • 90Hz refresh rate
    • 1080 x 2400 pixels resolution
    SoC
    • Samsung Exynos 1280
    • Google Tensor
    RAM and Storage
    • 6GB/8GB RAM
    • 128GB/256GB internal storage
    • microSD card slot (up to 1TB)
    • 8GB
    • 128GB/256GB internal storage
    • no microSD card slot
    Battery and Charging
    • 5,000mAh battery
    • 25W Super Fast Charging
    • No charger in the box
    • No wireless charging
    • 4,614 mAh battery
    • 30W Fast charging
    • Charger in the box
    • Qi wireless charging
    Security
    • Optical in-display fingerprint sensor
    • Optical in-display fingerprint sensor
    Rear Camera(s)
    • 64MP ƒ/1.8 Main (with OIS)
    • 12MP ƒ/2.2 Ultra-wide
    • 5MP ƒ/2.4 Depth sensor
    • 5MP ƒ/2.4 Macro
    • 50MP, ƒ/1.8 Main (with OIS)
    • 12MP ƒ/2.4 Ultra-Wide
    Front Camera(s)
    • 32MP ƒ/2.2
    • 8MP camera ƒ/2.2
    Ports
    • USB Type-C
    • No headphone jack
    • USB-C
    • No headphone jack
    Connectivity
    • 5G
    • LTE
    • Wi-Fi 802.11 a/b/g/n/ac (2.4G+5GHz)
    • Bluetooth 5.1
    • 5G
    • LTE
    • Wi-Fi 802.11 a/b/g/n/ac/6
    • (2.4G+5GHz)
    • Bluetooth 5.1
    Software
    • One UI 4.1 (Android 12)
    • Android 12
    Price
    • $349
    • $599

    Samsung Galaxy A53 5G vs Google Pixel 6: Design and Hardware

    Design aesthetics is subjective, but I personally think the Google Pixel 6 is a significantly better looking and more unique handset, with a different-looking camera strip that looks like a visor, and, in some colorways, a two-tone finish. The Galaxy A53 doesn’t look bad to me, but it looks a bit boring, a bit like Samsung was playing it safe — trying not to offend or stand out from the pack too much.

    pixel 6

    Both phones are roughly the same size, with a 6.5-inch screen for the Galaxy A53 and 6.4-inches for the Pixel 6. The Pixel 6 is a tad heavier and thicker, but I honestly couldn’t feel it when handling either phone. In terms of construction, the Galaxy A53 is a mid-ranger, so it’s very plasticky all around, while the Pixel 6 is a glass and aluminum sandwich. The latter is more premium and feels better in the hand, but the former is more likely to survive drops. Still, if you want to get a case for the Galaxy A53 or Google Pixel 6, there are options.

    Galaxy A53

    Display

    The Galaxy A53 sports a 6.5-inch 120Hz Samsung AMOLED panel and it’s a bit superior to the 90Hz OLED used in the Pixel 6, sourced from an unknown supplier. Not only does Samsung’s panel refresh faster, but it also gets noticeably brighter.

    Galaxy A53's all screen design.

    Galaxy A53 display.

    Underneath both screens are optical in-display scanners, and both are honestly below par in that they take a beat longer than usual to unlock. It’s one thing for pricier, higher-end devices to have a noticeably better in-display scanner, but many Chinese brands such as OPPO or Xiaomi also offer superior scanners in their mid-range devices.

    pixel 6 screen

    Pixel 6 display.

    Processor

    Bespoke chips power each device — Samsung’s own Exynos 1280 in the Galaxy A53, and the Google Tensor in the Pixel 6 Pro. Let’s not beat around the bush — Tensor is just a better SoC here. It’s significantly smarter (at things like machine learning and image processing) and generally moves around faster than the Exynos 1280 too. But again, considering the $250 price difference, this is acceptable. The Exynos 1280 is a perfectly decent chip — you won’t have any problems running Instagram or Gmail or most Android games on it — the Tensor is just a technically more advanced chip.

    Cameras

    This area is another landslide win for the Pixel 6 too. Google’s phone basically has a main camera that’s premium flagship level, able to go toe to toe against the highest tier iPhone or Samsung Galaxy. As such, it’s quite hard for the Galaxy A53’s very clearly mid-tier camera to keep up.

    Pixel 6 performance

    This isn’t to say the Galaxy A53’s cameras are bad. They’re good — particularly the main camera, a 64MP f/1.8 shooter that can capture lively pixel binned images during the day. At night, the sensor will have to rely a lot on night mode to produce noise-free images, and the results can be hit and miss.

    Galaxy A53

    The Pixel 6, meanwhile, uses a GN1 sensor (ironically manufactured by Samsung) with a much larger image sensor. Throw in Google’s best-in-class digital image processing and the Pixel 6 main camera just churns out perfectly balanced, detailed, noise-free shots day or night. We particularly are fans of the Pixel’s color reproduction, which is a bit dramatized from real life, but still keeps the original integrity of the scene. These Pixel 6 shots below are just about as good as smartphone photography can get right now — the Galaxy A53 just can’t match this level of dynamic range, details, and balance.

    Pixel 6 Pro Pixel 6 Pro Pixel 6 Pro Pixel 6 Pro sample Galaxy A53, main camera Galaxy A53, main camera Galaxy A53, main camera Galaxy A53, main camera

    Memory, battery, and other components

    The Galaxy A53 starts at just 4GB of RAM (remember, it’s a mid-tier phone) but can get up to 8GB, the Pixel 6, meanwhile, only comes with 8GB of RAM. Storage options are identical for both — 128GB or 256GB. But one advantage for Samsung is the A53 supports an SD card for additional memory, while the Pixel cannot.

    Pixel 6

    Pixel 6

    While both phones have stereo speakers that sound about even and IP68 water- and dust-resistance rating, the Pixel 6 has much better haptics, and its 4,614 mAh battery can be charged wirelessly. The Galaxy A53’s haptics are mushy, and the 5,000 mAh battery can only be charged the conventional method. Neither phone comes with a charger, by the way.

    a53

    The Galaxy A53 does not come with a charger — neither does the Pixel 6.

    Samsung Galaxy A53 5G vs Google Pixel 6: Software

    The Galaxy A53 runs Samsung’s OneUI Android skin over Android 12, while the Pixel 6 runs Android 12, with a distinct Pixel flavor that’s heavy on whimsical touches and lively animations. Google redesigned the Pixel software for the Pixel 6 and it is more customizable than before, with color schemes that can automatically adapt to your wallpaper of choice, as well as other personalized touches like the ability for the phone to identify songs playing near you and save the track listings (you can turn this off if find it creepy).

    The OneUI running in the Galaxy A53 is a bit bare-bones. Samsung DeX, which is a major feature in Samsung’s flagship phones, is not available here. The floating windows feature also doesn’t work as smoothly as in other higher-priced Samsung phones. And OneUI is also prone to the occasional animation stutter.

    The Galaxy A53 is still more than usable for most people, but the Pixel 6’s software is more thoughtful, and in this particular case of Pixel 6 vs Galaxy A53, moves around faster and smoother too.

    Samsung Galaxy A53 5G vs Google Pixel 6: Performance

    I already touched on this earlier, but the Google Pixel 6 is a better performer — it’s a bit faster at smartphone tasks, and it’s got a much better camera. The Pixel 6 is also more intelligent, with superior voice dictation ability due to Tensor being custom built to handle machine learning tasks for the Pixel 6.

    Battery life is one area where the Galaxy A53 takes a win, as its larger battery results in a phone that can go all day on a single charge, while the Pixel 6 may need a top-up before your night’s over if you’ve been really pushing it.

    As a media consumption machine, both phones are great, with large screens and stereo speakers, but the Galaxy A53’s wider, flatter sides make the phone a bit easier to hold with one hand while reclining on a sofa.

    Samsung Galaxy A53 5G vs Google Pixel 6: Which one should you get?

    As mentioned at the beginning, there’s a not small $250 price difference between the two, so this decision comes down to how much you value saving $250? If you’re on a tight budget, the Galaxy A53 is still a very capable phone with a fair price. But if you can splurge a bit and pay the $600 price of the Pixel 6, it’s worth getting Google’s flagship instead as it’s just a better phone. If the difference is even smaller, we would prefer the Pixel 6 over the Galaxy A53 as it is a flagship device that can do a whole lot more than what the Samsung mid-ranger can accomplish.

      Samsung Galaxy A53 5G
      The Galaxy A53 is Samsung's newest mid-tier offering and it offers a great screen and solid main camera at a low price.
      Google Pixel 6
      The Google Pixel 6 is a flagship phone with an excellent camera and unique design, plus Google's first ever SoC -- Tensor.

    The post Samsung Galaxy A53 5G vs Google Pixel 6: Battle of the affordable Android phones appeared first on XDA.


    from XDA https://ift.tt/s24NjAt
    via IFTTT

    How to install Android 12 and 12L on Google Pixel and other Android devices

    It’s that time of year again! Android 12, i.e. the next major release of Android is now available via stable channel. Google has also started the beta testing of Android 12L. For lucky owners of the Google Pixel 3a, Pixel 3a XL, Pixel 4, Pixel 4 XL, Pixel 4a, Pixel 4a 5G, Pixel 5, Pixel 5a, Pixel 6, or Pixel 6 Pro, you’ll be among the first users to see what new OS update has to offer.

    If you have any of the aforementioned Pixel smartphones running and older stable build and wondering how you can install Android 12 or 12L, just scroll down as we have a tutorial ready for you. Keep in mind that Google will be providing an incremental OTA for existing beta users to move to the stable release, but they can also opt for a manual flashing. You will need a PC/Mac with ADB and Fastboot installed to successfully execute the installation process, once you have downloaded the relevant Android 12 release packages.

    Alongside supported Google Pixel devices, Android 12/12L is also made available in the form of a GSI that can be flashed on a much wider range of devices. OEMs have joined in on the party as well, and you can flash Beta 1 on the following phones:

    Warning: The updates are intended for developers only, so don’t install them on your daily-driver. These builds are early releases and contain bugs and other system instabilities. Even if the flashing process doesn’t necessarily wipe your device, it is highly recommended that you back up your data before proceeding. Users are advised to exercise caution.

    The three methods to install the update are:


    Method 1: Sideload Android 12/12L via Recovery and ADB

    To install the stable build, you need to sideload the appropriate OTA package for your device from Recovery through ADB. This method will also work for Google Pixel devices with a locked bootloader.

    1. Download the update .zip file on your computer from here. For convenience, you can rename this file to a simpler name and place the file in the directory where ADB is located on your computer.
    2. Optional but recommended: Verify the SHA-256 checksum of the file you have downloaded to ensure that the file has been downloaded completely and correctly.
    3. Enable USB Debugging on your phone — Go to Settings > About Phone > Tap “Build Number” 7 times, (optionally) enter your pattern, PIN or password to enable Developer Options, and then navigate to Settings > Developer Options > Enable “USB Debugging”.
    4. Connect your phone to your computer. Authorize your computer connection on your phone when the prompt comes up on your phone, if this is the first time you are connecting with this ADB computer.
    5. On your computer, run the command:
      adb reboot recovery
    6. You should see “No command” on your phone screen. Now press and hold the Power button of your phone. While you hold Power, press the Volume Up button and let go of both buttons quickly. You should the Android recovery menu.
    7. Select the option Apply Update from ADB from the recovery menu.
    8. On your phone, select the option “Apply Update from ADB”
    9. On your computer, run the command:
      adb devices

      This should return a device serial with the “sideload” next to its name, indicating that your device is connected to the computer in sideload mode.

    10. On your computer, run the command:
      adb sideload "filename".zip

      Where “filename” is to be replaced with the name of the file downloaded in Step 1

    11. The update should install on your phone. Once the installation is complete, choose “Reboot system now” on your phone to reboot into Android 12.

    Method 2: Flashing full Factory Image via Fastboot

    If you have an unlocked bootloader on a Google Pixel device, you need to flash the full factory image of the Android 12 or 12L via Fastboot. Usually, this is done through a flash-all.sh or flash-all.bat script file that is included in the downloaded file, but its default configuration also wipes the device completely. You can, however, retain your data by deleting the “-w” wipe attribute from the command within the script.

    1. Download the factory image .zip file on your computer from here.
    2. Optional but recommended: Verify the SHA-256 checksum of the file you have downloaded to ensure that the file has been downloaded completely and correctly.
    3. Extract the .zip file, and copy and paste the resultant files onto your ADB and fastboot folder on your computer for convenience.
    4. Optional: The resultant files would contain a flash-all.sh or flash-all.bat script file. Using a text editor, open the flash-all.sh if you’re on macOS/Linux or the flash-all.bat script file if you’re on Windows. Find and remove/delete the -w flag in the fastboot update command. This will skip the data wipe for your phone. To avoid compatibility issues, a data wipe is recommended though.
    5. Enable USB Debugging on your phone — Go to Settings > About Phone > Tap “Build Number” 7 times, (optionally) enter your pattern, PIN or password to enable Developer Options, and then navigate to Settings > Developer Options > Enable “USB Debugging”.
    6. Connect your phone to your computer. Authorize your computer connection on your phone when the prompt comes up on your phone, if this is the first time you are connecting with this ADB computer.
    7. On your computer, run:
      adb reboot bootloader

      This will reboot your phone into Fastboot mode.

    8. On your Mac/Linux PC, run:
      flash-all

      This command executes the flash-all.sh script file, which will then install the necessary bootloader, baseband firmware, and operating system. If you are on Windows, you can simply double click the flash-all.bat file.

    9. Once the script finishes, your device will reboot into the new OS.

    Method 3: Install Android 12/12L GSI

    Even if you don’t own a compatible Pixel smartphone, you can still install Google’s official GSI binaries to test Android 12 or 12L, provided your device is compatible with Project Treble. You also need an unlocked bootloader. The last thing that we need to say is that flashing a GSI will require you to factory reset your device, so be sure you’re prepared to lose app data before you proceed with this! We recommend you make an off-device backup (such as on your PC or an SD Card) in case anything goes wrong.

    1. Download links for the official Android 12/12L Beta GSIs can be found here. Google has yet to publish GSIs based on the stable release. You should download the appropriate version based on your device’s architecture. To see which architecture your device has, run the following command:
      adb shell getprop ro.product.cpu.abi
    2. Optional but recommended: Verify the SHA-256 checksum of the file you have downloaded to ensure that the file has been downloaded completely and correctly.
    3. Extract the .zip file, and copy and paste the resultant files (system.img and vbmeta.img) onto your ADB and fastboot folder on your computer for convenience.
    4. Enable USB Debugging on your phone — Go to Settings > About Phone > Tap “Build Number” 7 times, (optionally) enter your pattern, PIN or password to enable Developer Options, and then navigate to Settings > Developer Options > Enable “USB Debugging”.
    5. Connect your phone to your computer. Authorize your computer connection on your phone when the prompt comes up on your phone, if this is the first time you are connecting with this ADB computer.
    6. On your computer, run:
      adb reboot bootloader

      This will reboot your phone into Fastboot mode.

    7. As mentioned earlier, the bootloader of the target device must be unlocked beforehand.
    8. Next, we need to disable Android Verified Boot (AVB). To do that, run the following command:
      fastboot flash vbmeta vbmeta.img
    9. Optional but recommended: Enter the following to wipe the system partition:
      fastboot erase system
    10. Flash the Android 12/12L GSI:
      fastboot flash system system.img
    11. Allow the image to flash, it could take a few minutes. Once that’s done, wipe the userdata partition:
      fastboot -w
    12. Finally, reboot your device:
      fastboot reboot
    13. Hopefully, your device should boot into the new build of Android.

    Be sure to follow our Android 12 and Android 12L tags for all the latest news on the new Android version!

    The post How to install Android 12 and 12L on Google Pixel and other Android devices appeared first on XDA.


    from XDA https://ift.tt/S1W8rQR
    via IFTTT

    Xiaomi’s new affordable smart speaker doubles up as an IR remote

    Xiaomi today launched a new smart speaker in the Indian market that has a neat trick up its sleeve. The Google Assistant-powered Xiaomi Smart Speaker IR Control is the second smart speaker from the company. As its name suggests, it packs an IR blaster that will let you control your remote-controlled home appliances, even if they don’t feature Google Assistant support.

    The new Xiaomi Smart Speaker IR Control features an updated design with a built-in LED clock display, a 1.5-inch full-range speaker, and two far-field microphones with voice wake-up support. The speaker also features buttons to help you easily adjust the volume, mute the microphones, and play/pause music.

    Xiaomi Smart Speaker IR Control on shelf with plant and books.

    As mentioned earlier, Xiaomi’s latest smart speaker offers a unique feature you won’t find on even the best smart speakers available on the market — IR controls. Using a built-in IR blaster, the speaker lets you use your voice to control your dumb home appliances, like your TV or AC. To do so, you can add the IR-compatible devices to the Xiaomi Home/Mi Home app on your phone.

    As with other Google Assistant-powered smart speakers, the Xiaomi Smart Speaker IR Control also includes Chromecast to let you cast media to other supported devices and a voice-activation LED that lights up when the speaker is active and listening for a command.

    Pricing & Availability

    The Xiaomi Smart Speaker IR Control is up for sale on Xiaomi’s website in a single black colorway. It’s priced at ₹5,999, but you can get your hands on one for just ₹4,999 during the initial sale. If you’d like to order one for yourself, you can do so by clicking on the link provided below.

      Xiaomi Smart Speaker IR Control
      The Xiaomi Smart Speaker IR Control is an affordable smart speaker with a neat trick up its sleeve.

    At the moment, Xiaomi has not provided any details regarding an international launch. We’ll update this post as soon as the company launches the speaker in other markets.

    The post Xiaomi’s new affordable smart speaker doubles up as an IR remote appeared first on XDA.


    from XDA https://ift.tt/sjIhMyo
    via IFTTT