LightBlog

samedi 2 juillet 2022

Asus Vivobook S 14X OLED review: OLED never looked this good

The Asus Vivobook S 14X OLED is among the first on the market to have a 120Hz OLED display, which is pretty sweet. After all, OLED laptops are delightful to begin with, and Asus absolutely invests in using the technology in its screens. Adding the high refresh rate on top of that is a chef’s kiss.

Unfortunately, there are some drawbacks in the product. It still uses a 720p webcam, and the 45W Intel 12th-gen processor isn’t paired with any dedicated graphics. In fact, performance wasn’t even on par with units I’ve tested with less powerful processors.

Overall, however, the Asus Vivobook 14X OLED has the best display that you’ll find on a laptop right now, so it offers a pretty great experience.

    Asus Vivobook S 14X S5402
    The Asus Vivobook S 14X S5402 packs some premium features at a reasonable price, with a 120Hz OLED display, a powerful CPU, and more.

      Features:

      Pros:

      Cons:

Navigate this review:

Asus Vivobook S 14X OLED pricing and availability

  • The Asus Vivobook S 14X OLED costs $1,099.99
  • The model that Asus sent for review is a Costco exclusive, and it’s a better deal than the other configuration

The Asus Vivobook S 14X OLED S5402 model is available now, and the model that the company sent me for review is exclusive to Costco. It includes an Intel Core i7-12700H, 12GB DDR4 memory, a 512GB SSD, and of course, a 14.5-inch 2.8K 120Hz OLED display.

There are other configurations, of course. In fact, while the model that Asus sent me comes in Midnight Black, it also comes in colors like Solar Silver and Sandy Grey. However, if you’re not a Costco member, there’s some bad news. There’s a Core i5 SKU, which will be available from vendors like Amazon, Best Buy, and B&H, it’s actually the same price as the Core i7 SKU that comes from Costco at $1,099.99.

Asus Vivobook S 14X OLED: Specs

Processor Intel Core i7-12700H Processor 2.3 GHz (24M Cache, up to 4.7 GHz, 6P+8E cores)
Graphics Intel Iris Xe
Body 32.23 x 23.09 x 1.79 ~ 1.79 cm (12.69″ x 9.09″ x 0.70″ ~ 0.70″), 1.63 kg (3.59 lbs)
Display Screen-to-body ratio: 87 %
14.5-inch, 2.8K (2880 x 1800) OLED 16:10 aspect ratio, LED Backlit, 0.2ms response time, 120Hz refresh rate, 550nits peak brightness, 100% DCI-P3 color gamut, 1,000,000:1, VESA CERTIFIED Display HDR True Black 500, 1.07 billion colors, Anti-glare display, 70% less harmful blue light, SGS Eye Care Display, Screen-to-body ratio: 87 %
Memory 12GB DDR4
Storage 512GB M.2 NVMe PCIe 4.0 SSD
Ports 1x USB 2.0 Type-A
1x USB 3.2 Gen 1 Type-A
2x Thunderbolt 4 supports display / power delivery
1x HDMI 2.0a
1x 3.5mm Combo Audio Jack
Keyboard Backlit Chiclet Keyboard, 1.4mm Key-travel
Camera 720p HD camera
With privacy shutter
Audio Smart Amp Technology
Built-in speaker
Built-in array microphone
harman/kardon (Mainstream)
with Cortana and Alexa voice-recognition support
Battery 70WHrs, 3S1P, 3-cell Li-ion
Power supply TYPE-C, 90W AC Adapter, Output 20V DC, 4.5A, 90W, Input: 100~240V AC 50/60Hz universal
Colors Midnight Black
Solar Silver
Sandy Grey
OS Windows 11 Home
Price $1,099.99

Design: It’s made of aluminum with a subtle design

  • It comes in Midnight Black, Solar Silver, and Sandy Grey
  • There are two USB Type-A ports, but one of them is USB 2.0

The model that Asus sent me for review is Midnight Black, but it also comes in Solar Silver and Sandy Grey. You can really just think of it as a black laptop. Unlike other OEMs, Asus didn’t use any shiny branding on the exterior design. Indeed, there’s Asus Vivobook branding that’s embossed on the lid with black text.

Top-down view of Asus Vivobook S 14X

It’s made out of aluminum, weighing in at 3.59 pounds. This is lighter than laptops that have dedicated graphics, but heavier than ultrabooks. After all, the Asus Vivobook S 14X does sort of sit in its own class between being an ultrabook and being a powerful creator laptop. It’s got the 45W H-series CPU, but it doesn’t have dedicated graphics.

Side view of Asus Vivobook S 14X

As far as ports go, Asus makes a critical mistake in my opinion. On the left side, there’s a USB 2.0 Type-A port. Personally, I think USB 2.0 should have died a fiery death by now, but unfortunately, it hasn’t. The right side has a USB 3.2 Gen 1 port, so that means that as an end user, you have to know the difference between the two USB Type-A ports on the device.

For example, if you go to plug in a 4K webcam, you’ll absolutely need to use the one on the right side, but if you don’t know the difference between the two, it’s going to take a little while to figure out what’s wrong. You might even think that one port is broken before realizing the difference between USB 2.0 and USB 3.2 Gen 1.

Side view of Asus Vivobook S 14X

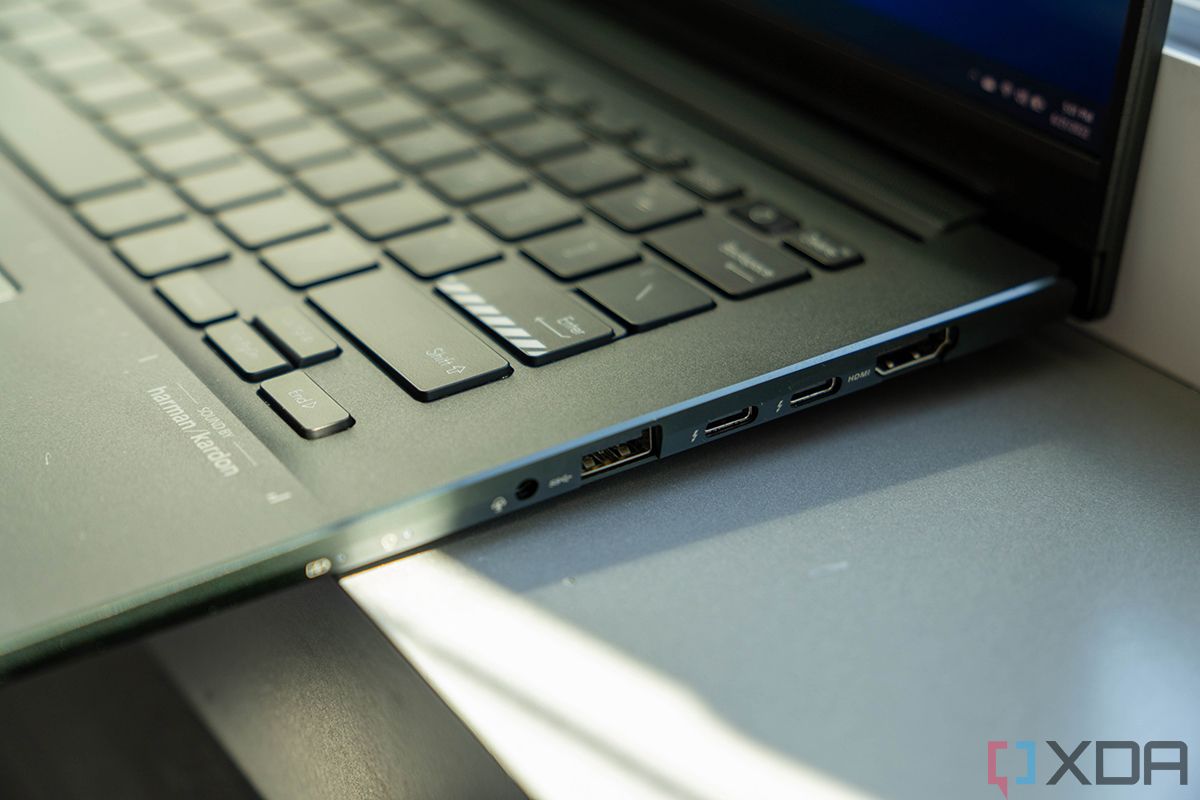
Also on the right side is an HDMI 2.0 port and dual Thunderbolt 4 ports, both of which can be used for charging. Obviously, Thunderbolt 4 also gets you goodies like 40Gbps data transfer speed, the ability to connect an external GPU, and the ability to connect two 4K monitors or one 8K monitor on a single port. What’s neat about the ability to connect an external GPU is that since this has an H-series processor already, it can be a work laptop on the go, but when you get home, you can use that single-cable solution to connect a powerful graphics card and turn this into a gaming laptop.

Display: The Asus Vivobook S 14X has a best-in-class display

  • The 14.5-inch screen is 2,880×1,800 OLED with a 120Hz refresh rate
  • The webcam is unfortunately 720p

One of the really cool things that we’re starting to see on the PC market is high refresh rate displays. As tends to be the case with anything that’s actually useful and new in PC hardware, it originated with the mobile market. Prior to that, high refresh rates were targeted exclusively at gamers, and the problem with gaming displays is that they’re usually not actually good for anything but gaming. Now, we’re actually seeing some really nice consumer displays that have high refresh rates and are also pleasant to look at.

Close up of Asus Vivobook S 14X display

We’ve seen 120Hz displays, and we’ve seen 90Hz OLED displays, but Asus is giving us a 2.8K 120Hz OLED display, which is the best display I’ve seen on a laptop so far. When you turn on the high refresh rate in Settings, it’s a delightful experience.

The only problem with these high refresh rate displays on Windows laptops is that they absolutely drain battery life. Intel’s processors just can’t do the same things on laptops that Qualcomm’s processors can do in phones. And on top of that, this laptop has a power-hungry processor.

ASUS Vivobook S 14X display test

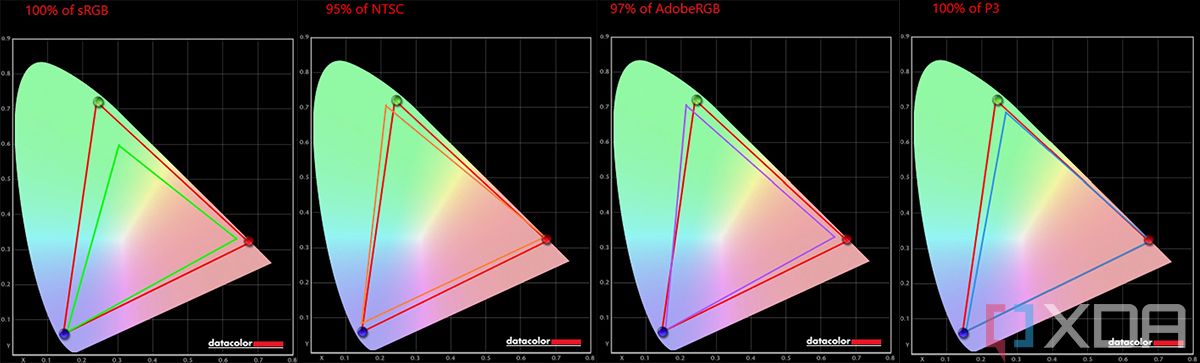
From my testing, the Asus Vivobook S 14X supports 100% sRGB, 95% NTSC, 97% Adobe RGB, and 100% P3, which is really impressive. The point is, you don’t even need to turn it up to 120Hz for this to be one of the best displays on a laptop. It’s just great.

ASUS Vivobook S 14X display test

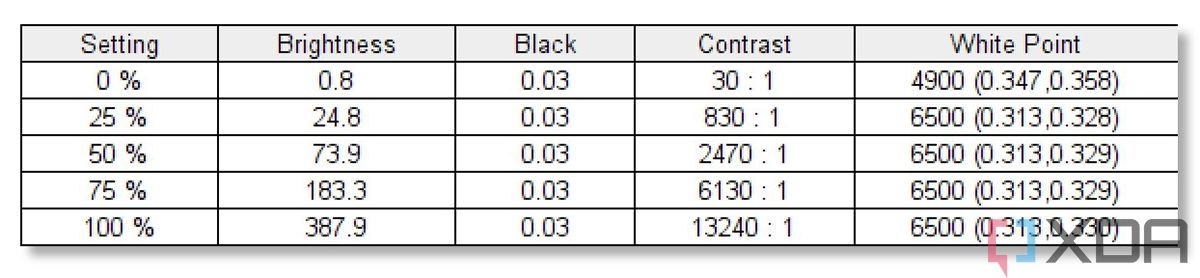
The display test above shows what you’d expect from an OLED display, with the black level staying the same from 0% brightness to 100%, and a high contrast ratio at 13,240:1.

Close up of Asus Vivobook S webcam

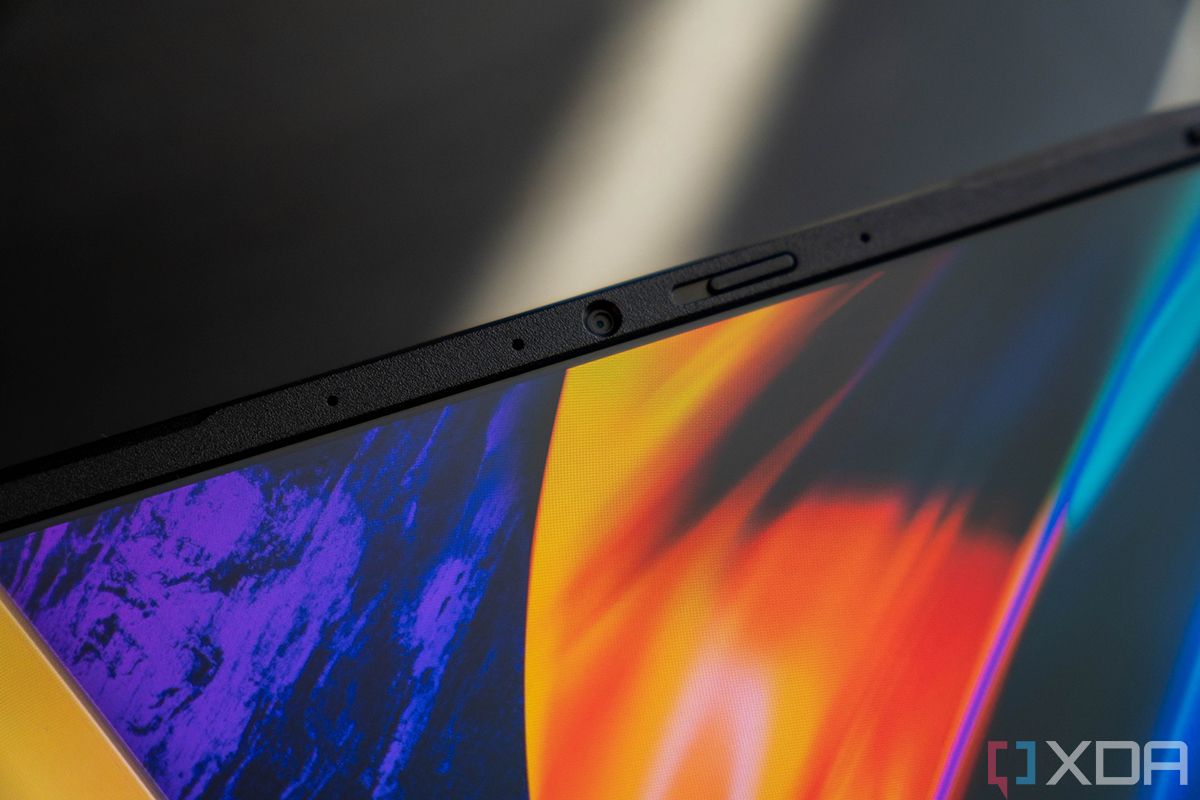
The webcam has a physical privacy guard, but the bad news is that the camera is still 720p. FHD webcams are becoming more and more popular, and if you take a lot of video calls and meetings, you’ll probably want a higher quality webcam.

Keyboard: It’s average, which is fine

  • The Chiclet-style keyboard is fine, but that’s it

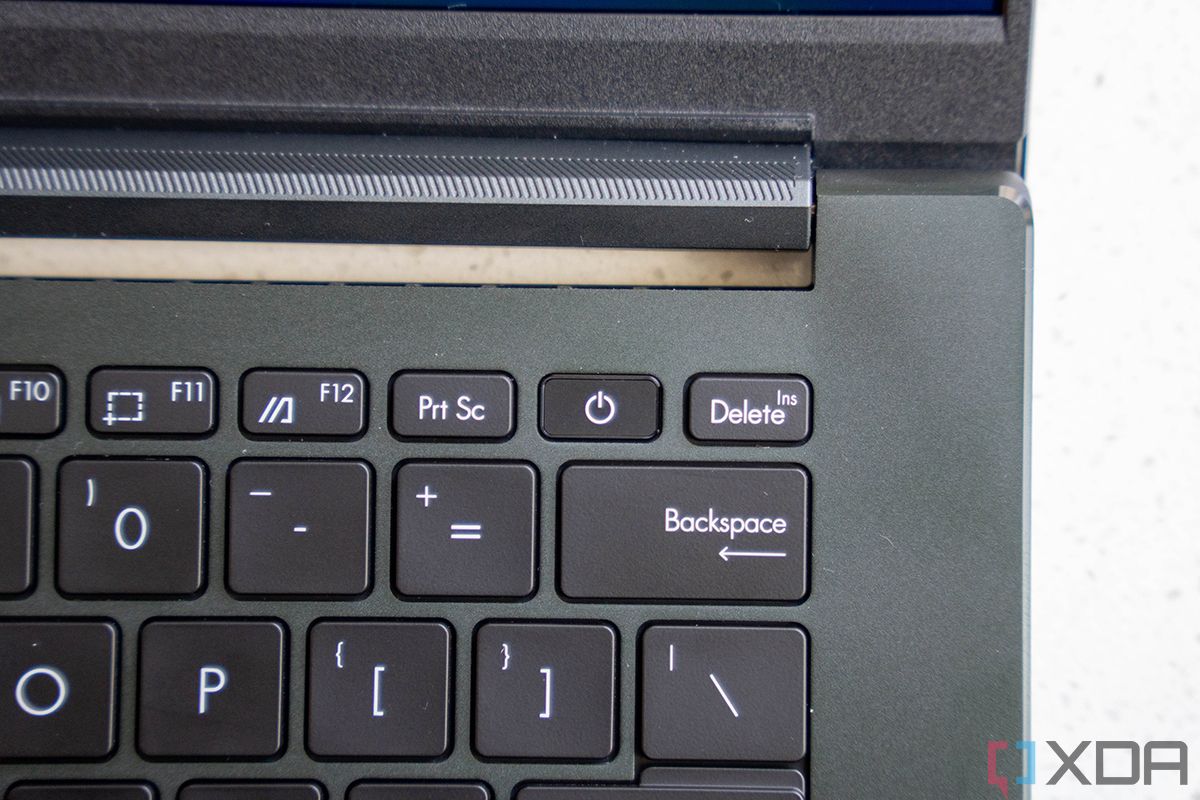
One thing that I’ll say about the keyboard is that it’s accurate, which is probably the most important thing. There weren’t any missed keystrokes or double keystrokes. Other than that though, it feels pretty average. In general, the keyboard is pretty loud, and it doesn’t have the same solid feel that you’d get from a Lenovo ThinkPad or an HP EliteBook.

Top down view of Asus Vivobook S 14X keyboard

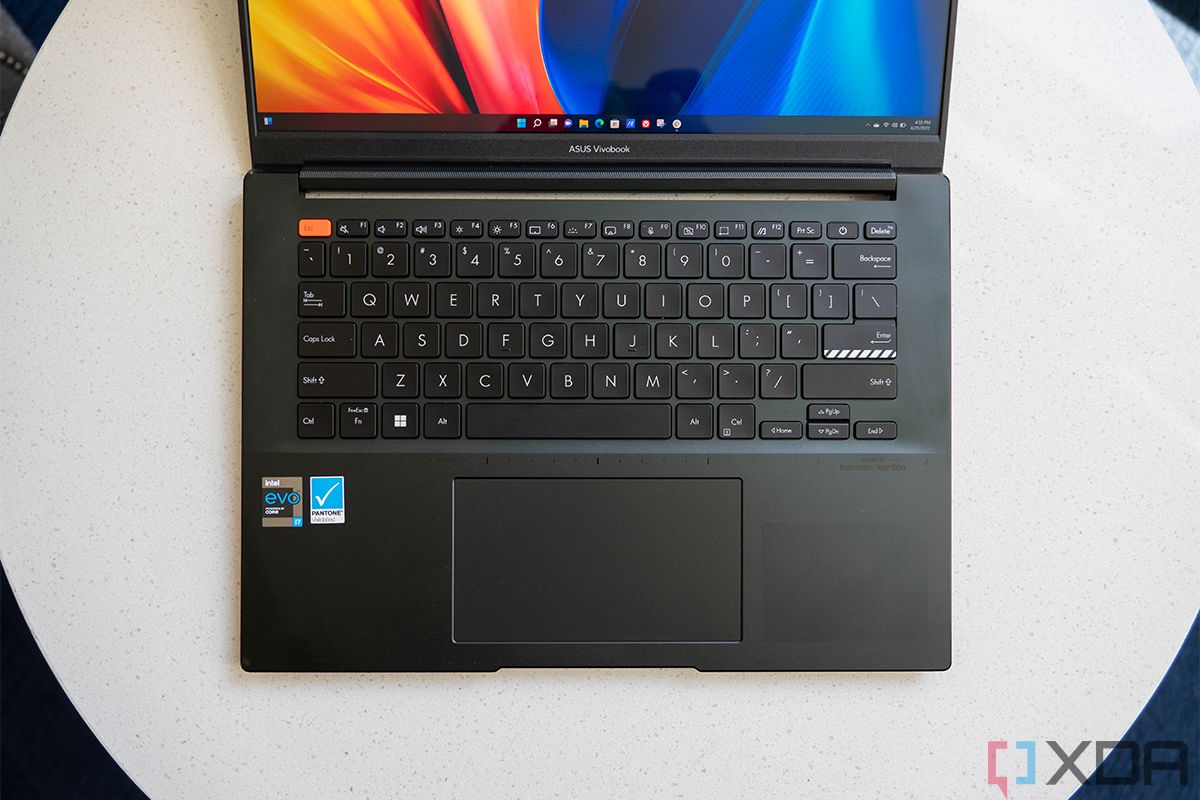
As you can see, it has standard Chiclet-style keys, and of course, it is backlit. It has some unique bits, such as an orange Esc key and markings on the Enter key, which might be helpful visual enhancements for some.

The touchpad is fairly large, which is nice. I’d love to see it get even larger in a future iteration of the product, but that’s fine for now.

Close up of power button

The power button doubles as a fingerprint sensor, and since there’s no IR camera, that’s your only method of biometric authentication on this device. It works well, scanning your fingerprint when you press it rather than after it boots up.

Performance: H-series processors without dedicated graphics isn’t too impressive

  • The Intel 12th-gen processor is 45W, but it doesn’t benchmark well

The Vivobook S 14X S5402 unit that Asus sent me includes a Core i7-12700H, 12GB RAM, and no dedicated graphics. Unfortunately, that’s not very good. I feel like it’s becoming more common for certain brands to use H-series processors without a dGPU, and I don’t like it. I’ve spoken with major OEMs like HP that have done it in the past, and they always end up rolling it back in the next generation of the product.

The 45W CPUs that I’m talking about are traditionally found in gaming laptops and mobile workstations. They’re for people that need all of the power that they can get, and they tend to be paired with powerful dedicated graphics. Laptops that are made for productivity usually have U-series processors, which are 15W, although some of them are now coming with 28W chips.

Front view of Asus Vivobook S

The additional CPU power obviously comes with a cost to the battery, but it’s without a significant gain in performance. If you’re doing creative work, you probably want to look for something with dedicated graphics, and that can be a lower-tier dGPU like an Nvidia GeForce RTX 3050 for things like Photoshop and Lightroom. For productivity, you won’t see any meaningful gains from a 45W CPU.

The integrated Iris Xe graphics are exactly the same as the ones found in a Core i7-1260P, with 96 execution units and clocked at 1.4GHz. The clock speed is a bit higher than what’s found in the graphics in the Core i7-1255U.

The Core i7-12700H in the Asus Vivobook S 14X S5402 also doesn’t benchmark well. Shockingly, the scores were lower than what I got on a laptop with a Core i7-1255U, a 15W processor with integrated graphics. To be clear, these units were plugged in with the power slider set to best performance. I even did a factory reset on the Vivobook and ran the tests again, trying to find a way for it to do better. It didn’t.

Asus Vivobook S 14X
Core i7-12700H
Dell Inspiron 14 2-in-1
Core i7-1255U
Dell XPS 15 9520
Core i7-12700H, RTX 3050 Ti
Lenovo Yoga 9i 14
Core i7-1260P
PCMark 10 5,233 5,305 6,640 5,616
3DMark: Time Spy 1,202 1,507 4,535 1,678
Geekbench 1,510 / 6,014 1,711 / 6,700 1,774 / 11,580 1,736 / 9,525
Cinebench 1,629 / 9,015 1,724 / 6,797 1,797 / 11,695 1,638 / 7,757
CrossMark (overall / productivity / creativity / response time) 1,356 / 1,389 / 1,342 / 1,300 1,428 / 1,450 / 1,464 / 1,265 1,855 / 1,735 / 2,052 / 1,671

You can see how it compares to the rest of Intel’s lineup, with the latest U-series Core i7 and the new P-series Core i7, but I also wanted to show the difference in scores when compared with a laptop that has the same processor and some lower-tier dedicated graphics. However, please note that both Geekbench and Cinebench are exclusively CPU tests, so the Vivobook should, in theory, match up with the Dell XPS 15 9520 on those two tests. I was unable to get it to do so.

Battery life was around three hours with the screen set to 120Hz, and around five hours with the screen set to 60Hz, which is about what I’d expect. Lots of companies quote big battery life numbers, but this is what it usually ends up being when you actually plug in a realistic use case.

I also have to say that I did less battery testing with this laptop than I do with others. The method is always to set the power slider to balanced and the screen brightness to a comfortable level, but performance really ended up being such a pain point here that I just got frustrated with not having it plugged in.

Should you buy the Asus Vivobook S 14X OLED?

The big feature with the Asus Vivobook S 14X is the display, of course, and it’s not for everyone.

Who should buy the Asus Vivobook S 14X S5402:

  • People that want the absolute best in display quality
  • Gamers that want productivity on the go and have an external GPU to connect when at home
  • Customers that want a lot of value for the price

Who should NOT buy the Asus Vivobook S 14X S5402:

  • Creators that need dedicated graphics
  • People that want a general productivity laptop
  • People that attend a lot of virtual meetings

The problem with the Asus Vivobook S 14X is that I have a hard time figuring out exactly what category this fits in. I wouldn’t call it a creator laptop; after all, I edited all of these photos on it and frankly, it was lacking when it was on battery life. And at the same time, people that want a productivity laptop would be better served with a U- or P-series processor. Still, you do get a 2.8K 120Hz screen for $1,100, so there’s a lot of value there.

The post Asus Vivobook S 14X OLED review: OLED never looked this good appeared first on XDA.


from XDA https://ift.tt/kgDpl8v
via IFTTT

How to change the Wi-Fi network on an Amazon Echo and Echo Show

A working Wi-Fi connection is an essential part of owning an Amazon Echo. Without it you can’t really do, well, anything. So when it comes to the time you get a new wireless router, for example, it’s important to get moved over as quickly as possible. Especially if your Echo and Alexa are central to your smart home setup.

Fortunately, changing to a new Wi-Fi network is straightforward and all you need is your phone and the Alexa app. Detailed below are the steps that apply to all Amazon Echo smart speakers as well as the Echo Show and Echo Spot devices with displays.

How to change the Wi-Fi network on an Amazon Echo

  • Enable Bluetooth on your phone and open the Alexa App.

Amazon Alexa (Free, Google Play) →

‎Amazon Alexa (Free, App Store) →

  • Trigger in the settings under Wi-Fi Network and follow on-screen prompts.
  • For Echo Show and Echo Spot, use the built-in display to access the Settings menu.

Amazon Echo

For this, you’ll want to make sure that you’re in the same room as the Echo and that Bluetooth is enabled on your phone. Then, open up the Alexa app and follow these steps.

  1. Select Devices.
  2. Select Echo & Alexa.
  3. Select your device.
  4. Select Settings.
  5. Select Wi-Fi Network and follow the on-screen instructions.

These may vary from device to device, but the basic steps involve holding down the action button on the speaker for around 15 seconds. From here you’re going to be waiting for the light to go orange before continuing.

The Alexa app puts your Amazon Echo into its setup mode and then pairs it to your new Wi-Fi network. Once complete, you’ll hear a message from your Amazon Echo and the orange light will have been replaced by a blue one.

How to change the Wi-Fi network on an Amazon Echo Show or Echo Spot

Amazon Echo Show 8

If you’re using an Amazon Echo device with a display then the process is a whole lot simpler. All you will need to do is to open the settings, usually by swiping down from the top and tapping the cog on the display.

Next, find the Network menu, open it and then simply select the Wi-Fi network you want to connect to. Since you have an on-screen keyboard, you’ll enter passwords here, too.

    Amazon Echo (4th Gen)
    The Amazon Echo is the best all-around smart speaker for most people with a nice design, great sound and the immense power of the Alexa ecosystem at its disposal.

The post How to change the Wi-Fi network on an Amazon Echo and Echo Show appeared first on XDA.


from XDA https://ift.tt/hvXZ1oW
via IFTTT

Black Shark 5 Pro Review: Pushing the Snapdragon 8 Gen 1 to its hot limits

Black Shark is a gaming smartphone brand that’s been around for a while. It’s backed by Xiaomi (not owned by, as the company fervently reminds the tech community) and typically packs high-end hardware in a more affordable package. Now the Black Shark 5 Pro is here, and it’s more of the same with physical triggers that can be mapped to touch inputs to help your game.

If you’re looking for a powerful smartphone that looks decent, then the Black Shark 5 Pro might well be up your alley. However, it might also be worth waiting for what’s to come after the Snapdragon 8 Gen 1 before taking the plunge on a gaming smartphone, as the Snapdragon 8 Plus Gen 1 promises to fix a lot of the shortcomings of the preceding flagship chipset.

With the Black Shark 5 Pro, there are a lot of problems that you mightn’t be able to get over, and that includes poor battery life, intense heat, and the lack of a headphone jack. If you’re interested to learn more, then read on.

    Black Shark 5 Pro
    The Black Shark 5 Pro is the latest gaming phone from the Xiaomi-backed company, but there are a lot of problems with it that may not necessarily command the price tag.

      Features:

      Pros:

      Cons:

Navigate this review:

Black Shark Pro 5: Specs

Specification Black Shark 5 Pro
Dimensions & Weight
  • 163.83mm x 76.25mm x 9.5mm
  • 220g
Display
  • 6.67-inch AMOLED
  • 1080 x 2400 (full HD+)
  • 144Hz refresh rate
  • Up to 720Hz touch sampling rate
  • 1300nits peak brightness
  • HDR10+
SoC
  • Qualcomm Snapdragon 8 Gen 1
    • Adreno GPU
RAM & Storage
  • 8GB LPDDR5 +128GB UFS 3.1
    • 6400MHz RAM
  • 12GB+256GB
  • 16GB+256GB
Battery & Charging
  • 4,650 mAh battery
  • 120W fast charging support
  • Supports QC/PD
Security Side-mounted fingerprint scanner
Rear Camera(s)
  • Primary: 108MP, f/1.75
  • Ultra-wide: 13MP, f/2.4
  • Macro: 5MP
Front Camera(s) 16MP, f/2.45
Port(s)
  • USB Type-C
  • No headphone jack
Audio Stereo speakers
Connectivity
  • 5G NR (SA/NSA)
  • 4G
  • 802.11 a/b/g/n/ac/ax dual-band Wi-Fi
  • Bluetooth 5.2
  • NFC
Software JoyUI 13 based on MIUI
Other Features Shoulder triggers

About this review: Black Shark sent us the Black Shark 5 Pro for review. The company did not have any input into the contents of this review.


Black Shark 5 Pro: Design

  • Not an overly “gamer” look
  • Camera barely protrudes
  • Comfortable to hold

Back of the Black Shark 5 Pro

The Black Shark 5 Pro’s design can simply be described as “gamer” — though it’s not over-the-top like I’ve seen from some other gaming brands. It has a soft-touch glass on the back, with a small icon that lights up on the back. I expected that this would be usable as a notification LED (makes sense, right?) but that’s not the case. It doesn’t do a whole lot, though there are some settings in the software that you can modify to make it react to things like phone calls.

It’s a pretty thick phone, but it’s still comfortable to hold thanks to the rounded back edges. The camera doesn’t take up a huge amount of space either, nor does it protrude much, even though it packs a pretty large 108MP sensor. The display is also completely flat, with a single-centered punch-hole selfie camera.

The back camera of the Black Shark 5 Pro

The shoulder triggers on the Black Shark 5 Pro are pretty cool

Where this phone is unique in its design is the implementation of two trigger buttons on the right-hand side. They’re not always active, and you need to swipe a release mechanism to allow them out to be pressed. When they’re not released, they are flush with the rest of the chassis of the phone.

Those shoulder triggers have to be mapped to touch inputs to be used in games, as games won’t recognize them as an official controller input. Nevertheless, they’re pretty cool, and it’s not too big of a deal to map them to your favorite games. It takes a bit of setup, but I’ve noticed in games like COD Mobile that it does make a difference, as in my case, I no longer need to claw my hands over the display to aim and shoot effectively. When not gaming, they can also be assigned other functions — for example, they will also take photos in the camera app by default.

Black Shark 5 Pro shoulder triggers

For a gamer phone, the Black Shark 5 Pro doesn’t have a lot of unique gamer design, and that’s not really a bad thing. Companies like RedMagic have been known to go a bit overboard in that department, whereas the Black Shark 5 Pro can go unnoticed as just a normal smartphone.

For the display, the Black Shark 5 Pro packs a 1080p flat AMOLED screen that goes up to 144Hz. At first glance, it sounds like a bad thing that it’s full HD 1080p and not 1440p, but there’s a reason for that. Higher resolutions require more computational power, so gaming phones often pack 1080p displays to push as high of a frame rate as possible.

The speakers are really loud and sound very good

There are two speakers, both a top and bottom-firing one. The top speaker I’ve noticed sounds a little tinnier, even though it’s a separate speaker to the earpiece. I’m not sure why that is as I would have expected them to be the same, given that they’re located in the same place on each side and separate from the earpiece. Nevertheless, the speakers are really loud and sound very good, so it’s not a big complaint that I have anyway. There’s no headphone jack either, which is a little strange for a gaming phone.

Black Shark 5 Pro: Gaming experience

  • Good performance
  • No thermal throttling makes for a very hot phone
  • Should have waited for the Snapdragon 8 Plus Gen 1

The “latest and greatest” chipset is a bit of a misnomer when it comes to the Snapdragon 8 Gen 1, and that’s thanks to all of the problems that consumers have been facing with it. It runs quite hot, drains a lot of battery, and doesn’t offer a huge amount by way of performance improvements over the Snapdragon 888. The Black Shark 5 Pro makes the most of it though and does the best that it can, sometimes to its own detriment.

We ran a gamut of tests on the Black Shark 5 Pro, and while the results were impressive, they were also alarming. CPU Throttling Test raised the temperature of the device to dangerous levels, with heat dissipating through the shoulder triggers at much higher rates than the rest of the phone. The shoulder triggers began to hurt my fingers from the heat. CPU Throttling Test is an unrealistic CPU load to be put on a smartphone, but I ran into similar heating issues when playing The Simpsons: Hit & Run through AetherSX2.

The Black Shark 5 Pro packs top specifications though, and it gives the results to match. We also ran Geekbench 5 and 3DMark’s Wild Life test, and those results lined up with what we expected too. The phone heats up a lot, but that’s par for the course: both with the Snapdragon 8 Gen 1, and with this being a gaming phone. We’d place more of the responsibility for that on the Snapdragon 8 Gen 1 than on Black Shark, although Black Shark did choose performance over throttling despite the heat.

Playing The Simpsons: Hit & Run was a pleasant experience, and the game runs near flawlessly. I played with a 2x internal resolution, and the game ran at more or less 60 FPS at all times. The phone heated up a lot, but the reduced thermal throttling was noticeable here as the game continued to run well despite the phone feeling like it was going to burn my fingers off. We measured the game’s performance with GameBench, and the results were as good as you’d expect.

Black Shark 5 Pro performance metrics

Black Shark 5 Pro Simpsons Hit and Run Framerate graph

To be honest, I can’t help but wonder if it would have been a smarter choice to dial up the thermal throttling just a little bit. An 83% thermal throttle is impressive, but it’s clear that the trade-offs are nigh-on dangerous. You can’t game on this phone intensively for a long time because it starts to hurt. Those temperatures probably aren’t safe for the phone’s battery, either.

This is one of the most powerful phones that I've tested with the Snapdragon 8 Gen 1

This is a powerful smartphone (and one of the most powerful that I’ve tested with the Snapdragon 8 Gen 1), but that’s only because it takes risks. With Snapdragon 8 Plus Gen 1 devices around the corner, it’s a shame that Black Shark didn’t wait it out. From our testing, it’s already a much more efficient chipset, and I think that gaming phones will stand to benefit a lot from it.

The best part of the Black Shark 5 Pro when it comes to power and battery life is the fact that it supports bypass charging. Bypass charging means that your phone will run off of the charger, not using any battery, and not charging up your phone either. It generates less heat (something that is sorely needed with this phone, to be fair), and in theory, safeguards your battery as a result.

We would like to give special thanks to the team at GameBench for the tool they provided us. Their tool makes it possible for any person, whether it be a regular user,  journalist, or engineer, to test a mobile game’s performance on an Android device. 


Black Shark 5 Pro: Camera

Look, nobody is buying a gaming phone for its camera. If you want a phone that takes good photos and has all of the over-the-top gaming features you may have heard of, there’s practically nothing on the market. Having said that, the Black Shark 5 Pro’s camera gets the job done as a decently usable smartphone camera that you can use in a pinch. Though if you care about picture quality that much, it’s not beating any top camera phones by any stretch of the imagination.

IMG_20220625_172738

For context, the Black Shark 5 Pro has a single 108MP primary camera, a 13MP ultra-wide camera, and a 5MP telephoto macro lens. That telephoto lens allows for actually useable macro shots, which is a plus over the 2MP macro cameras that manufacturers still to this day throw into phones.


Black Shark 5 Pro: JoyUI

The Black Shark 5 Pro runs JoyUI, the company’s own modification of MIUI. It looks the same and performs the same, with the same launcher, multi-tasking menu, and even the same control center when pulling down from the top right-hand side. It’s basically just a rebrand of MIUI with some green accents and a couple of hardware-specific features. That’s not a bad thing because I like MIUI, but it’s not a huge deviation from it whatsoever.

With JoyUI, you get all of the features that you’ve come to expect from MIUI. You get a fancy always-on display (with a ton of customization options), you get second space, and you get the quick ball if you’re into that. JoyUI is pretty heavy-handed in changes when compared to other Android variants, but to some, that’s a large part of its charm.

There are features here that integrate with the shoulder triggers though, and do it a whole lot better than I expected them to. For example, popping out a shoulder trigger and pressing it when the camera is open will take a photo, and you can enable them to do other things throughout the system, too. They’re not just for gaming, which I appreciated as I was worried that this was essentially just a gaming phone with no thought to the cohesiveness around the rest of the device.

I'm impressed by the level of thought that's been put into making the shoulder triggers a valuable part of the user interface

Overall, it’s more of Xiaomi’s MIUI, with some additional features. I’m impressed by the level of thought that’s been put into making the shoulder triggers a valuable part of the user interface, though, rather than making them an afterthought.


Miscellaneous

Security

To unlock your smartphone, the Black Shark 5 Pro supports both face unlock and a capacitive fingerprint sensor that’s inside of the power button. It’s almost certainly a bit of a cost-saving measure that there isn’t one in the display, but it’s no big deal really. It works well.

Audio

I know I already mentioned how good the speakers are, but it’s worth another moment to get across just how good they are. They’re loud — really loud — and are great for gaming. Black Shark did a great job here. I do need to point out the lack of a headphone jack though, as it’s an essential feature in a gaming phone. Bluetooth audio has latency, and it’s noticeable when gaming.

Battery life and charging

We touched on this already in the gaming experience section, but battery life really isn’t good. Bypass charging helps in the gaming area when you need to keep your phone powered, but the battery life you get out of the box isn’t great. Expect to get, maximum, five hours of screen on time, and it’s very likely you’ll get a lot less — especially when gaming. 120W charging is amazing when you need it and can charge this phone from 0% to 100% in 15 minutes, but it’s not always worth having super fast charging and then having terrible battery life. I’d personally rather have slower charging and a longer battery, especially because there are massively diminishing returns between 65W charging and 120W charging.

Bootloader unlocking, kernel sources, and software updates

You can unlock the bootloader of a Black Shark phone using Xiaomi’s MIUI unlock tool. It’s a bit of an involved process, though.

As for kernel sources, Black Shark basically never releases them. If you want to use custom ROMs or anything like that on your smartphone, this probably isn’t the phone to get. Software updates are also a bit hit or miss in that regard.


Should you buy the Black Shark 5 Pro?

The Black Shark 5 Pro offers a lot of good, but there are a lot of reasons to look elsewhere, too. The kernel source and update situation is particularly alarming, as companies are obligated under the GPL to release timely kernel sources. Some companies, such as OnePlus, have published kernel sources late but still typically always get to them at some point. Black Shark, however, just hasn’t released any kernel sources from the Black Shark 2 or newer.

Even aside from that, the phone itself heats up incredibly when gaming, to the point that I worry it can cause harm and injury. Between that, the lack of a headphone jack, and the battery life concerns, there’s just not a lot that Black Shark gets right for a gaming phone. The shoulder triggers are cool and work well, but that’s the only genuinely unique feature about this phone that you can’t really get anything like anywhere else.

As a result, if what you want is a gaming phone, it’s probably worth waiting to see what’s around the corner — particularly anything that may be powered by the Snapdragon 8 Plus Gen 1. There are too many trade-offs here, and for €799, there’s probably much better on offer. I love the speakers, I love the shoulder triggers, but I’m really not a fan of anything else with this phone.

    Black Shark 5 Pro
    The Black Shark 5 Pro is the latest gaming phone from the Xiaomi-backed company, but there are a lot of problems with it that may not necessarily command the price tag.

The post Black Shark 5 Pro Review: Pushing the Snapdragon 8 Gen 1 to its hot limits appeared first on XDA.


from XDA https://ift.tt/QwSscuW
via IFTTT

How to create a Discord bot and add it to your server

Discord has evolved a lot over the years and it now stands as a reliable platform for not only gamers but for anyone looking to connect with their peers over messages, video chat, and more. Many even use it as an alternative to WhatsApp and other popular messaging applications, especially thanks to its great emphasis on groups and communities. Discord has millions of daily active users and a good chunk of those use a bot on a day-to-day basis to automate things. If you use Discord in any capacity then there’s a good chance you’ve used a bot. If you’re wondering how to create one yourself then you’re in the right place. In this article, we’ll tell you how to make a Discord bot:

Navigate this article:

Prerequisites

Creating a Discord bot is a relatively simple task. You do need a little bit of programming knowledge to set things up, but the complexity of the code depends on the kind of bot you’re trying to make. Let’s take a look at a few things you need to get started. First, you need a Discord account, which you probably have. If not, you can create one for free by heading over to the Discord homepage. You can also download the Discord client and use it on your gaming laptop or even a phone.

Once done, you need to set up your own server to use the bot. You can then invite the bot to your server easily by following a few simple steps. Once the bot has arrived on your server, you can then code a function for it and use it in your server or assign it to other servers to which you have admin rights. To assign a bot function, we’ll use Node.js to access the discord.js Node library. You can download the latest version of Node.js from the official website.

Additionally, we’ll also need a code editor to write and modify the bot functions. We’ll be using Visual Studio Code in this tutorial, although you’re free to use whichever you like.


How to create and add a Discord bot to your server

The first step is to create an application on Discord for your bot to work. The idea here is to generate a token for your bot so that Discord recognizes the code. For this, you’ll need to head over to Discord’s applications page. You’ll be sent directly to the page once you log in with your Discord account where you’ll see a list of your apps. Don’t worry if the list is empty because we’ll be creating one now.

  • Hit the New Application button to get started.
    discord bot apps page
  • Now, give a name to your application and hit Create.
    name your discord bot page
  • It’ll now take you to a page in which you can enter details such as your app’s description, add tags, an app icon, and more. Once done, hit the Save Changes button to proceed.
  • Now, look for the Bot option in the menu list on the left sidebar. Tap on it to open the Bots page and press the Add Bot button. Allow permission to create the bot when prompted.
    Add bot to your server page
  • You’ll now see a security token for your bot on the next page. If the token hasn’t been generated, simply tap on the Reset button to create a new token. Copy this token ID as we’ll need it in the following sections.
  • This particular token allows you to control the bot, meaning you shouldn’t share this with anyone. If you think this token has been compromised, then simply come back to this page and hit the reset button to create a new one.
    Bot token in discord
  • Now, look for the OAuth2 option in the menu on the left sidebar and click on it to find your CLIENT ID. It’s a long string of numbers that you need to copy and paste to this URL below — replace the word CLIENTID with the actual CLIENT ID that you just copied –
    https://discordapp.com/oauth2/authorize?&client_id=CLIENTID&scope=bot&permissions=8
  • Simply paste this particular URL into your web browser and hit enter. It’ll open a page in which you can tell Discord where to send your bot. Select the server to which you want to add your new bot from the dropdown menu like so –
    Invite discord bot your server
  • Click on Continue and confirm whether or not you want to grant Admin rights of the server to your bot. You can grant or revoke the admin rights later too, so don’t sweat over this option.
  • Once you add the bot to your server, you’ll see a message confirming the arrival of the bot. That’s how you’ll know it worked. You’ll also see the bot in the members’ column on the right side.
    Test bot added to server

Well, that’s it, you’ve now created a Discord bot for your server. If you followed all the steps carefully, you should be able to see the bot on your server. The bot will stay offline until you define a function for it with a code, and sync it with the Discord platform. This is where the real work begins as you’ll set up a few parameters and tell your bot what you want it to do.

How to assign bot function and host a Discord bot

Now, follow the steps below to create and host a discord bot on your PC:

For this tutorial, we’ll be creating a simple ‘Ping-Pong’ Discord bot which, as the name suggests, will reply with ‘Pong’ every time you type ‘Ping’.

  • Create a new folder anywhere on your PC or Mac. We created a ‘New Folder’ on the Desktop in our Windows PC for this tutorial.
  • Now, open Visual Studio Code and create a new file with the code mentioned below. Replace “Paste your bot’s token here without quotes” with the bot’s token you copied earlier.

    DISCORD_TOKEN= “Paste your bot’s token here without quotes.”


    Visual studio code for .env discord bot with token
  • Next, create a new file and add the following code. Once done, save this particular file as bot.js within the same folder. This code will add the function to your Discord bot. It’ll reply with “pong” every time you type “ping”.

    require(‘dotenv’).config();
    const Discord = require(“discord.js”);
    const client = new Discord.Client({intents: [“GUILDS”, “GUILD_MESSAGES”]});
    client.on(“ready”, () => {
    console.log(`Logged in as ${client.user.tag}!`) })
    client.on(“message”, msg => {
    if (msg.content === “ping”) {
    msg.reply(“pong”);
    }
    })
    client.login(process.env.DISCORD_TOKEN);


    Visual studio code for bot function
  • Now, open the terminal window from the New Folder that you created and install the Discord.js library using the following command. You’ll need Node.js installed on your system for this to work, so keep that in mind.

    npm install –save discord.js dotenv


    Windows powershell with discord.js code for bot
  • The next step is to create a package.json file. Use the following command to create it:

    npm init -y


    create a package json file
  • Lastly, you can now use the “node bot.js” command to run the bot.
    command to run the discord bot

As soon as you run the node bot.js command, you’ll notice that the Discord bot in your server will be online. You can then test the bot by typing ‘ping’ to which it will respond ‘pong’.

Discord bot now live

You can also create a Discord and host it in the cloud for others to use. For that, you’ll have to use an online IDE such as Replit to host your code.

The complexity of the coding process depends on the function you want to assign to your bot. The coding process for a simple ‘Greeting Bot’, for instance, isn’t going to be as complicated as, say, a ‘Music Bot’ that can play music from your preferred platform. You can also create a bot to moderate your server and even kick members that repeatedly break rules in your server. There are tons of useful Discord bots out there, so the possibilities are endless, really. Top.gg is a good place to look for Discord bots if you don’t want to go through the hassle of coding. Just pick up a bot from the website and make changes as necessary to modify the bot according to your needs. There are plenty of options to choose from so be sure to use the search bar on the top to find what you’re looking for.


Well, that brings us to the end of this particular tutorial. There are a ton of useful Discord bots out there right now, so we highly recommend doing a Google search to see if somebody’s already created a bot to automate your process. And before you leave, we also suggest you join XDA’s Discord server in which you’ll find like-minded individuals and also stay up-to-date with all things XDA. So which Discord bot are you going to create first? Let us know by dropping a line in the comments below.

The post How to create a Discord bot and add it to your server appeared first on XDA.


from XDA https://ift.tt/gCEvQsN
via IFTTT

vendredi 1 juillet 2022

Nvidia Shield Experience 9.1 brings Auto Low Latency Mode, Night Listening Mode, and more!

Nvidia is rolling out a fresh software update for all Shield TV devices. The latest release is based on Shield Experience 9.0, and it introduces a host of new features and bug fixes, including a new Auto Low Latency Mode, a Night Listening Mode, AI upscaling support for 60Hz HDR10 video, and more.

Nvidia Shield Experience 9.1 started rolling out to all Shield and Shield Pro devices earlier this week, and it includes the following changes:

  • Enhancements:
    • Adds support to automatically enable game mode on supported TVs (ALLM)
    • Adds night listening mode (HDMI audio only)
    • Adds option specify network workgroup when connecting to SHIELD over local network
    • Adds option to create your own password when connecting to SHIELD over local network
    • [SHIELD Pro 2019] Adds AI upscaling support for 60Hz HDR10 video
    • [SHIELD Remote 2019] Adds option to only wake SHIELD with power button or NETFLIX button
    • [Game Controllers] Adds option to only wake SHIELD with logo button
    • Adds option to match uncompressed audio with Dolby reference volume levels
    • Adds option to disable displaying HDR/Dolby Vision content
    • Adds notification when app uses microphone
  • Bug fixes:
    • Display
      • Fixes bug where Dolby Vision mode would become re-enabled after reboot
    • Network
      • Resolves issue where link speed was not reported when connecting ethernet cable
      • Resolves issue where “Restart Wi-fi” in Quick Settings was not working properly
    • Audio
      • Resolve audio pops heard after hotplug of USB audio devices
      • Fixes bug where some apps would only play through headphones after “Match content audio resolution” is enabled
      • Resolves issue where HDMI fixed volume required disable-enable cycle to work properly
      • Fixes bug where stereo upmix would not become enabled after playing multichannel discrete audio
      • [SHIELD 2019] Disables comfort noise feature when Dolby Audio Processing is enabled
    • Storage
      • Improves file transfer speeds to attached storage
      • Resolves issues where NAS would not reconnect after SHIELD restart
    • Accessories
      • Fixes bug where SHIELD Controller 2017 or SHIELD Remote 2015 would not auto pair after taking upgrade
    • Shield TV app
      • Fixes bug where SHIELD TV app would not send keyboard entries while streaming GeForce NOW
      • Resolves SHIELD TV app issue where user could not copy/paste text (passwords, URL, etc)
    • Other
      • Resolves issue connecting to GeForce NOW servers while NVIDIA Share is active
      • Improves stream to twitch duration indefinitely
      • Resolves issue where system would become unresponsive after enabling Dolby Audio Processing from quick menu
      • Resolves issue where SHIELD would wake up unexpectedly
      • Improved HDMI-CEC compatibility with other HDMI connected devices
      • Resolves issue where app switcher (double tap home) would not show most recent screenshot properly
      • Resolves adb connection issue where host PC would need to be re-authorized after 7 days
      • Fixes bug where D-pad “up” and “down” would not function after upgrade

While some users report that the latest Shield Experience update fixes several annoying issues, others say that it completely bricks their devices. Therefore, we advise users to head over to Nvidia’s announcement thread (linked below) and check user reports for their respective devices before installing the update.


Source: Nvidia forums

The post Nvidia Shield Experience 9.1 brings Auto Low Latency Mode, Night Listening Mode, and more! appeared first on XDA.


from XDA https://ift.tt/elCW0nN
via IFTTT

The OnePlus Nord 2T will go on sale in India starting July 5

After launching the OnePlus Nord 2T in Europe earlier this year in May, OnePlus has now launched the device in India. The latest addition to OnePlus’ affordable Nord lineup packs MediaTek’s Dimensity 1300 chip, a 50MP triple camera setup, a 4,500mAh battery, and 80W wired fast charging support. If you’re in the market for a new mid-range smartphone, here’s everything you need to know about the OnePlus Nord 2T.

OnePlus Nord 2T Review: Nailing the fundamentals, the same as it did before

OnePlus Nord 2T: Specifications

Specification OnePlus Nord 2T
Dimensions & Weight
  • 159.1 x 73.2 x 8.2mm
  • 190g
Display
  • 6.43-inch FHD+ AMOLED
  • 90Hz refresh rate
  • HDR10+ certified
  • Gorilla Glass 5
SoC MediaTek Dimensity 1300
RAM & Storage
  • 8GB/12GB LPDDR4X RAM
  • 128GB/256GB UFS 3.1 storage
Battery & Charging
  • 4,500mAh
  • 80W wired fast charging support
Security In-display fingerprint sensor
Rear Camera(s)
  • Primary: 50MP IMX766, OIS
  • Ultra-wide: 8MP, 120° FoV
  • Mono: 2MP
Front Camera(s) 32MP IMX615, EIS
Port(s) USB Type-C
Audio Dual stereo speakers
Connectivity
  • 5G
  • 4G LTE
  • Wi-Fi 6
  • Bluetooth 5.2
  • NFC
Software OxygenOS 12.1 based on Android 12
Colors
  • Gray Shadow
  • Jade Fog

In case you missed our previous coverage, the OnePlus Nord 2T is a minor upgrade over the Nord 2 from last year. The device features an updated design with a rectangular camera island on the back, which houses three camera sensors. These include a 50MP Sony IMX766 primary camera with OIS, an 8MP ultra-wide camera, and a 2MP macro sensor. Over on the front, the device has a 6.43-inch FHD+ 90Hz AMOLED display with a left-aligned hole-punch cutout for the 32MP selfie shooter.

The Dimensity 1300 on the OnePlus Nord 2T is paired with up to 12GB LPDDR4X RAM, up to 256GB UFS 3.1 storage, and a 4,500mAh battery with 80W wired fast charging support. Other noteworthy features include HDR10+ certification, an in-display fingerprint sensor, and a USB Type-C port.

Green OnePlus Nord 2T on white background. Gray OnePlus Nord 2T on white background.

The OnePlus Nord 2T runs OxygenOS 12.1 based on Android 12 out of the box and OnePlus is promising two major Android upgrades and three years of security updates for the device.

Pricing & Availability

The OnePlus Nord 2T will be available in two color variants, Gray Shadow and Jade Fog, starting July 5. The device will be available through OnePlus’s website, Amazon.in, the OnePlus Store app, OnePlus Experience stores, and other major offline retailers in the region. The base 8GB+128GB variant of the device will set you back ₹28,999 (~$367), while the premium 12GB+256GB model will cost ₹33,999 (~$430). Those who purchase the device before July 11 using an ICICI bank credit or debit card will receive an instant bank discount of ₹1,500.

    OnePlus Nord 2T
    The OnePlus Nord 2T features MediaTek's Dimensity 1300 chipset and a 4,500mAh battery with 80W fast charging support.

Along with the OnePlus Nord 2T, OnePlus has also launched a new Blue Agate color variant of the OnePlus Nord Buds and the OnePlus Bullets Wireless Z2 in India.

Thinking of buying the OnePlus Nord 2T? Check out our review of the device (linked above) before making your purchase.

The post The OnePlus Nord 2T will go on sale in India starting July 5 appeared first on XDA.


from XDA https://ift.tt/WCwrkSe
via IFTTT

OneDrive’s Photo Story feature is now available in public preview

In February this year, we spotted evidence pointing towards a new Photo Story feature in a teardown of Microsoft OneDrive v6.49 Beta 1 for Android. Initially, the strings only revealed the feature’s name. However, a subsequent beta release (v6.50 Beta 3) included more strings highlighting its functionality. Microsoft has now officially announced the feature, and here’s everything you need to know about it.

In a recent post on the OneDrive blog, Microsoft reveals that Photo Story in OneDrive is “a new, interactive feature that securely connects your favorite memories to the people who matter the most.” Essentially, the feature lets OneDrive users create a private, invitation-only feed where they can share images with family and friends. It offers support for comments, reactions, and notifications.

Currently, the feature is available in beta in Australia on the OneDrive mobile app for Android and iOS, along with OneDrive for web. Microsoft plans to roll it out to users in the U.S. and other regions later this year. If you wish to try it out, you can download the OneDrive mobile app on your smartphone and sign up for a personal OneDrive account. Once you’re in, you can select the Shared tab to create your first photo story. You can then invite friends and family to view your photo story feed, and they will be able to leave comments and reactions on the images you share.

The Photo Story feature is available for OneDrive Basic 5GB (free), OneDrive Standalone 100GB, Microsoft 365 Personal, and Microsoft 365 family accounts. It is not available for OneDrive work or school accounts.

What do you think of OneDrive’s new Photo Story feature? Do you think it’s a handy addition, or would you much rather have Microsoft focus on other, more useful features for its cloud storage service? Let us know in the comments section below.

The post OneDrive’s Photo Story feature is now available in public preview appeared first on XDA.


from XDA https://ift.tt/BGLTuok
via IFTTT