LightBlog

dimanche 26 juin 2022

What is Shizuku, and what can you do with it on your Android device?

The Android Debug Bridge, or ADB for short, is a handy development tool to interface with your phone for debugging and testing. Through ADB, developers and power users can access Android’s built-in Linux command line shell with greater privileges than user-installed apps. Notably, the ADB shell privilege is not equal to superuser access, hence you might still need to root your device to take complete control of the OS. However, depending on your modding requirements, the shell access is sufficient to grant or deny permissions, change system settings values, and do much more. This is where the Shizuku app comes into play.

Navigate this article:


What is Shizuku?

Shizuku is a nifty solution to tackle a rather complex scenario in the Android modding world: Allowing third-party apps to access system-level Application Programming Interfaces (APIs). The idea is to run a dedicated process with shell-level permissions, which acts as a proxy between the system server and the apps. Instead of relying on running commands in the su shell, developers can then utilize the Shizuku server component to perform elevated operations.

In a nutshell, if an app needs special permissions that can only be granted through ADB (or with root), you can just use Shizuku to grant them right from your Android device.

The Shizuku project is open-source, and it has been maintained by Rikka (aka RikkaW), Haruue, and several other developers.


What are the features of Shizuku?

  • Minimal performance overhead.
  • Extremely fast execution (powered by Android’s inter-process communication mechanism called “binder”).
  • Apps can use the Android system APIs with negligible code additions.
  • On Android 11 and above, you can set up and launch Shizuku directly on your device.

How to download Shizuku?

As mentioned earlier, the Shizuku project is open-source, hence you can take a look at the codebase or compile it yourself after grabbing the sources from its official GitHub repository.

In case you are looking for the pre-compiled version of Shizuku, you can grab it directly from the Google Play Store. The developers also host several mirrors to make it easier to download the official APK release.

Shizuku (Free, Google Play) →


How can I install and configure Shizuku?

The Google Play version of Shizuku is installed by Android’s own package manager and it will continue to be updated by the Play Store. If you want to opt for the APK release from GitHub, then you need to manually sideload the package on your Android device.

Although you can use Shizuku in a non-root environment, having root access drastically simplifies the process of setting up the Shizuku’s service. Follow along with the guide below to learn how to configure Shizuku with your choice of method.

With root access

Before installing Shizuku with root access, make sure you have the latest version of Magisk installed on the target device.

  1. Locate the Shizuku icon and tap on it to open the app.
  2. On the main screen, go to the section called Start (for rooted devices).
    Shizuku start for rooted devices
  3. Tap the Start button to initiate the process.
  4. Press Grant to give the root permissions when requested.
  5. If everything goes right, the Shizuku service will start within a few seconds on a new screen, then automatically close when it’s finished.
  6. Scroll to the top and verify the running status of Shizuku. It should display a version number followed by “root.”

Shizuku running root

By default, the Shizuku service doesn’t automatically start itself after a reboot. To change the behavior, tap the Settings icon in the upper right corner, then locate the Start on boot (root) option. Once enabled, the Shizuku service will execute without any user intervention after you reboot your device.

Shizuku start on boot root

It is worth mentioning that the developers of the Shizuku project are working on an advanced front-end called Sui. It’ll eventually replace the current Shizuku app. To give it a try, download the latest release from its GitHub repo. Since Sui is designed as a Magisk module, you still need Magisk to run the app.

Download Sui

Unlike regular companion apps, Sui doesn’t offer a typical app icon to start with. To access its interface, do one of the following:

  • (Android 8.0+, Sui 12.1+) Long press system settings from the home app, you will find the shortcut of Sui.
  • (Android 8.0+, Sui 12+) Enter “Developer options” in system settings, the system will ask you to add the shortcut of Sui.
  • Enter *#*#784784#*#* in the default dialer app.

Sui main screen

While Sui has its own potential, the project isn’t feature-complete just yet. Until the migration from Shizuku’s current app to Sui is officially greenlit, it is advised to use the main Shizuku app to configure different aspects of Shizuku.

Without root access

Starting with Android 11, Google added the wireless debugging feature to Android’s developer options. It can be used to configure Shizuku’s service on the target device without root access.

  1. Locate the Shizuku icon and tap on it to open the app.
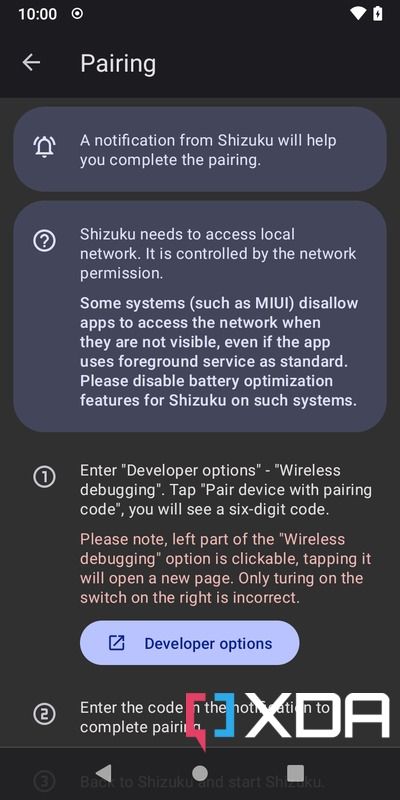
  2. On the main screen, go to the section called Start via Wireless debugging.
    Shizuku start via wireless debugging
  3. Tap the Pairing button, then press Developer options. Next, scroll down until you find the Wireless debugging option. Turn it on.
    Shizuku wireless debugging screen Developer options Wireless debugging toggle
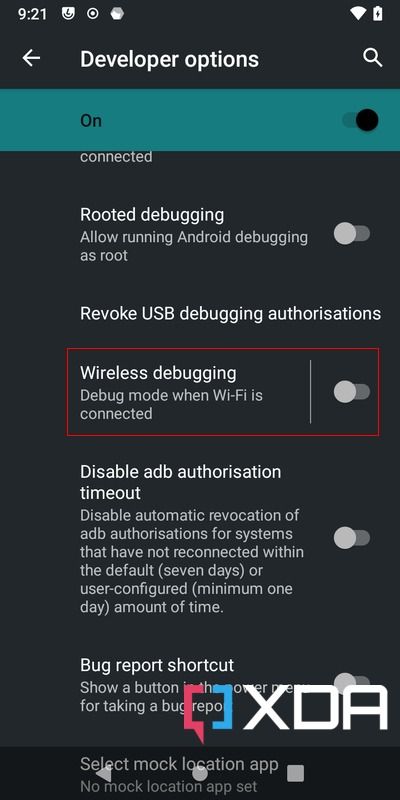
  4. Check the Always allow on this network box, then press Allow to enable the feature.
    Allow wireless debugging on this network
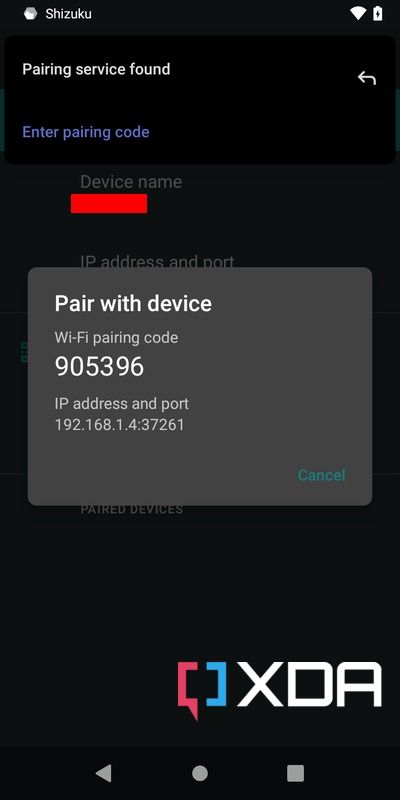
  5. Tap on the Wireless debugging menu. Next, select the option named Pair device with pairing code.
    Wireless debugging pair device with pairing code
  6. Now, put the unique 6 digit Wi-Fi pairing code into the Shizuku Pairing code notification textbox.
    • You can also swipe down on your status bar to the Shizuku notification, then tap Enter pairing code, and press the Send button on the right to confirm.
      Wireless debugging pairing code Shizuku pairing code
  7. At this stage, you should see a Pairing successful message if the pairing code was correct.
    Shizuku pairing successful
  8. Return to the Shizuku app main screen.
    • You might have to swipe away the Pairing successful notification before you can do that.
  9. Locate the Start via Wireless debugging section and tap the Start button to enable the service.
  10. The Shizuku service will now automatically start on a new screen, then automatically close when it’s finished.
    Shizuku wireless debugging started
  11. Scroll back to the top and verify the running status of Shizuku. It should display a version number followed by “adb.”

Shizuku running ADB

Keep in mind that you need to enable the “Wireless debugging” option again and restart Shizuku after restarting the target device.

It is also possible to invoke the Shizuku service via wired ADB access. This is particularly useful for older Android revisions, or some OEM Android skins where wireless debugging isn’t easily accessible. However, you need a PC/Mac with ADB installed as well as the OEM Android driver installed as prerequisites.

  1. Before proceeding, make sure the target device is discoverable by the ADB process on your PC/Mac.
    • Type adb devices in the terminal window, then press Enter. You should see a unique device identifier number under List of devices attached, letting you know it is connected and recognized by the ADB interface.
  2. Open the Shizuku app at least once on your phone.
  3. Execute the following command on your PC/Mac’s terminal window:
    adb shell sh /sdcard/Android/data/moe.shizuku.privileged.api/start.sh

    Shizuku wired adb start

  4. If successful, you should see an exit with 0 status on the terminal window within a few seconds.
  5. On your phone, open the Shizuku app. Then scroll back to the top and verify the running status of Shizuku. It should display a version number followed by “adb.”

Provided you follow through with all of that, you should now have a working Shizuku instance on your Android device.


How to use Shizuku?

If you’re familiar with Magisk, then Shizuku is quite similar. But instead of managing root access, it manages shell access. As a result, if you have a working Shizuku instance and then try to open an app that utilizes Shizuku to perform elevated operations, you should see a prompt to allow access. As soon as you allow it, Shizuku will seamlessly take care of the API access requirements.

Shizuku access Swift backup

It is also possible to use Shizuku in conjunction with on-device terminal emulator apps. This portion is beyond the scope of this tutorial, but you can explore this feature by tapping the “Use Shizuku in terminal apps” option on the main menu of the app.

For the Android app development community, you can easily leverage the power of Shizuku. To do so, take a look at our explainer and check out the Shizuku API repo.

Shizuku Official Website


Conclusion

Rooting your Android device opens it up to a world of customizations, but it’s not always a feasible option. Unfortunately, as time goes on, and Google improves its tamper detection methods, there’s less and less space left to tinker about. The Shizuku app somewhat fills the void, which is great for the Android modding scene. Hopefully, we will see a plethora of apps and mods with native support for the Shizuku service in the near future.

The post What is Shizuku, and what can you do with it on your Android device? appeared first on XDA.


from XDA https://ift.tt/lM2Oc4W
via IFTTT

samedi 25 juin 2022

Dell XPS 15 (2022) review: The right mix of power and portability

Dell’s XPS 15 has been one of the best laptops for creators for years, and the 2022 model is no different. It blends a four and a third pound chassis with the performance of Intel’s 12th-gen 45W processors and Nvidia’s GeForce RTX 3050 Ti graphics, all while delighting the user with a 3.5K OLED display and a powerful quad-speaker setup.

It’s not perfect. Dell continues to prioritize narrow bezels over a quality webcam, and that’s an issue in the age of working from home. Plus, the cost of parts is going up, and we’re seeing the price of devices keep up with that.

This year’s model is just a spec bump, with a faster CPU and faster memory, but certain things still caught me by surprise. Battery life was really good, something I never expect from a laptop with a 45W CPU and RTX graphics. Ultimately, it’s just a delightful laptop that I’m happy to recommend.

    Dell XPS 15 9520
    Dell's XPS 15 blends power and portability with RTX graphics, 12th-gen Intel processors, and coming in a sub-five-pound package.

      Features:

      Pros:

      Cons:

Navigate this review:

Dell XPS 15 (2022) price and availability

  • The Dell XPS 15 9520 starts at $1,449 and is available now
  • It’s available in either Platinum Silver or Frost colors

Announced this spring, the Dell XPS 15 9520 is available for purchase now, and it starts at $1,449. That base model will include a Core i5-12500H, 8GB DDR5 memory, a 256GB SSD, and an FHD+ display. It won’t include dedicated graphics.

As usual, there are lots of options. You can get it with up to 64GB RAM and a 2TB SSD, and the display has two different 4K options (technically the OLED one is considered 3.5K), one of which is OLED and the other of which isn’t. The CPU goes up to a Core i9-12900HK, and the graphics card goes up to an Nvidia GeForce RTX 3050 Ti.

There are two colors. One is Platinum Silver, packing a black carbon fiber keyboard deck. It’s the classic XPS look. The other is Frost with a white woven glass fiber keyboard deck.

Dell XPS 15 (2022) specs

CPU 12th Generation Intel Core i7-12700H (24MB Cache, up to 4.7 GHz, 14 cores)
GPU NVIDIA GeForce RTX 3050 Ti 4GB GDDR6 (40W)
Display 15.6-inch 3.5K (3456 x 2160) InfinityEdge OLED touch display, DisplayHDR 500, 400-nit, 100% DCI-P3 color gamut, 100,000:1 contrast ratio, 176° wide viewing angle +/- 88° / 88° / 88° / 88°, up to 0.65% anti-reflective, anti-smudge
Body 344.72×230.14x18mm (13.57×9.06×0.71in), 1.96kg (4.31lbs)
Ports 2x Thunderbolt 4 (USB Type-C) with DisplayPort and Power Delivery
1x USB 3.2 Gen 2 Type-C (DisplayPort / Power Delivery)
1x Full-size SD card reader v6.0
1x 3.5mm headphone/microphone combo jack
Wedge-shaped lock slot
1x USB-C to USB-A v3.0 & HDMI v2.0 adapter ships standard
Storage 512GB PCIe 4 x4 SSD
Memory 16GB (2x8GB) DDR5 Dual Channel at 4800MHz
Battery 86Whr battery (built-in), 130W AC adapter (USB Type-C)
Audio Studio quality tuning with Waves MaxxAudio Pro and Waves Nx 3D audio
Quad-speaker design with 2.5W x2 woofers and 1.5W x2 tweeters = 8W total peak output
3.5mm headphone/microphone combo jack featuring Waves Nx 3D audio with head tracking
Dual microphone array optimized with Waves MaxxVoice supporting VoIP
Microsoft Cortana capable
Inputs Touch Display (optional)
2 Digital Array Microphones
Full size, backlit chiclet keyboard; 1.3mm travel
Glass surface Precision Touchpad
Windows Hello fingerprint reader in power button & HD (720p) Windows Hello camera in upper bezel
Ambient Light Sensor for display backlight control
Material CNC machined aluminum in platinum silver with carbon fiber composite palm rest in black
OS Windows 11 Home
Price $2,253

These are the specs of the unit that Dell sent me for review. As mentioned above, the base model starts at $1,449.

Design: There are no design changes

  • It has the familiar Dell XPS design, with a black keyboard and silver exterior
  • There are three USB ports, and it also includes an SD card slot

To be clear, the only things that have changed gen-over-gen are internal. If you knew what the Dell XPS 15 9500 and 9510 models looked like, you can safely skip this section.

Top down view of Dell XPS 15

The model that Dell sent me comes in Platinum Silver with a black carbon fiber palm rest. This is what I consider to be classic XPS. Back when there was only one colorway for the entire lineup, this was it. Since then, it’s expanded. The second one was Frost with a white woven glass fiber palm rest, and I have to say, that one is pretty sweet. That second option debuted with the XPS 13 and XPS 13 2-in-1, but it more recently came to the XPS 15. The XPS 17 only has the XPS classic look.

The middle is stamped with a shiny Dell logo, and that’s the flashiest part of the exterior. The sides are silver, a design that actually debuted with the XPS 15 9500 a couple of years ago; prior to that, the sides matched the black keyboard deck.

Side view of Dell XPS 15

It has all of the ports that you need, as long as they’re USB Type-C. There are actually three USB Type-C ports, two of which are Thunderbolt 4. Thunderbolt is the most versatile port there is, supporting 40Gbps transfer speeds and fully supporting USB4. The USB Type-C port on the other side, however, is USB 3.2 Gen 2, so you get 10Gbps transfer speed. You can charge the laptop with any of the three, and it’s actually nice to have a powerful machine like this that uses USB Type-C for charging. It’s somewhat rare since, for a time, Power Delivery only supported up to 100W.

Side view of Dell XPS 15

Also on the right side is a 3.5mm audio jack and a full-size SD card slot. If you’re a photographer, then you already know how important this is, and you probably already know that a full-size SD card slot is somewhat rare in laptops. But ultimately, this is a creator machine, so it has one.

The design of the Dell XPS 15 9520 is tried and true, and if you like it, you might want to jump on it. The Dell XPS 13 and XPS 13 2-in-1 both got redesigned this year, which means that the larger models likely aren’t far behind.

Display: The OLED is as sweet as always

  • The screen is 15.6 inches diagonally with a 16:10 aspect ratio
  • It comes in FHD+, OLED 3.5K, and non-OLED 4K

As you’d expect from something with “15” in the name, it has a 15.6-inch display, which has been 16:10 since the XPS 15 9500 came out. There are three options: 1,920×1,200, 3,456×2,160 OLED, and 3,840×2,400 IPS LCD. Dell sent me the OLED model, which is obviously my favorite.

Close up of Dell XPS 15 display

There’s something to remember about Dell’s OLED displays though, which is that you don’t really need them. Their non-OLED screens are so good that you won’t even see much of a difference. With OLED, you get true blacks because pixels are only lit up when they’re being used, and because there’s no backlight, those colors tend to also be more vibrant. However, you can also have a really great IPS LCD screen that could pass as OLED, and that’s what Dell offers.

Dell XPS 15 display test

The OLED screen on the model that Dell sent me obviously scored well on my display tests, supporting 100% sRGB, 94% NTSC, 96% Adobe RGB, and 100% P3. These are the best scores that you’ll find. But again, the other configurations are going to reach in the 90s as well.

Dell XPS 15 display test

Brightness maxed out at 405.7 nits, slightly exceeding the promised 400. As you can see, black doesn’t go up as brightness increases, a benefit of OLED.

The point that I’m trying to get across is that Dell puts really great displays on its XPS laptops. OLED is fantastic as always, and FHD+ is for if you really need the extra battery life.

Close up of Dell XPS 15 webcam

As always, Dell is committed to having the narrowest bezels around for the most immersive experience. Indeed, it has prioritized that above all else, even chopping down the chin a couple of years ago when it moved from a 16:9 display to 16:10. Unfortunately, that also means that there’s still a 720p webcam when the rest of the market is moving toward higher-quality 1080p webcams thanks to the boom in working from home.

Keyboard: It has a massive touchpad

  • Dell uses one of the largest touchpads on any 15-inch Windows laptop
  • The fingerprint sensor still requires you to wait for the PC to boot

As mentioned above, the palm rest is black carbon fiber, and the keyboard is a matching black, using Chiclet-style keys. The keyboard is both comfortable and accurate, although it does leave something to be desired over say, a ThinkPad X1 Extreme, given that ThinkPads are renowned for having the best keyboards. One thing I will say is that while it’s not quite as quiet, I do like the force curve a bit more. To me, Lenovo’s ThinkPads have too long of a key-depth, and they sometimes don’t feel modern.

Top down view of Dell XPS 15 keyboard

One thing I absolutely love is the big old touchpad that Dell chose to include. It’s about as big as it gets in a 15-inch laptop, and the only other OEM I see trying to make large touchpads is Apple. It’s great to see on the Windows side. I will say that the big touchpad can feel a bit wobbly at times, and I think a haptic touchpad in its place would be a nice change. Perhaps we’ll see that in a future iteration. In the meantime, I’ll absolutely take this big touchpad as a win.

Speaker on the Dell XPS 15

The keyboard is flanked by the speakers, and Dell actually has four, two of which are underneath the laptop. It has a total of two 2.5W woofers and two 1.5W tweeters, making for an excellent audio experience. They’re tuned with Waves MaxxAudio Pro and Waves Nx 3D, and combined with the beautiful OLED display, this is a great machine for media consumption.

The Dell XPS 15 is the perfect creator PC

Dell used to talk about that a lot more, putting the high-quality display, high-quality sound, and more under an umbrella called Dell Cinema. The branding might not be there anymore, but the quality still is.

Performance: Intel 12th-gen and RTX graphics are a winning combo

  • The Dell XPS 15 9520 comes with Intel 12th-gen H-series processors, and either integrated graphics, an Nvidia GeForce RTX 3050, or an RTX 3050 Ti
  • Along with 12th-gen CPUs, the other upgrade includes DDR5 memory

As I mentioned earlier, all of the upgrades on this machine are internal. It now comes with Intel’s 45W 12th-gen processors, which in turn enable it to have DDR5 memory. It’s also offered with either integrated graphics, an RTX 3050, or an RTX 3050 Ti, and those options existed for its predecessor. The configuration that Dell sent me includes an Intel Core i7-12700H, an Nvidia GeForce RTX 3050 Ti, 16GB DDR5, and a 512GB SSD.

Front view of the Dell XPS 15

Personally, I think the Dell XPS 15 is the perfect machine for creators. It’s got the best display, and it’s got just the right internals. But it actually doesn’t have to be. If you want something that’s just a bigger laptop and you don’t need the power, you can get it with integrated graphics. But specced out as it is in this model, I love it.

The Dell XPS 15 is what its predecessors have always been: the best at what they're meant to do

In the battery testing that I’ll talk about in a bit, I used it for work. That’s my usual writing articles in the web browser, and then using apps like Slack, OneNote, and so on. But a lot of what I used it for included apps like Adobe Lightroom Classic and Photoshop, and that was on battery life with the power slider set to best power efficiency. The best way I can put it is that I didn’t have to crank up the dial at any point to get the performance that I needed.

Intel’s new 12th-gen CPUs have a hybrid architecture, with big cores and little cores. The big cores, or P-cores, handle tasks that need a boost in performance. For things that don’t, there are the E-cores.

Ultimately, the Dell XPS 15 9520 is what it has always been. It’s quite possible the best laptop. It’s a perfect blend of power and portability.

For benchmarks, I used PCMark 10, 3DMark, VRMark, Cinebench, Geekbench, and CrossMark. As you can see, I just keep adding more benchmarks.

Dell XPS 15 9520
Core i7-12700H, RTX 3050 Ti
Dell XPS 17 9720
Core i7-12700H, RTX 3060
Lenovo Legion 5 Pro
Ryzen 7 5800H, RTX 3070
PCMark 10 6,640 6,280 6,800
3DMark: Time Spy 4,535 6,250 9,963
3DMark: Time Spy Extreme 2,250 2,967
VRMark: Orange 4,745 8,689 12,249
VRMark: Cyan 2,753 2,752 9,093
VRMark: Blue 1,325 1,902 3,027
Cinebench R23 1,797 / 11,695 1,767 / 11,714 1,423 / 11,729
Geekbench 5 1,774 / 11,580 1,753 / 12,992 1,475 / 7,377
CrossMark overall 1,855 1,871
CrossMark productivity 1,735 1,702
CrossMark creatvity 2,053 2,157
CrossMark response time 1,671 1,624

Included in the comparison is the newest Dell XPS 17, which is meant to be a bit more powerful with its RTX 3060 graphics. I’ll have a review on that soon, although to be honest, don’t expect it to look a whole lot different from this one. It’s obviously a similar product that’s a bit bigger and a bit more powerful.

The model that Dell sent me comes with an 86WHr battery, which is the larger of the two options. Interestingly, battery life is pretty great. My lowest was four hours and 55 minutes and my best was six hours and six minutes, with an average of around five and a half hours. Again, I did leave the power slider on best power efficiency, something that I don’t always do. But performance was so good that I didn’t need to touch it. Indeed, it was quite impressive.

Should you buy the Dell XPS 15 (2022)?

The Dell XPS 15 9520 is the best at what it’s meant to do, but you should be aware of if your use case fits that.

You should buy the Dell XPS 15 (2022) if:

  • You want the best creator machine with a 15-inch display
  • You want the best experience when streaming movies and TV shows

You should not buy the Dell XPS 15 (2022) if:

  • You’re looking for a productivity machine (check out the XPS 13 instead)
  • You’re looking for a quality webcam

I think the biggest reason not to get the Dell XPS 15 is if you want a productivity machine. That’s what U-series processors and integrated graphics are for, and something like a Dell XPS 13 would actually serve you much better than an XPS 15 would. Of course, there’s also the issue of the webcam, which is something to be aware of.

    Dell XPS 15 9520
    Dell's XPS 15 blends power and portability with RTX graphics, 12th-gen Intel processors, and coming in a sub-five-pound package.

The post Dell XPS 15 (2022) review: The right mix of power and portability appeared first on XDA.


from XDA https://ift.tt/tIakT7z
via IFTTT

Razer Kishi v2 Review: An easy recommendation for cloud gaming and emulation on your phone

Gaming on smartphones is hard, and there’s not a whole lot that you can really do about it either. Most smartphones have evolved to become computing powerhouses, but finicky touch controls make it so that your phone may not necessarily be the most comfortable to play games on. There are controllers you can get for phones though that make it a bit easier, and Razer’s Kishi v2 aims to make cloud gaming and emulation an effortless experience.

XDA Recommended Award Badge
I’ve been using the Razer Kishi v2 for gaming on my smartphone for the past two weeks now, and it’s night and day between touch controls and using the actual controller. It’s comfortable to use for long periods of time, and it fits all of the phones I’ve tested it in just fine. I’ve given it a shot in the Google Pixel 6 Pro, the Samsung Galaxy S22 Ultra, and the ZTE Axon 40 Ultra and have been able to play for an extended period of time without any problems. It should fit pretty much any of the best Android phones.

The Razer Kishi v2 connects via the USB-C port, and it’s aimed at being a universal plug-and-play option for any Android smartphone with a USB-C port. There are pre-installed bumpers that aim to hold your phone securely in place, but you can remove them or swap them out for thinner ones if you need to. It’s a pretty great controller all things considered, though there are some caveats. If you emulate a lot of games or want to play the likes of Google Stadia, though, then this might just be your next controller.

    Razer Kishi v2
    The Razer Kishi v2 is the follow-up to the company's already-great universal controller. There are a few improvements across the board, and it makes for an excellent cloud gaming or emulation controller.

      Features:

      Pros:

      Cons:

Navigate this review:


Razer Kishi V2: Specifications

Specification Razer Kishi V2
Dimensions & Weight
  • 220 x 117 x 47mm
  • 284g
Inputs
  • Two analog thumbsticks with clickable buttons (L3/R3)
  • One mechanical D-pad
  • ABXY face buttons
  • Two triggers (L2/R2)
  • Two bumpers (L1/R1)
  • Two programmable multifunction buttons (M1/M2)
  • Menu and Options buttons (labeled Start and Select in some games)
  • Share button (requires Razer Nexus)
Ports
  • USB-C plug for phone connection
  • USB-C port for passthrough charging only
  • Charging indicator light
Compatibility
  • Android 9 Pie or higher is required for full functionality
  • Samsung Galaxy S9/S9+/S10/S10+/S20 Series/ S21 Series/S22 Series/Note 8/Note 9/Note 10/Note 10+
  • Google Pixel 2/2 XL/3/3XL/4/4XL/ 5 Series/ 6 Series
  • Razer Phone 1 and Razer Phone 2

About this review: Razer sent me the Razer Kishi v2 on the 9th of June, 2022. The company had no input into the contents of this review.


Razer Kishi v2: Look and feel

Razer Kishi v2 full controller

The Razer Kishi v2 is made of plastic and is pretty lightweight, and yet it doesn’t feel cheap. It’s designed that way so that it doesn’t get in the way of your gaming by adding to the weight of your phone. The buttons are clicky and tactile, and it feels fairly sturdy — enough to throw into a bag and carry around.

The Kishi v2 doesn't get in the way of your gaming

If I had one major complaint about the form factor of the Razer Kishi v2, it’s that it doesn’t close up fully. When there’s no device clasped in it, it’s still quite wide open and it takes up a lot of room in my bag. Given that there’s no carrier case for it either, it’s a little bit inconvenient.

Turning the Razer Kishi v2 on its back, you’ll find the clip that holds the entire thing together. Extend it outwards and the phone can be placed on the inside, aligning with the USB-C port on the right-hand side. The controller then clasps onto the phone from the top and bottom, with rubber at each end to stop your phone’s back from scratching. These rubber pieces can cause some phones to be misaligned, though, but you can remove them to adjust things around. Phones with particularly large camera bumps, still beware.

Back of the Razer Kishi v2

As for the buttons and joysticks, they’ll be familiar to anyone who has ever used the Nintendo Switch Joycons before. They’re comfortable to use, and my unit doesn’t have any dead zones or drifting, either.

Razer Kishi v2 Dead Zones

I tested the sensitivity of the joystick using the Gamepad Tester app. (Note: I didn’t draw in the full circles of the X and Y axes).

Gamepad tester (Free, Google Play) →

Razer Kishi v2 Charging port

On the bottom of the right-side controller, there’s a USB-C port that can be used for charging your phone while playing. It doesn’t fast-charge phones though even when using a compatible charger (meaning your battery will still likely drain in intensive games), nor does it support USB-C to 3.5mm jack adapters. As a result, you can’t use wired earphones or headphones when playing games, even if your phone has a headphone jack or you have an adapter. The Razer Kishi v2 is powered by your smartphone, so you don’t need to charge it or keep it plugged in.

The biggest criticism I have is the lack of access to a headphone jack or USB-C port because gaming with latency over earphones or speakers is frustrating. The best experience I’ve had with this controller is using the speakers over my phone, as it’s the only way I can play without frustration from audio latency. It’s not usually an issue for me to be able to play out loud in my apartment, but if it would be for you, then it may not be worth it.


Razer Kishi v2: Nexus app

razer kishi v2 nexus app razer kishi v2 nexus app

Just like with the original Kishi, Razer has released an app that you can use with the Razer Kishi v2. The Razer Nexus app is a portal to access games that are compatible with the controller, and it enables integrated live streaming to Facebook and YouTube. You can also use it to capture videos and screenshots of gameplay or to remap buttons on the controller.

It’s not a particularly useful app for its browsing capabilities. The first row of apps appears to be apps that are categorized as games that are already installed on your phone, regardless of whether or not they’re compatible. After that, it just acts as a way to find games that will be compatible with a controller. It’s not a great app and you don’t really need it if you don’t want to install it. It can be used for firmware updates, but at the time of writing, I haven’t received an update, and I’m not sure what kind of updates the company would even roll out.

Razer Nexus (Free, Google Play) →


Razer Kishi v2: Gaming experience

Razer Kishi v2 game play of Cyberpunk 2077

The Kishi v2 is a fantastic experience that allows me to play console and even PC titles anywhere at any time

The Razer Kishi v2 offers an amazing experience in gaming and feels just like any other controller. I’ve used it to play Cyberpunk 2077 on Google Stadia and for a ton of different titles in emulators such as Dolphin Emulator and AetherSX2. It’s a fantastic experience that allows me to play console and even PC titles anywhere at any time.

Funnily enough, the Razer Kishi v2 won’t be of much use in the most popular Android titles like Call of Duty: Mobile and PUBG Mobile. That’s because both of those games have disabled controller inputs as the developers feel they make the game unfair for users who don’t have additional peripherals. Your best bet is to map the controller inputs to touches on the display, but that’s a lot more trouble than it’s worth.

However, where I’ve found the Razer Kishi v2 works nicely is in the likes of Google Stadia. It gives a console-like experience on a handheld, and the controller is in no way a barrier between me and the games that I play. In fact, I’d wager you could probably get a better experience in Cyberpunk 2077 on your smartphone with the Razer Kishi v2 than you could with a gaming PC packed with older parts. Who’s buying a graphics card nowadays anyway?

Not every game on PC supports controllers, so if you’re using Steam Link, you might need to do some funny remapping to get things working. I imagine that’s the same as with GeForce NOW. It’s the same story as with Moonlight for game streaming. Anything that supports standard controller inputs will support the Kishi v2’s buttons, as it just sends standard key events that can be read by any app. When configuring it with AetherSX2, you need to go to controller settings, “port 1”, and select “automatic mapping”. I didn’t need to make any other changes after that.


Should you buy the Razer Kishi v2?

The Razer Kishi v2 is a fantastic controller for very specific use cases, but it’s one that people may have an issue with for different reasons. For me, I’m happy to use it and get a lot of fun out of it, but I can totally understand why it might not be your cup of tea for one reason or another. On top of that, the steep asking price of $99 might be too much, especially if you’re not too much of a gamer. Some of the controllers competing in the space are adopting cooling solutions as well, which the Razer Kishi v2 entirely skips out on.

It's so comfortable to play games with

If, though, you like to emulate games on the go especially, then I recommend this controller as long as you don’t care about audio latency or can play over speakers. It’s so comfortable to play games with, and I’ve been properly playing through games like The Simpsons: Hit & Run and Sonic Heroes on my phone with ease. It’s not currently available for iPhones, but the company intends on launching a controller with support for the lightning port soon.
    Razer Kishi v2
    The Razer Kishi v2 is the follow-up to the company's already-great universal controller. There are a few improvements across the board, and it makes for an excellent cloud gaming or emulation controller.

I’m glad that Razer is committed to improving on its controllers, and I hope that for a third iteration, the company improves on some of the issues that it has like the large form factor when not in use, and the terrible USB-C port.

The post Razer Kishi v2 Review: An easy recommendation for cloud gaming and emulation on your phone appeared first on XDA.


from XDA https://ift.tt/2wys6ZS
via IFTTT

Samsung Galaxy S22 Camera Walkthrough: Different camera modes, Expert RAW, and more

Samsung’s Galaxy S series phones are fitted with some of the best camera systems you can find on the market. While the Galaxy S22 Ultra takes the crown for having the best — and the most versatile — camera system out of the three phones in the series this year, I think the vanilla Galaxy S22’s cameras are also up there with the best in the business. Be it for taking casual photos with the main camera or for some professional-looking images with its ‘Pro’ mode, I think the Galaxy S22 offers plenty of great features. That being said, all the camera features and shooting modes aren’t entirely obvious at first blush, especially if you’re using a flagship phone with an advanced camera system for the first time. So let’s take a quick look at some of the most important camera features and modes in this Samsung Galaxy S22 camera walkthrough.

Navigate this article:

Samsung Galaxy S22 camera system

The Samsung Galaxy S22 comes with three lenses at the back. They’re all stacked in the corner as we saw on the Galaxy S21 last year. The Galaxy S22’s primary lens uses a 50MP sensor, a massive leap over the 12MP sensor from last year. It pixel bins to 12.5MP, though, so keep that in mind. This particular sensor itself is larger coming in at 1/1.56-inches compared to the Galaxy S21’s 1/1.76-inches.

In addition to the main shooter, you also get a 12MP ultrawide camera and a 10MP telephoto lens with 3x optical zoom. For selfies, we’re looking at a 10MP shooter that sits inside the punch-hole camera cutout on the display. All these camera sensors come together to offer a pretty good experience overall. The images captured using the Galaxy S22 look pretty impressive. It can even capture some really good shots at night when the lighting is less than ideal. Our Galaxy S22 review has a lot more samples for you to look at, so let’s take a look at Samsung’s camera app and all the modes it brings to the table.

Samsung Galaxy S22: Camera app

For the Samsung Galaxy S22 series, you can either use the stock camera app that comes with the One UI or download the Expert RAW camera app from the Galaxy Store to take advantage of more granular control over many of the core camera functions. The stock camera app also comes with a ‘Pro’ mode that lets you manually control many of these functions but the Expert RAW is built around shooting in the RAW image format.

Samsung galaxy S22 camera app single hand

I think the stock camera app itself is enough for most users as it offers a lot of different functions and modes to choose from. Just like the OnePlus camera app, Samsung’s pre-installed camera app will put you in the main ‘Photo’ mode as soon as you launch the app. Unlike the OnePlus camera app, however, it doesn’t put you back in the same mode that you were using the last time before closing it. The app automatically takes you back to the ‘Photo’ mode every time you re-launch the app, which is good.

From the main viewfinder screen, you can swipe left or right to access different preset camera modes that are easily accessible. You’ll also see a bunch of options on the top of the screen that are specific to the mode you’re currently using. If you’re using the video mode, for instance, you’ll see the option to change the resolution and frame rate of the recording, You can also enable ‘Super Steady’ mode or change the aspect ratio of the video.

Samsung Galaxy S22 camera viewfinder Samsung Galaxy S22 camera modes

Irrespective of the mode you’re in, you can also tap on the ‘1x’ button to zoom in or out of the frame. I also like how the camera app seamlessly switches between the lenses as zoom in or out without any lag. In addition to the main camera modes that are accessible through the viewfinder screen, you can tap on the ‘More’ button to check out all the available options. Samsung’s stock camera app on the Galaxy S22 offers a ton of different modes to choose from.

Before heading into the camera modes, let’s take a quick look at some of the camera settings that you may want to play around with. You can hit the Setting cog on the top-left corner of the viewfinder to enter the camera settings page. Here, you’ll see a bunch of options that are pretty much self-explanatory. Samsung also gives you a quick summary of each option to give you a better understanding of what it does before you can go ahead and enable it.

Personally, I like to enable the Scan QR code option as it makes it a lot easier for me to scan the codes on a day-to-day basis. I also recommend you check out the advanced video recording options to enable HDR10+ videos and the Zoom-in mic option. Also, be sure to disable the ‘Location tags’ option if you don’t want your smartphone to add the location information to the metadata. In any case, I think it’s best to always remove the EXIF data from your images before sharing them online. You can check out our how to remove EXIF data guide to know more about it.

Samsung Galaxy S22: Camera modes

Here’s a quick rundown of all the modes that are available in Samsung’s stock camera app:

‘Pro’ and ‘Pro Video’ modes: The ‘Pro’ and ‘Pro Video’ modes essentially give you manual controls for taking still photos and recording videos, respectively. For capturing still photos, you can also use the Expert RAW app which we’ll discuss later in this article.

Single Take:  This is a nifty feature that allows you to take multiple photos and videos with a single tap of a button. Your Galaxy S22 will capture whatever’s in the frame for up to 20 seconds. You can then choose to share it as a video, cut it into a GIF, or take screenshots from it to be shared as individual photos.

Night: This mode is pretty self-explanatory. The Galaxy S22 is pretty good at capturing photos in low light but the night mode tightens things up by adding more details to the shot. It’s worth pointing out that the Night mode on the Galaxy S22 doesn’t automatically kick in, so you’ll have to manually enable it.

Food: The ‘Food’ mode, as the name suggests, is specifically designed to capture gobsmackingly good photos of the food that you’re eating. You don’t always have to use this particular mode for taking pictures of the food, but you do get a couple of neat features such as the ability to add a blur effect around the food or change the color temperature of the frame before capturing the image.

Samsung Galaxy S22 food

Panorama: This particular mode automatically uses the ultra-wide lens and lets you pan across the frame to capture a wide perspective. We’ve had this mode in smartphones for a while now, and there’s nothing new to write home about.

Super slow-mo: With the Galaxy S22, you can capture 720p Super slow-mo footage at 960fps. The Galaxy S22 is, in fact, better than the Galaxy S22 Ultra in this regard as the latter tops out at 480fps for its Super slow-mo videos.

Hyperlapse: Recording Hyperlapse videos can be a lot of fun and the Galaxy S22 gives you a few good options in this mode. You can record either an FHD or a UHD Hyperlapse video by using both the main and the ultra-wide camera. You can also select the speed of the recording based on what you’re shooting.

Portrait video: Portrait video is essentially just a portrait mode for videos. It lets you focus on any object or person in a scene while adding a soft focus on the rest to give a cinematic look and feel to the footage.

Director’s View: This is a great tool for advanced videographers as it lets you switch between different camera lenses in the rearview while recording. You can also choose to enable the front-facing camera in this mode to simultaneously look at the footage from all the camera sensors on the phone.

Galaxy S22 camera Director's view

Bixby Vision and AR Zone: Lastly, you also see the options to enable Bixby Vision or AR Zone from the mode selection screen. Bixby Vision is essentially Samsung’s version of Google Lens that lets you scan items in the frame to pull out relevant results. Alternatively, you can also use it to scan texts or for translation. AR Zone, on the other hand, will let you add cool AR stickers or Doodles to the frame. You can use these features to come up with some cool results, although they don’t necessarily take the center stage inside the camera app.

Samsung Galaxy S22: Expert RAW camera app

Samsung Galaxy S22 with the Expert RAW app

Expert RAW, for those that don’t know, is Samsung’s advanced camera app that adds a selection of new features and controls to some of the company’s latest flagship devices. This particular app is compatible with the Galaxy S22 but it doesn’t ship with the phone by default. You can download it from Samsung’s Galaxy Store provided you have a supported Galaxy handset with a Samsung account set up on it. It’s worth mentioning that the Expert RAW camera app isn’t available to download outside the Galaxy Store.

As the name suggests, this particular camera app is targeted at advanced users who know their way around professional cameras and all their functions. It’s built around shooting in the RAW image format and Samsung even says that this app adds a wider dynamic range to add more details, thereby maximizing the editing potential. The result is a 16-bit RAW image that can take up as much as 30MB of space on your phone. Additionally, the app also adds more granular controls for ISO, shutter speed, EV, and more.

On the surface, the Expert RAW camera app isn’t a lot different from the pre-installed stock camera app. In fact, you can’t use the Expert RAW camera to shoot portraits, use night mode, take selfies or even record a video. Think of it as a dedicated app for the ‘Pro’ mode which can be easily accessed with just a tap of a button instead of going to the main camera app and then selecting the ‘Pro’ mode. You do get a histogram tool that isn’t available on the main camera app. Samsung also says the Expert RAW offers a boost to dynamic range through the use of multi-frame RAW files.

Personally, I am not a huge fan of capturing RAW photos even though I am aware of the post-processing possibilities it unlocks for each image. It may take some time to get used to, but once you’ve mastered the art of shooting in RAW and making powerful edits to your images, there’s no going back. But if you find the learning curve to be too steep, you can stick to Auto and let your phone do all the heavy lifting for you.

Closing Thoughts

Well, that brings us to the conclusion of the Samsung Galaxy S22 camera walkthrough article. I hope this guide was useful for those who are scratching their heads over which settings or camera modes to explore. I highly recommend you check out Samsung Galaxy S22 review which I’ve linked earlier in this article to check out some camera samples. Alternatively, you can also take a look at our Galaxy S22 vs OnePlus 10 Pro comparison to look at more samples and see how it compares with the shots captured using the OnePlus’ flagship phone with Hasselblad goodness.

    Samsung Galaxy S22
    The Samsung Galaxy S22 brings a triple camera setup to the table along with a feature-packed stock camera app and a powerful Expert RAW camera app for advanced users.

You’ll find all these camera modes on the Galaxy S22 Plus as well as the Galaxy S22 Ultra, although the Ultra has a more advanced camera system. So which Samsung Galaxy S22 camera mode are you going to explore first? Let us know by dropping a line in the comments below. Also, be sure to share your favorite camera mode to shoot using the Galaxy S22 or the Galaxy S22 Plus.

The post Samsung Galaxy S22 Camera Walkthrough: Different camera modes, Expert RAW, and more appeared first on XDA.


from XDA https://ift.tt/kwUaIOY
via IFTTT

vendredi 24 juin 2022

CTS-D is a new Compatibility Test Suite module with tests submitted by Android app developers

As part of the Android Compatibility Program, Google gives smartphone OEMs access to a Compatibility Test Suite (CTS). The suite includes a collection of over two million test cases that OEMs use to weed out bugs early in the smartphone development process so that users get a consistent app experience across various devices. However, the CTS mostly includes tests written by Android engineers with little input from app developers. To give app developers a chance to share their “unique perspectives on actual device compatibility issues,” Google has now introduced CTS-D.

CTS-D is a new CTS module that includes compatibility tests written by app developers. It already consists of a few tests contributed by the community, and Google is now inviting more developers to build and contribute test cases to catch app compatibility issues they face. The company further notes: “We know that many of you have already created your own tests to verify compatibility on various devices. We want to work with you to bring those tests into AOSP.”

To submit a new test, you can file a proposal using this template before contributing your test code to AOSP. The Android team will then review your submission to verify its eligibility. Currently, Google is inviting app developers to submit Power Management test cases.

Along with app developers, Google is also “strongly advising” smartphone OEMs to use CTS-D to identify and mitigate issues. However, the company does not strictly require OEMs to run CTS-D tests to pass device certification. Consequently, some OEMs might not run CTS-D tests on their devices. If that turns out to be the case, app developers will have the option to file a report if a device does not pass a CTS-D test using this issue tracker template. Google says it will then work with OEM partners to resolve it.


Source: Android Developers Blog

The post CTS-D is a new Compatibility Test Suite module with tests submitted by Android app developers appeared first on XDA.


from XDA https://ift.tt/qiDGWmT
via IFTTT