Recent reports from Samsung Pay users reveal that the app no longer works on non-Samsung devices. The disgruntled users claim that the app used to work well on their non-Samsung devices up until a few weeks ago, but it now displays an “ID not valid” error when signing in on a non-Samsung device.
Although Samsung has a history of limiting certain features to its devices, Samsung Pay was one of the few exceptions. The payments app supported non-Samsung devices, and it even let Galaxy Watch 4 users make payments when connected to a non-Samsung phone. Sadly, though, that doesn’t seem to be the case anymore.
According to recent reports on Reddit and the Samsung Community forums (via SamMobile), Samsung Pay users who do not have access to a Galaxy smartphone can no longer log into the app. Affected users say the app now returns the aforementioned “ID not valid” error. In response to queries, Samsung’s customer support has reportedly noted that Samsung Pay will no longer work on non-Samsung devices. But that seems unlikely, as Samsung would’ve made a public announcement before making such a huge change.
It’s interesting to note that even though affected users are no longer able to sign into Samsung Pay, they can still log into their Samsung accounts using the same ID. This leads us to believe that the change could be a result of a bug, but we don’t have any evidence to support this claim. We expect Samsung to make an announcement regarding the issue in the coming days, and we’ll make sure to let you know as soon as that happens.
The change could be a result of the recent introduction of Samsung Wallet — a comprehensive digital wallet app that gives Galaxy users access to Samsung Pay and Samsung Pass features in one place. Unlike Samsung Pay, the Samsung Wallet app is exclusive to Galaxy smartphones.
Are you able to log into your Samsung Pay account on a non-Samsung smartphone? Does the app let you make payments using a connected Galaxy Watch 4? Let us know in the comments section below.
We’ve been hearing about Telegram Premium for a long while. The wait is finally over now. Telegram has just released version 8.8 on the Apple App Store — allowing users to unleash Telegram’s full potential for $4.99 per month. Existing features remain free, expectedly. However, those wanting to get their hands on some tempting new additions will have to pay a monthly fee now.
At the time of writing, the update is still not available on the Google Play Store. However, the company tends to release major updates for all platforms within the same day. So you can expect to see that version within a day or two if the publishing process goes smoothly.
The full list of Premium features includes:
4GB uploads.
Faster downloads.
Connect 4 accounts in any app.
Organize your chats into 20 folders, holding 200 chats each.
Pin 10 chats in your main list.
Reserve up to 20 public t.me links.
Save 400 favorite GIFs and 10 favorite stickers.
Write a longer bio for your profile and include links.
Include longer captions for photos and videos.
Voice-to-text transcriptions.
Exclusive stickers and reactions.
Premium badge on profile.
Profile video support.
No ads.
More custom icons.
Apart from the Premium perks, version 8.8 on iOS also adds some features for free and paid users alike. Public groups now support join requests, there’s a new animation when sharing large files from other apps to Telegram, in addition to bot improvements, ProMotion 120Hz support, and bug fixes.
These new features are rewarding to paying users, but they also aren’t too tempting for those who’d rather not pay. Free users will probably not feel like they’re missing out on much. Nonetheless, in my opinion, the offerings are significantly richer than those of Twitter Blue. Whether a notable portion of Telegram users ignores the new Premium tier or subscribes to it is yet to be seen.
Apple revealed iOS 16, iPadOS 16, and macOS Ventura during the main keynote of WWDC22. These major updates come packed with features and changes that further enrich their respective devices. For example, the iPhone has gained Lock Screen widgets, while M1 iPads now support resizable app windows. One of the notable additions introduced on the Mac is Stage Manager. This new multitasking tool builds upon existing ones — such as Mission Control — and makes it even simpler to handle using several apps at once. Here’s how to use the Stage Manager feature on macOS Ventura.
How to use Stage Manager
Make sure you’re running macOS Ventura on your Mac.
Open the Control Center by clicking its icon in the Menu Bar.
Confirm that Stage Manager is turned on. If it’s not, click on its toggle.
Now launch the apps you would like to use.
Move the cursor to the left edge of the screen. You will find the apps you have launched. Drag the app you want to use with the existing one from the left side to the center.
These apps will now be grouped together — and that is visually represented when taking a look at the Stage Manager view on the left side.
You can now switch between different groups of windows to quickly jump from one task to another.
It’s worth mentioning that Stage Manager is also available on M1 iPads running iPadOS 16. This change truly brings the iPad a step closer to the Mac. Personally, I don’t see myself using Stage Manager. That’s because my workflow usually runs in a single Safari window. I just hop between Safari tabs or have two open side by side. Mission Control is more than enough for me to view all open windows and deal with them accordingly.
Will you be using Stage Manager? Why or why not? Let us know in the comments section below.
No matter how smart tech gets, there will always be a situation where you would need to perform a reset. Whether it’s to sell it or dispose of it safely, or just to fix some annoying issues, being able to reset a device is a fundamental feature. When it comes to the Amazon Echo, it’s not particularly obvious how you get this done. There’s no button on the latest models glaring at you with a big “RESET” label over it. There aren’t many physical controls at all on an Amazon Echo, so we see where the confusion comes from.
Never fear, it’s easy enough to reset an Amazon Echo once you know what to do. All of the methods shown here can be carried out on the device, with no need for your phone. Whether you’re still using a 1st Gen, the latest 4th Gen or even an Echo Show, we’ll show you how to do a full reset on them all.
How to reset 1st Gen Amazon Echo, Echo Plus, and Echo Dot
Press into the pinhole at the bottom for eight seconds to reset.
There are outliers to consider and it’s the 1st Gen Echo, Echo Plus, and Echo Dot. While there’s no big bold reset button on these, there is still a physical control to carry it out.
On all three devices, flip them over and look for a pinhole on the base. You’ll need a paper clip or a pin or something similarly thin and pointy. Push it into the hole while the device is on and keep it pressed down for eight seconds.
The ring light should first turn off and then turn orange. The Echo is now back into setup mode ready for you to start again with the Alexa app on your phone or tablet.
How to reset 2nd Gen Amazon Echo, Echo Dot, Echo Plus, and Echo Studio
Hold down the microphone off and volume down buttons for 20 seconds.
From the second generation of Amazon Echo speakers, there is a different method to use. The pinhole went away and instead you have to use a combination of presses of the physical buttons on the speaker.
The combination for the 2nd Gen models is a little different from the newer ones, though.
To reset, hold down the microphone off and volume down buttons at the same time. After about 20 seconds the ring light will go off and then return in orange. The Echo has now reset and is back into setup mode. From here it’s over to the Alexa app to set it up again.
How to reset 3rd and 4th Gen Amazon Echo and Echo Dot
Hold down the action button for 25 seconds.
Just to keep everyone on their toes, Amazon changed the reset process again for the most recent two generations of its smart speakers. On these, the process involves only one button press. Hold down the action button for up to 25 seconds.
First, the ring light should briefly flash blue, then turn off, then back on again. When the reset process is complete the ring light should be orange indicating a return to setup mode.
From here, to set the Echo or Echo Dot up again, head back over to the Alexa app on your phone or tablet.
Navigate to Device Options > Reset to Factory Defaults.
By virtue of having a display, the process is a little different for the Echo Show devices. Follow these steps.
Swipe down on the display.
Select Device Options.
Select Reset to Factory Defaults.
If you’re selling or disposing of your Echo Show be sure not to select the option to retain existing smart home connections. This is obviously useful if you’re just resetting to freshen up your device and reuse it. But if you’re getting rid of it it’s a good idea to make sure that nothing remains linked to your home.
As you can see, the process is largely very simple, but Amazon has changed things around every few generations that necessitate some guidance for end-users. We hope this guide has been useful to you in resetting your Amazon Echo device.
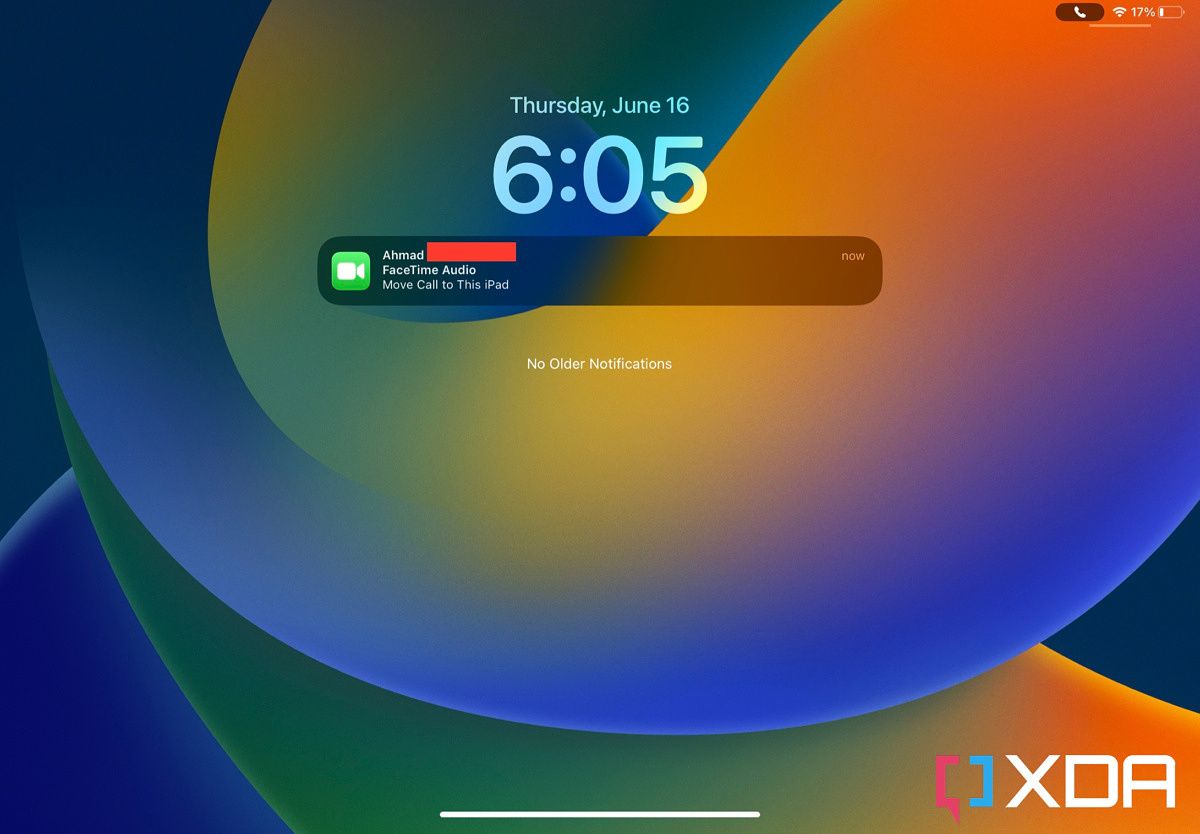
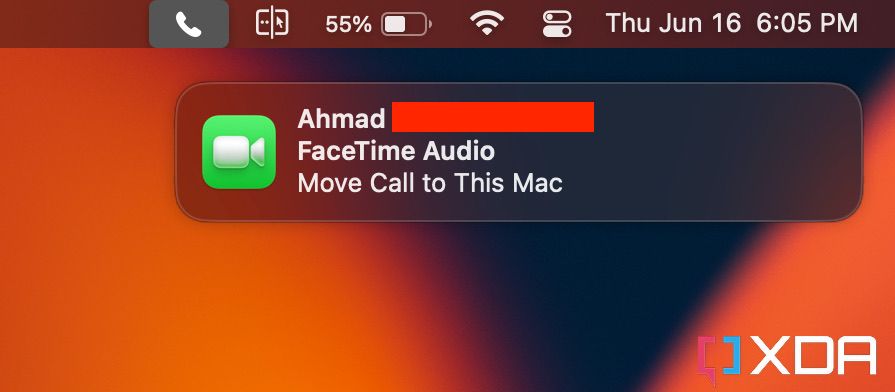
Apple revealed iOS 16, iPadOS 16, and macOS Ventura during the main keynote of WWDC22. These major version bumps come packed with features that further enrich their respective devices and make our lives easier. For example, the new iPhone Lock Screen now allows us to completely personalize it through endless customizations. That’s not to mention the ability to add widgets to it — which spare us the need to unlock our phones to glance at relevant information. One of the useful Continuity features to land on these operating systems is FaceTime Handoff. You know those times when you answer a FaceTime call outdoors and then reach home and feel like switching to your Mac or iPad? Now you no longer need to hang up and start a new call from the other device. You can simply hand off the call between all three device types without interrupting the call.
How to use FaceTime Handoff
Make sure your iPhone/iPad/Mac devices are paired to the same Apple ID account and running the compatible operating systems.
Ensure that Handoff is enabled in the General Settings of your devices (it’s on by default).
Check your Bluetooth and Wi-Fi toggles and confirm that they’re enabled on all of your devices.
Voila! There’s nothing else you need to do. When you answer an audio or video FaceTime call on any of your devices, you will get a notification or banner on all nearby devices. Clicking it will switch the device handling the FaceTime call, thanks to Handoff.
This new FaceTime feature is a painful reminder that Apple Music still doesn’t support Continuity. The convenience of switching calls from one device to another seamlessly only makes me want Music Queue Handoff even more. Fingers crossed we get that in iOS 17.
Do you see yourself using FaceTime Handoff? Let us know in the comments section below.
Late last year, I got to review the Lenovo Yoga 6, one of the company’s most budget-oriented convertibles, and I admittedly liked a lot about it. It was powered by fast AMD processors, it looked and felt great with its fabric-covered lid, and it otherwise nailed all the basics. It wasn’t without its problems, but when I got the chance to review its successor, I was very happy to do so.
I did have some issues with the last-generation model of the Yoga 6 – the lack of an HDMI port, the poor webcam, and some other downsides made it a little hard to truly love it. But for this year, it feels like Lenovo listened to every single one of my pain points and addressed them. The Lenovo Yoga 6 feels almost like the perfect entry-level convertible now. Lenovo didn’t upgrade the processors, but everything else is better in this new model, and if you want a convertible laptop for a reasonable price, this should absolutely be on your radar.
The Lenovo Yoga 6 Gen 7 officially starts at $749.99, though you can already find it cheaper than that
It’s available directly from Lenovo and at Best Buy, but not every configuration is available everywhere
Lenovo announced the Yoga 6 Gen 7 back at CES 2022, and it launched in the second quarter of 2022. Officially, the laptop starts at $749.99, but Lenovo’s website already has the base model going for as low as $599.99, which makes this laptop an even better deal. That price includes an AMD Ryzen 5 5500U, 8GB of RAM, and 256GB of SSD storage, which is a fantastic deal for a convertible laptop like this.
If you don’t want to buy from Lenovo directly, you can also find the laptop at Best Buy, though only a couple of configuration options can be found there right now. More options could become available later on, and they should also start showing up at other retailers over time.
Lenovo Yoga 6 Gen 7: Specs
CPU
AMD Ryzen 5 5500U (6 cores, 12 threads, up to 4.0GHz, 8MB cache)
Graphics
Integrated AMD Radeon Graphics (7-core, 1800MHz)
Display
13.3-inch IPS, WUXGA (1920 x 1200), 170 DPI, 100% sRGB, up to 300 nits, TUV Low Blue Light, Dolby Vision, touch
Body
304 x 218 x 17.45 mm, 1.37kg
Memory
8GB LPDDR4x-4266
Storage
256GB NVMe PCIe SSD
Battery
59Wh battery
Ports
2 x USB 3.2 Gen 1 Type-C (with Power Delivery and DisplayPort 1.4)
2 x USB 3.2 Gen 1 Type-A (one always on for charging)
1 x HDMI 2.0
1 x microSD card reader
1 x combo audio jack
Audio
Dual 2W stereo speakers with Dolby Atmos
Dual array microphones
Connectivity
Wi-Fi 6
Bluetooth 5.1
Camera
1080p Full HD webcam with IR, privacy shutter
Color
Dark Teal
Material
Aluminum + fabric (top), ABS (bottom)
OS
Windows 11 Home
Price
$749.99
Design: It’s even more beautiful than before
The Lenovo Yoga 6 comes with a lid covered in fabric, which gives it a distinct look and feel
The edges of the base are now fully curved, giving it a more modern look and making it more comfortable to hold
This time, there are plenty of ports for all your peripherals
The design was one of my absolute favorite things about the Lenovo Yoga 6 when I reviewed it last year, but the company still went ahead and improved it. Just like with the previous model, the lid of the laptop is covered in a dark blue fabric, and it makes the Yoga 6 really stand out from the sea of metal laptops out there. But now, Lenovo has also modernized the design, in line with what happened with the Yoga 9i, which we’ve also reviewed (and loved).
The edges of the base are now fully curved, making for a laptop that just looks more appealing than it did with the old flat edges. If you buy a model of the laptop with the aluminum top cover rather than the fabric-covered one, you’ll also see the curved edges there. In addition to looking great, this also makes it easier to hold the laptop in your hand, because the smooth rounded edges don’t dig into your palms as much.
The chassis has a more balanced design this year.
On the more mechanical side, the latest generation of the Yoga 6 is taller and heavier than its predecessor, albeit by a small margin. This is thanks to the new display and likely because of some other hardware changes we’ll get into. However, this new design is also more even, so there’s a consistent thickness across the chassis, instead of the wedge-like design of the previous model. At 17.45mm, it’s somewhere in between the maximum and minimum thickness of the previous model, but closer to the minimum.
One thing I complained about the previous Lenovo Yoga 6 was a lack of ports, and also some weird limitations revolving around them. For example, there was no HDMI port, and I had to buy a dock to be able to use my external monitor. Also, one of the USB-C ports didn’t support charging, so it was something I had to keep in mind if I wanted to plug in peripherals that used USB-C. This time, Lenovo fixed all of that.
On the left side of the laptop, we have two USB Type-C ports, along with the newly-added HDMI port, and a microSD card reader, which is also a new addition. Both USB Type-C ports support charging this time, which is great, though it also makes me wish each of the ports was on a different side so I could more easily plug in the charger in different scenarios.
On the right, there are two USB Type-A ports, a microSD card reader – yet another new addition – and the power button, with a power indicator light. This makes for a fantastic selection of ports, and enough to connect a good handful of peripherals without needing docks. That was a major pain point for me with last year’s model, and seeing it fixed here is fantastic.
Display: It’s got a 16:10 aspect ratio now
The display comes in a taller 16:10 aspect ratio and WUXGA resolution
The webcam has also been upgraded to a Full HD sensor and supports Windows Hello
The display was another thing I had some complaints about with the previous iteration of the Yoga 6. While it was fine, the 16:9 aspect ratio made it feel very small for my liking. But here, too, Lenovo listened. This year, the display has been stretched up to have a 16:10 aspect ratio, which is thankfully becoming a lot more common in 2022 laptops. It’s actually still a 13.3-inch panel, but having a taller aspect ratio really does make a big difference for productivity. There’s just more on the screen, and I love that.
Aside from adding new pixels to fill the additional vertical space, the resolution on this year’s model is the same as last year’s and that’s not a complaint, personally. I know some like extremely sharp screens, but Full HD is perfect for a display of this size, and everything looks as sharp as I’d want it to. One thing that hasn’t changed is the brightness, which still maxes out at 300 nits. This is fine for working indoors, but it does get very hard to see if you’re outside in broad daylight. While indoors with the window open, I have to use it at about 60% brightness to be comfortable.
Lenovo claims the display also covers 100% of sRGB, and while I don’t have the tools to measure that specifically, colors do look pretty good on this screen. It’s obviously not meant for creative professionals, but for this price range, it’s as good as you could expect it to be.
Windows Hello facial recognition makes it very easy to get up and running.
We’re not done with welcome upgrades yet, though, because above the display, there’s yet another one. The webcam has now been upgraded to a 1080p sensor, and I can’t accurately express how good it is to see this happen. The webcam on the previous model was really not very good, even for a 720p camera. I’ll say this isn’t the best 1080p camera I’ve seen on a laptop, but it’s a huge upgrade, and if you’re making video calls and meetings frequently, this will actually serve you very well now. I have to reiterate – this is a fantastic upgrade that I’m really happy to see.
And that’s not all. While the previous model only included a fingerprint reader for Windows Hello authentication, this new camera also now includes Windows Hello facial recognition. This is the most convenient way to unlock a computer, in my opinion, and I will always appreciate having it. It truly does make it a breeze to start using the laptop when I need to work, and it’s almost never failed to recognize me, even in very dim lighting.
Keyboard and trackpad: They’re as solid as ever
The new Yoga 6 uses Lenovo’s traditional style keyboard with rounded keys
Lenovo has made the trackpad a lot larger, thus more comfortable
Moving down to the keyboard base, this is the area with the least changes from the previous model, but that’s not necessarily a bad thing. I actually enjoyed typing on the keyboard of the Lenovo Yoga 6, and that stays true with the newest model. The keys have a comfortable travel distance and don’t bottom out too harshly, so they’re really comfortable to type on. They feel very snappy and I’ve never really had an issue where a key failed to actuate when I wanted it to or anything.
The only changes on the keyboard this year are a couple of function keys, which include shortcuts for the Settings, Calculator, and Snipping Tool apps in Windows 11, plus the new Smart Key that opens a quick toolbar to launch apps like Lenovo Vantage and Lenovo Voice.
Below the keyboard, the changes are a bit bigger – which is something I can also say about the touchpad. Because the laptop has a taller screen, the chassis is also taller, which means more space for the touchpad. For a 13-inch laptop, this feels huge, and it makes navigating Windows 11 far easier with gestures like scrolling, but also just clicking and dragging. My only issue with it is that the mouse buttons only actuate in the bottom 30% of the trackpad area, which means sometimes I want to click something and I can’t because my hand is just a little higher than it should be.
Also on the keyboard deck, there’s a fingerprint reader for those that prefer it. Personally, I have no idea why you’d want to use a fingerprint reader instead of the much easier facial recognition, but it’s nice that even in this mainstream device, Lenovo gives you both options.
Performance: It’s using last-gen processors, and that’s ok
Lenovo is using the same AMD Ryzen 5000 series processors as the last-gen Yoga 6
Performance is still fine for most people, but battery life has gotten worse
Lenovo upgraded almost everything about the external side of the hardware in the Yoga 6, but one thing that hasn’t changed is the inside. Just like last year’s model, the Lenovo Yoga 6 Gen 7 comes with AMD’s Ryzen 5000 series processors, and my unit specifically came with a Ryzen 5 5500U. I was a bit miffed when this was announced, and I still find it odd that Lenovo couldn’t at least opt for the enhanced Ryzen 5 5600U that used an improved architecture.
With that being said, this is far from a bad processor, with 6 cores and 12 threads. I’d say the bigger limitation in the configuration Lenovo sent me is the 8GB of RAM, which make it harder to work with a lot of apps and browser tabs open. It happens almost daily that one of my browser tabs has to reload when I switch to it. Of course, there are models of this laptop with 16GB of RAM, and not everyone has the same workloads I do, so this isn’t a negative on the whole, it’s just not suited to my particular needs. For the price, this is still a solid configuration.
The review unit I tested for the previous model had a Ryzen 7 processor, so it’s not fair to make a direct comparison to see if anything changed in the performance, but there’s no reason why you should expect any major changes. But we can compare it to another budget-oriented laptop, the Surface Laptop Go 2, and see that this is on a similar level, and it’s actually still better in most ways.
Lenovo Yoga 6 Gen 7
AMD Ryzen 5 5500U
Surface Laptop Go 2
Intel Core i5-1135G7
Lenovo Yoga 6 Gen 6
AMD Ryzen 7 5700U
PCMark 10
4,732
4,362
5,024
3DMark: Time Spy
1,144
1,193
1,174
Cinebench
1,123 / 5,471
1,240 / 3,582
1,180 / 6,908
Geekbench
1,078 / 5,226
1,307 / 4,075
1,184 / 6,074
All in all, the laptop performs very well, and despite some browser tabs having to reload sometimes, it has been more than fine for my day-to-day use at work. The only problem I really have is that trying to play media on the web, particularly with multiple apps or tabs open, caused the display to freeze if I had hardware acceleration enabled (which is the default setting in Vivaldi). This seems like it might be an issue with the graphics driver I currently have, so hopefully, an update will address it as soon as possible.
Battery life is surprisingly short compared to the previous generation.
Surprisingly, battery life wasn’t that good on this model, though. Seeing as the processors are similar, I went in expecting battery life on par with the model I reviewed last year, but no. The laptop has always lasted me over five hours, but always less than six. The most I got was 5 hours and 46 minutes, and the minimum was almost exactly 5 hours. That’s generally been with brightness at around 60%, mostly focused on web browsing and writing, often with about 5 to 10 tabs open. Some light photo editing is also involved. If you need a machine to get a lot of work done while you’re away from an outlet, it’s hard to recommend this one wholeheartedly.
Should you buy the Lenovo Yoga 6 Gen 7?
All in all, the Lenovo Yoga 6 nails almost all the basics of being a great convertible in this price range, and it’s easier to recommend than its predecessor.
You should buy a Lenovo Yoga 6 Gen 7 if:
You want a convertible laptop without breaking the bank
You’re looking for a great laptop for school work
You tend to connect a lot of peripherals to your laptop
You shouldn’t buy a Lenovo Yoga 6 Gen 7 if:
You want something that doesn’t need to charge for a whole day
You want the latest and greatest processors
With all the improvements Lenovo has made this year, the Yoga 6 Gen 7 is a fantastic laptop with very little to dislike. The biggest thing to look out for is the battery life, which probably won’t be good enough if you want to spend a whole day away from an outlet and using the laptop actively. If your usage is lighter, though, that shouldn’t be a huge problem.
The OnePlus 10 Pro offers some big improvements in the camera department compared to its predecessors. As we mentioned in our OnePlus 10 Pro camera review, the camera system on this phone can hold its own against the top dogs. It may not outperform some big names like the Pixel 6 Pro or the Vivo X80 Pro, but you can get some good looking photos out of this phone. If you’re using a flagship phone with an advanced camera system like this for the first time, then you may find it a bit overwhelming. So let’s take a look at all the camera modes along with different options that are available in this OnePlus 10 Pro camera walkthrough.
Even though the OnePlus 10 Pro’s camera hardware is largely similar to last year’s OnePlus 9 Pro, there’s now a very unique-looking camera housing at the back that may have caught your attention. There are mixed opinions on the way this new camera module looks, but I personally think it looks good. It adds a bit of personality to the phone and makes it more recognizable in the sea of other flagship devices.
The OnePlus 10 Pro features a triple camera system headlined by a 48MP, f/1.8, 1/1.43-inch main camera; an 8MP, f/2.4 telephoto zoom lens with 3.3x optical zoom; and a 50MP, f/2.2 ultra-wide camera. The main and zoom lens sensors are identical to the one used on the OnePlus 9 Pro, but you do get a new ultra-wide sensor. OnePlus is using a Samsung JN1 sensor with a wide 150-degree field of view.
The camera hardware on the OnePlus 10 Pro is complemented by Hasselblad’s color science optimization. OnePlus’ partnership with the Swedish camera maker also brings some other noteworthy additions which we’ll discuss in the following sections. Casual users will find plenty of what they need in the OnePlus 10 Pro’s camera system, but you might want to take a look at our collection of the best camera phones if you’re an advanced user with specific needs.
OnePlus 10 Pro: Camera app
Now that we know what the OnePlus 10 Pro’s camera system is made of, it’s time to take a look at the camera app that lets you interact with the hardware to capture photos and videos. I am using the Indian variant of the OnePlus 10 Pro running OxygenOS 12.1 software. This is the OS you’ll get with all the OnePlus 10 Pro units sold outside China.
The OnePlus 10 Pro’s camera app is packed with a ton of features and different modes to shoot with. The camera app layout, however, is still designed to make it easier to navigate and find the right settings. It’s very intuitive and you won’t have to dig deep into the settings to find what you need, really. One thing to note about the camera app — it’s also something that I personally dislike — is that it stays in the last shooting mode instead of defaulting back to the photo mode. This happens even when I actively close the camera app from the recent menu and come back after, say, a couple of hours. It’s not necessarily a deal-breaker as I always double-check the shooting mode I am in before hitting the capture button, but I think it’s definitely something to keep in mind.
The app itself is fairly easy to navigate, as I mentioned earlier. Once you are in the main camera app, you can quickly swipe left or right to change the shooting mode from ‘Photo’ to ‘Video’, ‘Portrait’, ‘Night’, and more. In each of these modes, you also get an option to select the lens and switch between ultra-wide, main, or telephoto modes. Tapping and holding the lens button opens up an iPhone-like zoom dial which you can drag left or right to zoom in and out. It’s impressive how the camera viewfinder keeps up with your changes and switches between lenses almost seamlessly without any lag.
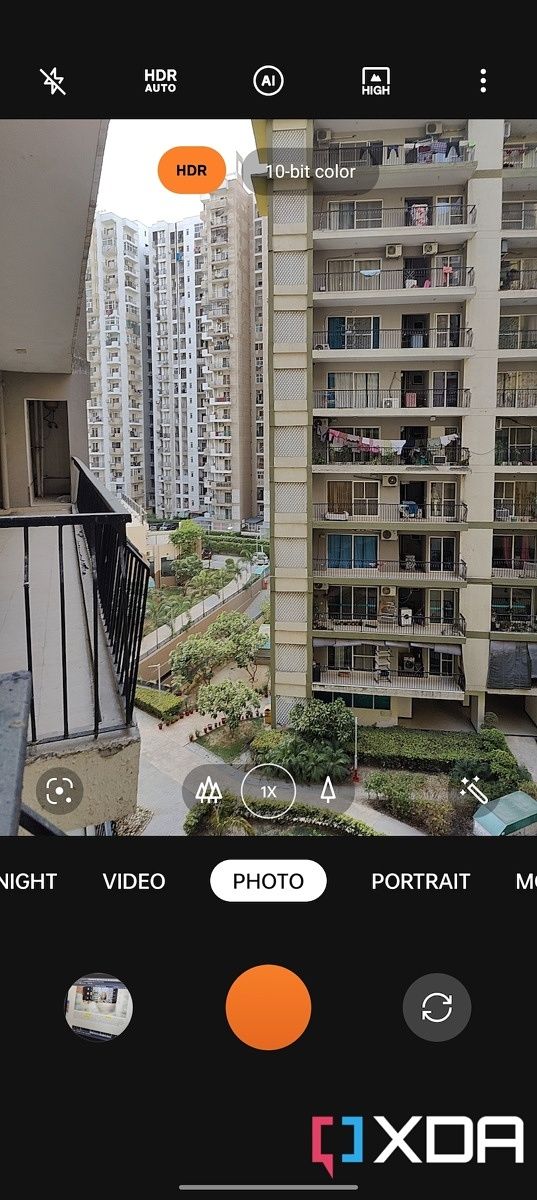
Additionally, you’ll also find a bunch of options on the top of the viewfinder that’ll let you set different things. These options differ based on the shooting mode. The main photo mode, for instance, will show you an option to set a timer, enable HDR and AI enhancement, and more. While in the video mode, you’ll see options to set the video output resolution, frame rate, and more. These are self-explanatory options which I am sure you’ll understand what they do as you start exploring. But there’s one thing that I’d like to highlight before moving on to the next section — the 10-bit color mode.
How to enable 10-bit color mode in OnePlus 10 Pro
One of the most important things to highlight about the OnePlus 10 Pro is that it supports a 10-bit color mode. For those that don’t know, the 10-bit color refers to the depth of tone an image or video can contain. Most cameras record in an 8-bit color that is shot and saved in JPEG format. What’s the difference? Well, 8-bit color contains 256 levels of tone or 16.7 million colors. In the case of 10-bit color, the depth of tone increases to 1,024 levels, or 1.07 billion colors.
These additional levels of tone make a significant difference for advanced users who can tweak the colors during post-processing. It is, however, worth pointing out that JPEG doesn’t support 10-bit, so the OnePlus 10 Pro saves still images in High-Efficiency Image File (HEIF) format.
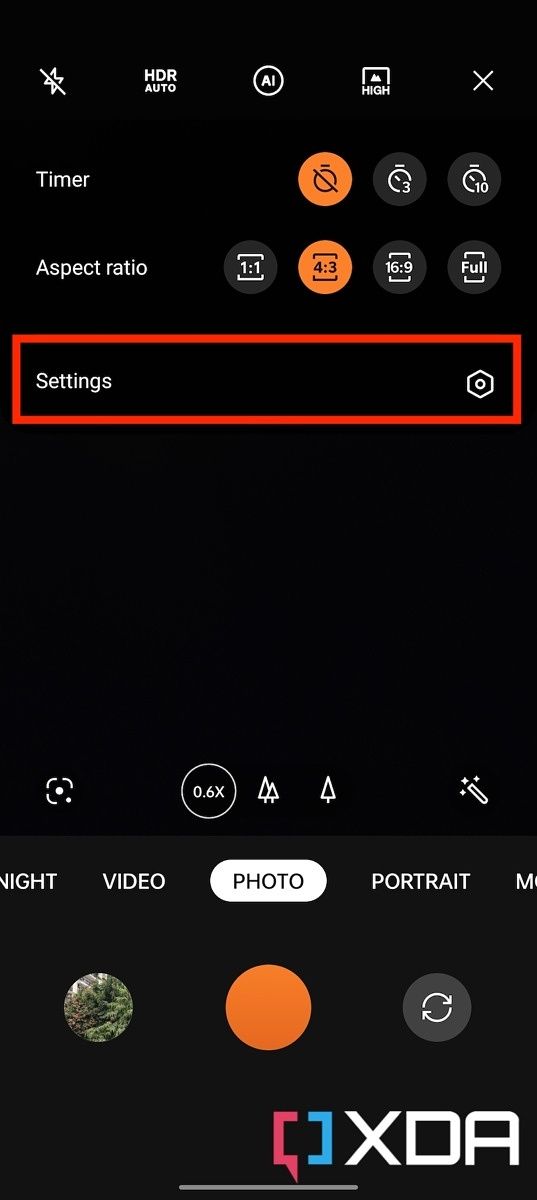
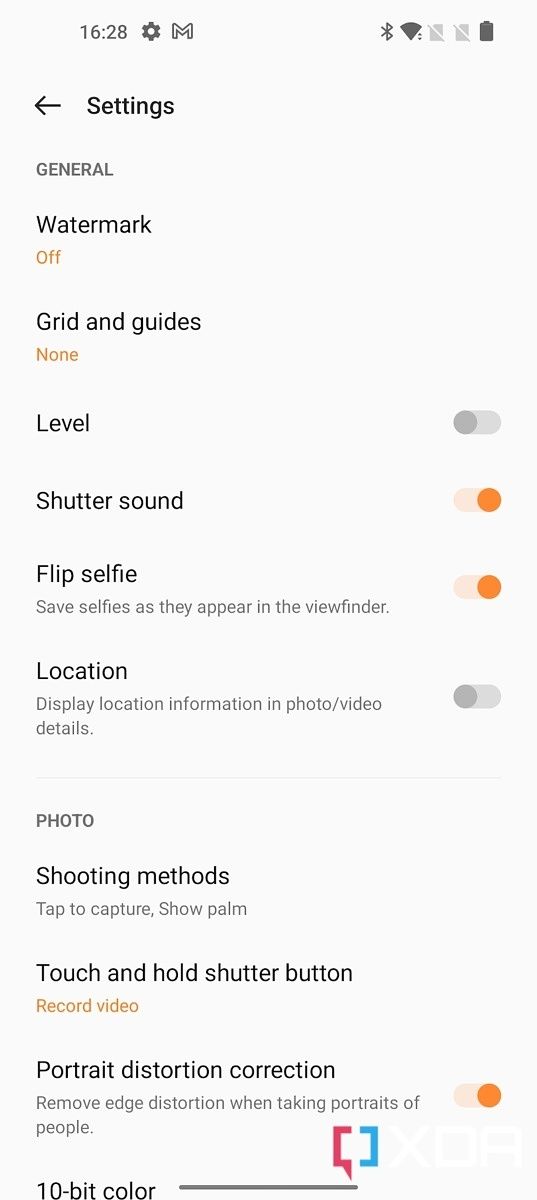
The 10-bit color mode is disabled by default but you can enable it rather easily by heading over to the Settings inside the camera app by tapping the three dots in the top-right corner of the screen. Now, scroll down until you see the 10-bit color mode and activate it. Activating the 10-bit color mode will automatically enable the HEIF option below it too.
Once you return to the viewfinder, you’ll see a message on the screen reminding you the camera is shooting in 10-bit color. It’s worth mentioning that the OnePlus 10 Pro can shoot 10-bit color photos in both the standard Photo mode and in Night mode, that too regardless of the three camera lenses you use. It will, however, not work in the Portrait mode, so keep that in mind.
While we’re here on the camera settings page, let’s take a look at some other settings that may want to tweak for a better experience overall. Here, I personally like to enable the grid lines to help me align my photos better. I also recommend you turn off the location tags unless you want your phone to add the location tags to the metadata. Irrespective of your preference with this option, I highly recommend you strip the EXIF data from each image before sharing it online. You can check out our how to remove the EXIF data guide to learn more about the process. Lastly, I also like to enable the option that tells me when the camera lens is dirty.
OnePlus 10 Pro camera modes
In addition to the modes that are easily accessible through the main camera viewfinder, you can tap on the ‘More’ button and find all the camera modes that are available in the OnePlus 10 Pro’s camera app. A lot of these shooting modes such as the Time-Lapse, Pano, and Dual-View Video are pretty self-explanatory, but there are a couple of interesting and new options too.
The “150-Degree” mode, for instance, is a fun way to use the ultra-wide lens on the OnePlus 10 Pro. It takes advantage of the new ultra-wide sensor’s extremely wide FoV, allowing you to get an interesting shot of your subject or the scene. The “XPAN” mode is a throwback to old Hasselblad cameras as it shoots in a 65:24 aspect ratio. Here’s a quick look at a couple of samples that I was able to capture to show you what these modes can do:
Captured using OnePlus 10 Pro 150-degree mode
Here are a couple of shots captured using the XPAN mode on the OnePlus 10 Pro:
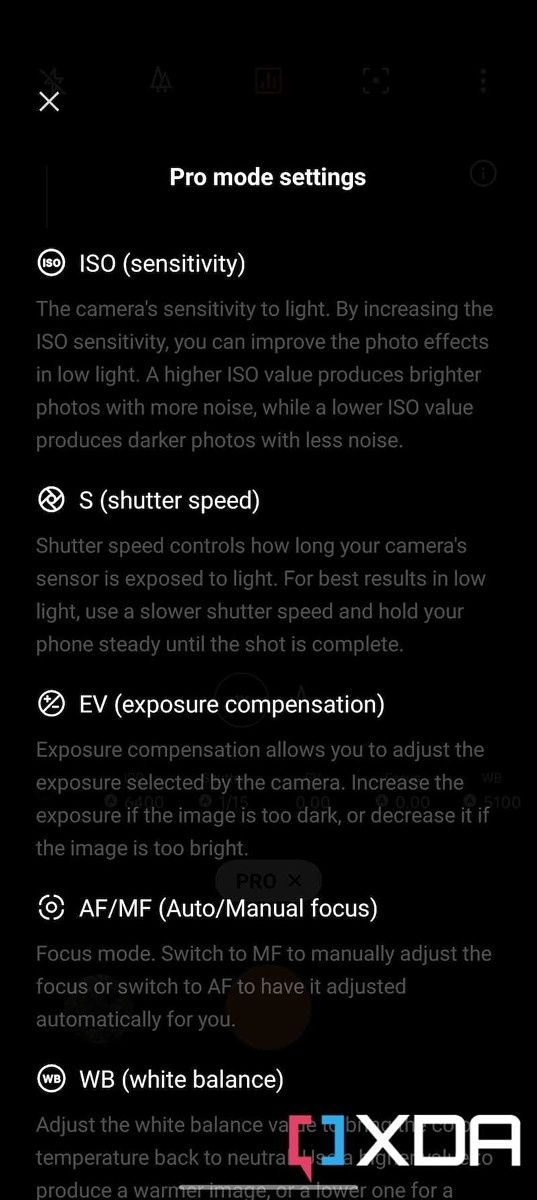
Notably, you also get a “Pro” mode for still photography and a “Movie” mode for recording videos in manual mode with more granular controls. These modes, as you probably already know, just give you more control over things like the ISO, exposure, and shutter speed among other things. You can also choose to ignore this and shoot videos using the normal mode to capture moments without going through the hassle of getting all the settings right. The OnePlus 10 Pro, in case you’re wondering, can record 8K@24fps, 4K@30/60/120fps, and 1080p@30/60/240fps.
I also like how the camera app has a dedicated button to explain some of the jargon. It makes it that much easier for amateur users to get accustomed to all these new features.
Closing Thoughts
Well, that brings us to the conclusion of this quick camera walkthrough of the OnePlus 10 Pro. I highly recommend you check out my colleague Ben’s OnePlus 10 Pro camera review which I’ve linked earlier in this article to learn more about the camera features on offer here. Ben goes into a lot more detail discussing various camera modes along with some samples too.
The OnePlus 10 Pro features a triple camera setup and comes with a very intuitive app, letting you take advantage of all the features and shooting modes.
I hope you found this particular guide useful and you’re now aware of all the OnePlus 10 Pro camera features. So which is your favorite OnePlus 10 Pro camera feature? Let us know by dropping a line in the comments down below.