LightBlog

dimanche 19 juin 2022

OnePlus 10 Pro Camera Walkthrough: All the camera modes, 10-bit color, & more

The OnePlus 10 Pro offers some big improvements in the camera department compared to its predecessors. As we mentioned in our OnePlus 10 Pro camera review, the camera system on this phone can hold its own against the top dogs. It may not outperform some big names like the Pixel 6 Pro or the Vivo X80 Pro, but you can get some good looking photos out of this phone. If you’re using a flagship phone with an advanced camera system like this for the first time, then you may find it a bit overwhelming. So let’s take a look at all the camera modes along with different options that are available in this OnePlus 10 Pro camera walkthrough.

Navigate this article:

OnePlus 10 Pro: Camera system

OnePlus 10 Pro back panel

Even though the OnePlus 10 Pro’s camera hardware is largely similar to last year’s OnePlus 9 Pro, there’s now a very unique-looking camera housing at the back that may have caught your attention. There are mixed opinions on the way this new camera module looks, but I personally think it looks good. It adds a bit of personality to the phone and makes it more recognizable in the sea of other flagship devices.

The OnePlus 10 Pro features a triple camera system headlined by a 48MP, f/1.8, 1/1.43-inch main camera; an 8MP, f/2.4 telephoto zoom lens with 3.3x optical zoom; and a 50MP, f/2.2 ultra-wide camera. The main and zoom lens sensors are identical to the one used on the OnePlus 9 Pro, but you do get a new ultra-wide sensor. OnePlus is using a Samsung JN1 sensor with a wide 150-degree field of view.

The camera hardware on the OnePlus 10 Pro is complemented by Hasselblad’s color science optimization. OnePlus’ partnership with the Swedish camera maker also brings some other noteworthy additions which we’ll discuss in the following sections. Casual users will find plenty of what they need in the OnePlus 10 Pro’s camera system, but you might want to take a look at our collection of the best camera phones if you’re an advanced user with specific needs.


 OnePlus 10 Pro: Camera app

OnePlus 10 Pro camera app

Now that we know what the OnePlus 10 Pro’s camera system is made of, it’s time to take a look at the camera app that lets you interact with the hardware to capture photos and videos. I am using the Indian variant of the OnePlus 10 Pro running OxygenOS 12.1 software. This is the OS you’ll get with all the OnePlus 10 Pro units sold outside China.

The OnePlus 10 Pro’s camera app is packed with a ton of features and different modes to shoot with. The camera app layout, however, is still designed to make it easier to navigate and find the right settings. It’s very intuitive and you won’t have to dig deep into the settings to find what you need, really. One thing to note about the camera app — it’s also something that I personally dislike — is that it stays in the last shooting mode instead of defaulting back to the photo mode. This happens even when I actively close the camera app from the recent menu and come back after, say, a couple of hours. It’s not necessarily a deal-breaker as I always double-check the shooting mode I am in before hitting the capture button, but I think it’s definitely something to keep in mind.

The app itself is fairly easy to navigate, as I mentioned earlier. Once you are in the main camera app, you can quickly swipe left or right to change the shooting mode from ‘Photo’ to ‘Video’, ‘Portrait’, ‘Night’, and more. In each of these modes, you also get an option to select the lens and switch between ultra-wide, main, or telephoto modes. Tapping and holding the lens button opens up an iPhone-like zoom dial which you can drag left or right to zoom in and out. It’s impressive how the camera viewfinder keeps up with your changes and switches between lenses almost seamlessly without any lag.

OnePlus 10 Pro zoom lens dial

Additionally, you’ll also find a bunch of options on the top of the viewfinder that’ll let you set different things. These options differ based on the shooting mode. The main photo mode, for instance, will show you an option to set a timer, enable HDR and AI enhancement, and more. While in the video mode, you’ll see options to set the video output resolution, frame rate, and more. These are self-explanatory options which I am sure you’ll understand what they do as you start exploring. But there’s one thing that I’d like to highlight before moving on to the next section —  the 10-bit color mode.

How to enable 10-bit color mode in OnePlus 10 Pro

One of the most important things to highlight about the OnePlus 10 Pro is that it supports a 10-bit color mode. For those that don’t know, the 10-bit color refers to the depth of tone an image or video can contain. Most cameras record in an 8-bit color that is shot and saved in JPEG format. What’s the difference? Well, 8-bit color contains 256 levels of tone or 16.7 million colors. In the case of 10-bit color, the depth of tone increases to 1,024 levels, or 1.07 billion colors.

These additional levels of tone make a significant difference for advanced users who can tweak the colors during post-processing. It is, however, worth pointing out that JPEG doesn’t support 10-bit, so the OnePlus 10 Pro saves still images in High-Efficiency Image File (HEIF) format.

OnePlus 10 Pro camera app OnePlus 10 Pro camera app

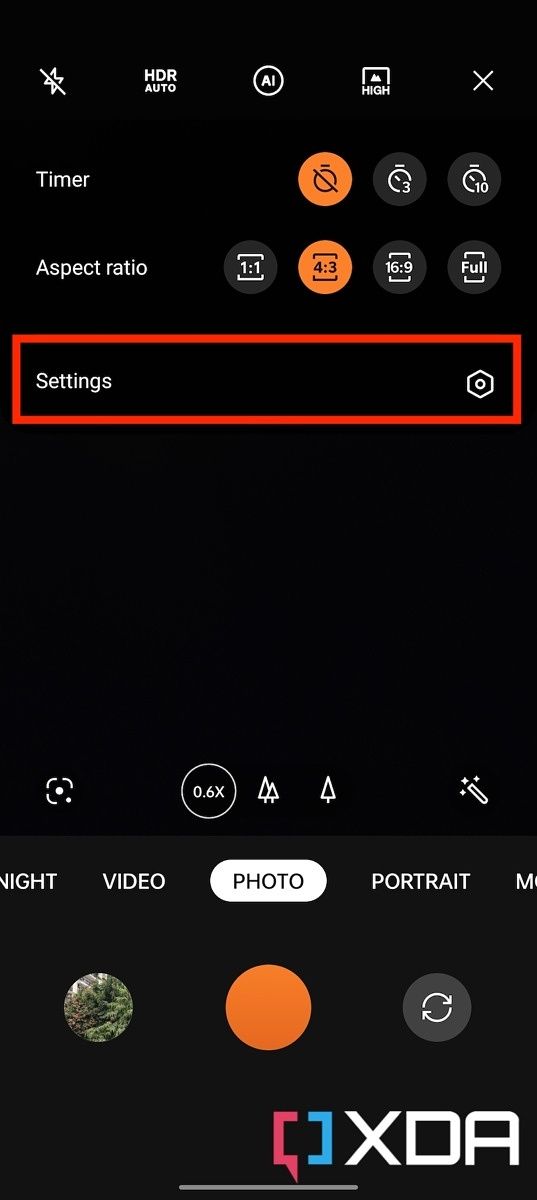
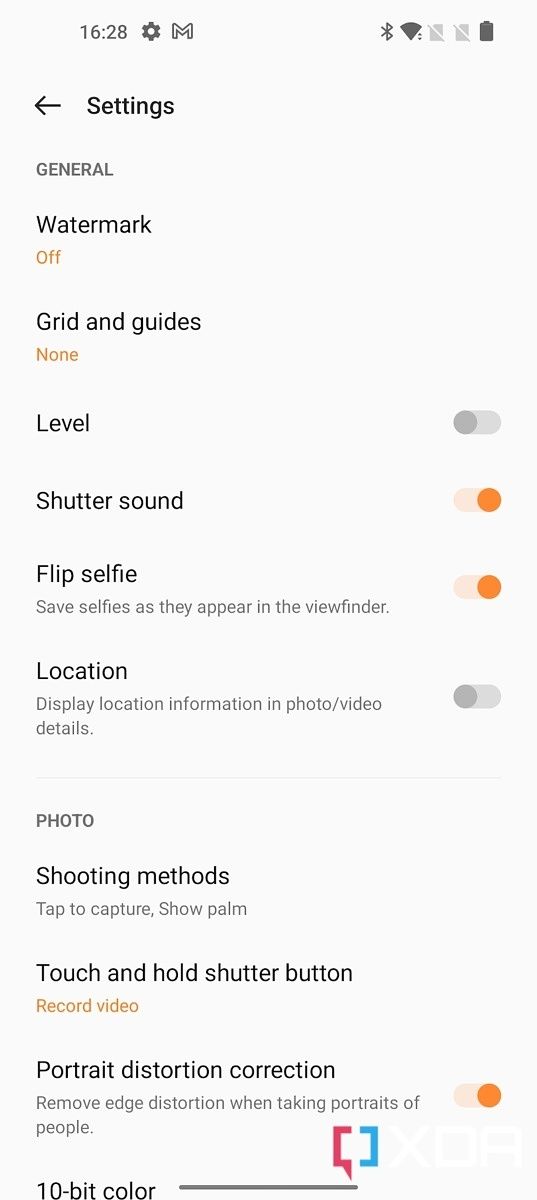
The 10-bit color mode is disabled by default but you can enable it rather easily by heading over to the Settings inside the camera app by tapping the three dots in the top-right corner of the screen. Now, scroll down until you see the 10-bit color mode and activate it. Activating the 10-bit color mode will automatically enable the HEIF option below it too.

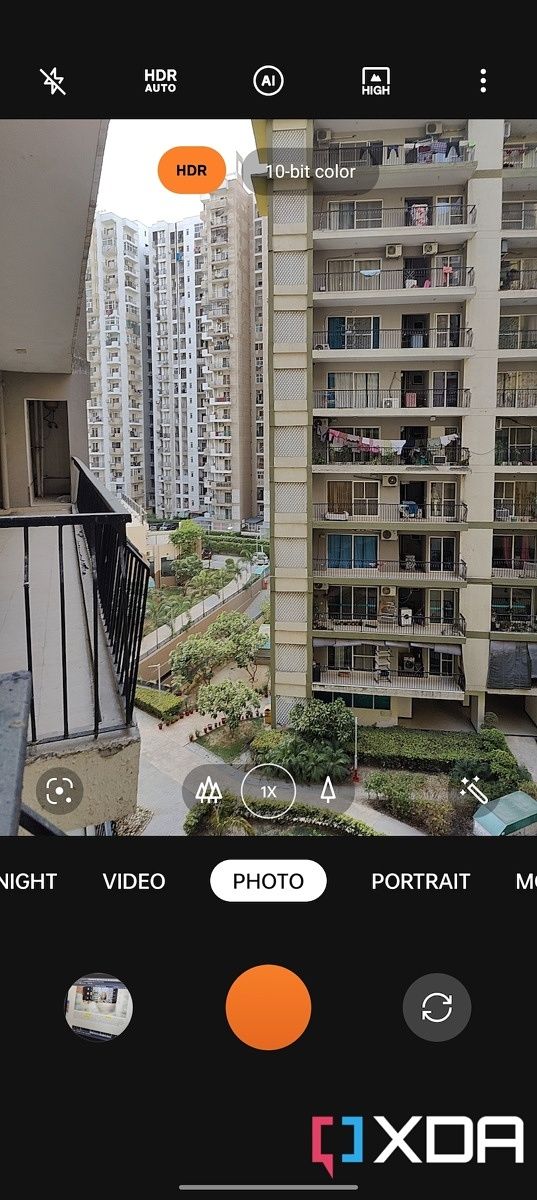
Once you return to the viewfinder, you’ll see a message on the screen reminding you the camera is shooting in 10-bit color. It’s worth mentioning that the OnePlus 10 Pro can shoot 10-bit color photos in both the standard Photo mode and in Night mode, that too regardless of the three camera lenses you use. It will, however, not work in the Portrait mode, so keep that in mind.

10-bit color mode message being displayed on the OnePlus 10 Pro camera viewfinder

While we’re here on the camera settings page, let’s take a look at some other settings that may want to tweak for a better experience overall. Here, I personally like to enable the grid lines to help me align my photos better. I also recommend you turn off the location tags unless you want your phone to add the location tags to the metadata. Irrespective of your preference with this option, I highly recommend you strip the EXIF data from each image before sharing it online. You can check out our how to remove the EXIF data guide to learn more about the process. Lastly, I also like to enable the option that tells me when the camera lens is dirty.


OnePlus 10 Pro camera modes

In addition to the modes that are easily accessible through the main camera viewfinder, you can tap on the ‘More’ button and find all the camera modes that are available in the OnePlus 10 Pro’s camera app. A lot of these shooting modes such as the Time-Lapse, Pano, and Dual-View Video are pretty self-explanatory, but there are a couple of interesting and new options too.

The “150-Degree” mode, for instance, is a fun way to use the ultra-wide lens on the OnePlus 10 Pro. It takes advantage of the new ultra-wide sensor’s extremely wide FoV, allowing you to get an interesting shot of your subject or the scene. The “XPAN” mode is a throwback to old Hasselblad cameras as it shoots in a 65:24 aspect ratio. Here’s a quick look at a couple of samples that I was able to capture to show you what these modes can do:

OnePlus 10 Pro 150-degree ultra-wide

Captured using OnePlus 10 Pro 150-degree mode

Here are a couple of shots captured using the XPAN mode on the OnePlus 10 Pro:

OnePlus 10 Pro XPan shot OnePlus 10 Pro XPan shot

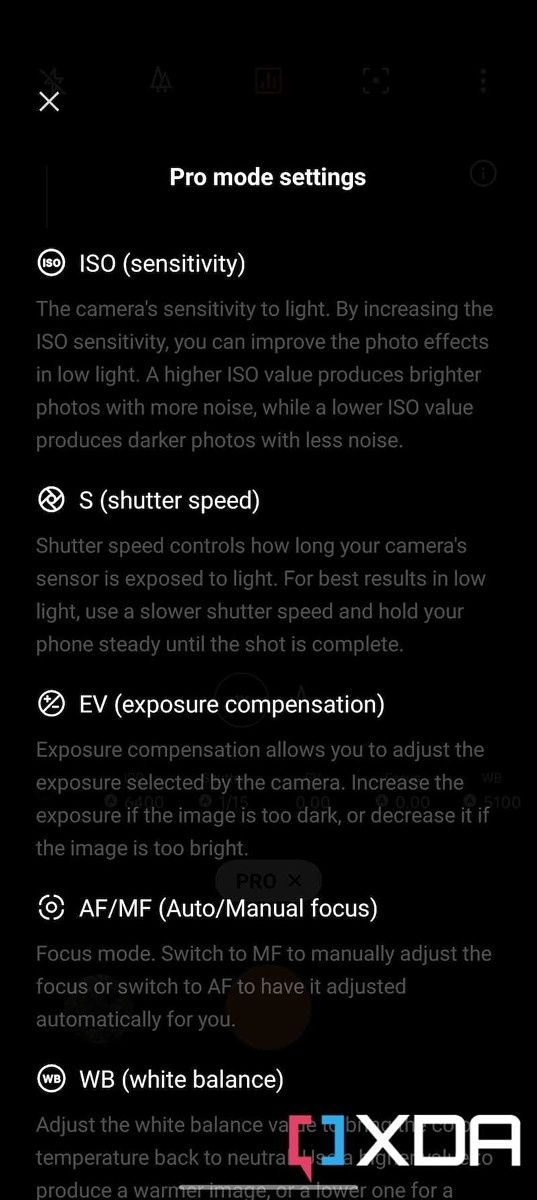
Notably, you also get a “Pro” mode for still photography and a “Movie” mode for recording videos in manual mode with more granular controls. These modes, as you probably already know, just give you more control over things like the ISO, exposure, and shutter speed among other things. You can also choose to ignore this and shoot videos using the normal mode to capture moments without going through the hassle of getting all the settings right. The OnePlus 10 Pro, in case you’re wondering, can record 8K@24fps, 4K@30/60/120fps, and 1080p@30/60/240fps.

oneplus 10 pro camera app oneplus 10 pro camera app

I also like how the camera app has a dedicated button to explain some of the jargon. It makes it that much easier for amateur users to get accustomed to all these new features.

OP10 pro camera app pro mode OP10 pro camera app pro mode

Closing Thoughts

Well, that brings us to the conclusion of this quick camera walkthrough of the OnePlus 10 Pro. I highly recommend you check out my colleague Ben’s OnePlus 10 Pro camera review which I’ve linked earlier in this article to learn more about the camera features on offer here. Ben goes into a lot more detail discussing various camera modes along with some samples too.

    OnePlus 10 Pro
    The OnePlus 10 Pro features a triple camera setup and comes with a very intuitive app, letting you take advantage of all the features and shooting modes.

I hope you found this particular guide useful and you’re now aware of all the OnePlus 10 Pro camera features. So which is your favorite OnePlus 10 Pro camera feature? Let us know by dropping a line in the comments down below.

The post OnePlus 10 Pro Camera Walkthrough: All the camera modes, 10-bit color, & more appeared first on XDA.


from XDA https://ift.tt/Xx8nIQ4
via IFTTT

samedi 18 juin 2022

How to remove bloatware from the Samsung Galaxy S22 without root access

Having to deal with bloatware is never a pleasant experience. The sad part is that even the best Android phones come with pre-installed apps that you didn’t ask for. They’re often shipped by the OEMs as a result of their monetization partnerships with other brands and companies. The Samsung Galaxy S22 also comes with a bunch of apps that can’t be uninstalled. This includes the usual suspects like the Galaxy Store and My Galaxy along with duplicate apps such as Calendar, Messages, and more. In this article, we’ll show you how to remove bloatware from the Samsung Galaxy S22.

While these pre-installed apps don’t cross paths with your day-to-day usage or do anything harmful, they tend to take up storage space — and sometimes even system resources — that could be used by other apps. Even when they don’t, some people just find them annoying and hard to ignore. So let’s take a look at a couple of simple steps using which you can free your shiny new $800 smartphone from the pre-loaded and “uninstallable” bloatware.

Note: You can follow the same set of instructions to uninstall bloatware on other Android smartphones too.

The only things you’ll need for this are your smartphone, a PC/Mac with ADB, and a USB cable to connect your phone to your computer.

How to Uninstall Bloatware from Samsung Galaxy S22 without Root Access

We’ll be showing you how to remove bloatware using both ADB as well as ADB App Removal GUIs such as the “Universal Android Debloater”. Neither of these methods requires root access to your phone, so you should be able to get this done easily as long as you follow the steps carefully.

Caution: Uninstalling some system apps can be dangerous and may result in force closes and malfunctions, or even a bricked device. We recommend removing only the apps that you think are absolutely unnecessary.

Step 1: Enable USB Debugging on your Galaxy S22

  • Open the Settings app on your Galaxy S22 and scroll all the way down to find the About phone option.
    Samsung Galaxy S22 about phone
  • Now, look for an option named Software information and tap on it to see all the software details including One UI version, Android version, and more.
    Samsung galaxy s22 software information
  • Find the Build number option and tap on it several times to enable Developer Options.
  • Once enabled, you’ll now see Developer Options right below the About phone option on the Settings page.
    Developer options galaxy s22
  • Enter Developer options, scroll down a bit till you find the Debugging section to enable USB Debugging.
    Samsung Galaxy S22 debugging

Step 2: Using ADB to remove installed packages

  • It’s important to ensure that you have ADB installed on your computer before we begin this step. You can check out our How to install ADB guide if you’re new to this.
  • After enabling USB Debugging, plug in your Galaxy S22 into your computer and change the USB settings from Charging phone only mode to Transferring files mode when prompted.
  • On a Windows machine, browse to the directory where ADB is installed and hold the Shift key and right-click on the name of the directory and select Open command/PowerShell window here.
  • If you’re using a Mac, launch a Terminal window and navigate to the ADB directory using cd <path to the directory>.On my Mac, for instance, it was cd /Users/karthiksmac/Desktop/platform-tool
    Mac Terminal galaxy s22
  • Once you’re in, simply type adb devices and hit enter to see the serial number of your device. You may see a prompt on your phone asking you to authorize a connection with the computer if you’re doing this for the first time. If yes, then grant it.
    Allow USB Debugging Galaxy S22
  • After that, re-run the adb devices command to see the serial number.

Step 3: Removing app packages

  • In the command prompt or Terminal window, enter adb shell and hit enter.
  • You can then use the following command to get a list of Samsung apps that are installed on your device:

    pm list packages | grep ‘Samsung

    .
    Mac Terminal with Galaxy S22 app packages
  • If you don’t know what you’re looking at or don’t identify the app by looking at the package names, then we suggest you download an application on your phone called the Package Name Viewer 2.0 to find out the package name of the app that you want to uninstall.

    Package Name Viewer 2.0 (Free, Google Play) →

Step 4: Time to get rid of the bloatware

  • Once you have the package name of the app that you want to uninstall, use the following command to remove it from your phone:

    pm uninstall -k --user 0 NameOfPackage

  • Note that you’ll have to replace “NameOfPackage” from the command with the full package name, without any ” or <>.

If you followed the steps correctly, then you’ve successfully uninstalled the bloatware from your Galaxy S22. Since there’s no way to uninstall all the apps together using the ADB, you’ll have to manually execute the command for every app you want to uninstall.

If this sounds like a lot of work for you or if you aren’t comfortable running ADB codes, then you can also consider using an app removal GUI to remove the bloatware. One of the best things about using a GUI like the “Universal Android Debloater” is that you can also select a bunch of packages together and remove them in a single batch.

Universal Android Debloater

You can head over to our XDA Forums’ “Universal Android Debloater” thread to download and learn more about it. It’s worth pointing out that you can also re-install the apps that you may have removed by mistake. You can head over to our bloatware removal guide to find out the steps involved in re-installing the apps.


Closing thoughts

Well, that brings us to the end of this tutorial. Removing bloatware from your Samsung Galaxy S22 smartphone, as you can see, is a fairly simple task if you know your way around the ADB tool. That being said, we hope OEMs allow us to get rid of these apps more easily, just like how you’d uninstall a regular app from your smartphone.

If you stumbled upon this article while looking for a way to remove bloatware from any other Android phone, then you’d be happy to know that this method can be used on any smartphone regardless of the OEM or carrier. Good luck with the process and we hope you enjoy your bloatware-free Galaxy S22 as much as we did while putting together its review.

The post How to remove bloatware from the Samsung Galaxy S22 without root access appeared first on XDA.


from XDA https://ift.tt/eo4JuXO
via IFTTT

How to use Continuity Camera on macOS Ventura and iOS 16

Apple revealed iOS 16, iPadOS 16, and macOS Ventura during the main keynote of WWDC22. These major updates come packed with new additions that further enrich Apple products and the features they offer. These include a customizable iPhone Lock Screen with widget support, resizable app windows on M1 iPads, and a redesigned Settings app on the Mac. With every annual version bump, Apple tends to further tie its devices together through new Continuity features. 2022’s updates are no different, as they include some mind-blowing tech magic. Continuity Camera is a new addition that allows you to use your compatible iPhone as a wireless webcam for your Mac. The feature works instantly and seamlessly — as is the case with other Apple Continuity tools. Here’s how to use Continuity Camera on macOS Ventura and iOS 16.

Prerequisites for Continuity Camera to work

  • Your iPhone and Mac should be running iOS 16 and macOS Ventura respectively.
  • You must be using an iPhone XR or a newer model for the basic Continuity Camera feature to work.
  • To use Center Stage and Desk View, you must be using an iPhone 11 or a newer model.
  • For Studio Light you need an iPhone 12 or a newer model.
  • Both your iPhone and Mac must be paired to the same Apple ID.
  • You should have Bluetooth and Wi-Fi enabled on both devices, along with Continuity Camera Webcam in iOS General Settings (which is on by default).

How to use Continuity Camera in an app

  • Launch FaceTime or the video calling app of your choice.

How to use Continuity Camera on macOS Ventura and iOS 16

  • Click on Video (the naming could differ based on the app) in the Menu Bar.
  • Tap on your iPhone’s name after you make sure it’s near your Mac.

macOS Ventura hands-on

  • You will get the option to disconnect the camera feed on your iPhone if you want to switch back to using the Mac’s camera.

How to use it on a website

  • Load the video calling website you plan on using.
  • Locate its settings and find the video input section.

How to use Continuity Camera on macOS Ventura and iOS 16

  • Choose your iPhone’s name from the list of available cameras.

Continuity Camera is such a great feature — especially for those who use a Mac Studio or Mac Mini and don’t want to get a dedicated webcam for their occasional video calls. I’ve used it a few times and it works smoothly in terms of both audio and video.

Do you plan on using Continuity Camera? Why or why not? Let us know in the comments section below.

The post How to use Continuity Camera on macOS Ventura and iOS 16 appeared first on XDA.


from XDA https://ift.tt/0U5ZzQb
via IFTTT

The robots of iOS 16 can prove to websites that you’re not a robot

Apple revealed iOS 16, iPadOS 16, and macOS Ventura during the main keynote of WWDC22. These major operating system (OS) upgrades come packed with plenty of new features and changes. Most notably, iPhone users can now fully customize their Lock Screens through different fonts, widgets, 3D wallpapers, and more. iOS also gains plenty of other additions that enrich it — as a relatively limited OS. For example, iMessage and Apple Mail gain unsending capabilities, and FaceTime now supports Handoff. One of the smaller changes we’ve discovered is a new toggle that seemingly allows iOS 16 users to bypass CAPTCHAs in apps and websites.

Automatic CAPTCHA verification on iOS 16 beta 1 1

We’ve found in iOS 16 beta 1 a new option for automatic verification. It is on by default and states that iCloud will handle CAPTCHA verifications on your behalf. It’s unclear under which conditions it works, but it certainly sounds like a feature that will spare us from having to solve the annoying CAPTCHAs.

It’s a bit ironic how iOS 16 will handle human verification without human input. We still don’t know how exactly the feature works or its specific conditions. If you’re curious to check it out, you can go to the Settings app, click your name at the very top of the list, tap Password & Security, then scroll to the bottom of the list. There you can disable it if you’d rather continue solving the intrusive puzzles. We will share additional details if we learn more about this feature later on.

iOS 16 is currently in beta testing. The first beta is available to those enrolled in the company’s developer program. If you’d rather not pay $99 per year, you can wait for the free public beta program. Apple has stated that it will launch that in July. Though, remember that beta builds can be very unstable, and you’re not meant to install them on your daily driver.

Which iOS 16 feature do you like the most? Let us know in the comments section below.

The post The robots of iOS 16 can prove to websites that you’re not a robot appeared first on XDA.


from XDA https://ift.tt/6IPmXNw
via IFTTT

Apple MacBook Air M2 (2022) vs Apple iPad Pro M1 (2021): Which M-powered beast should you buy?

Apple launched the all-new MacBook Air (2022) during WWDC22. The reveal also included that of macOS Ventura — which further enriches the Mac lineup with handy features. And considering that this new MacBook packs the M2 chip, you might want to take a look at our list of best apps for Apple silicon. These applications are specifically optimized for the family of M chips that power the company’s latest computers. Speaking of M processors, Apple has even started including these chipsets in some of its higher-end iPads. This is the MacBook Air M2 (2022) vs iPad Pro M1 (2021) — two thin and light, M-powered beasts that cater to different users.

Navigate this article:

Apple MacBook Air M2 (2022) vs Apple iPad Pro M1 (2021): Specifications

Apple MacBook Air M2 Apple iPad Pro M1
Processor
  • Apple M2 (8-Core CPU)
  • Apple M1 (8-Core CPU)
Graphics
  • Apple M2 (8-Core GPU)
  • Apple M2 (10-Core GPU)
  • Apple M1 (8-Core GPU)
Body
  • 11.97 x 8.46 x 0.44 inches
  • 2.7lbs
  • 11.04 x 8.46 x 0.25 inches
  • 1.5lbs
Display
  • 13.6-inch Liquid Retina display (2560 x 1664), up to 500 nits peak brightness, True Tone technology
  • 12.9-inch Liquid Retina XDR multi-touch display (2732 x 2048), up to 1600 nits peak brightness, True Tone technology, ProMotion technology for adaptive refresh rates up to 120Hz
Ports
  • Two Thunderbolt/USB 4 ports (40Gbps, Power Delivery, one external display)
  • MagSafe 3 port
  • Headphone jack
  • Thunderbolt/USB 4 port (40Gbps, Power Delivery, one external display)
Storage
  • 256GB
  • 512GB
  • 1TB
  • 2TB
  • 128GB
  • 256GB
  • 512GB
  • 1TB
  • 2TB
Memory
  • 8GB
  • 16GB
  • 24GB
  • 8GB
  • 16GB
Battery
  • 52.6Whr battery
  • Up to 18 hours of video playback
  • 30W charger
  • 40.88Whr battery
  • Up to 10 hours of video playback
  • 20W charger
Audio
  • Four-speaker sound system with wide stereo sound and spatial audio support when playing Dolby Atmos content
  • Four speaker audio
Camera
  • 1080p FaceTime HD camera
  • Pro rear camera system: Wide and Ultra Wide cameras
    • Wide: 12MP, ƒ/1.8 aperture
    • Ultra Wide: 10MP, ƒ/2.4 aperture, 125° field of view
    • 2x optical zoom out
    • Digital zoom up to 5x
    • Brighter True Tone flash
    • LiDAR scanner
  • TrueDepth front-facing system
    • Ultra Wide: 12MP, ƒ/2.4 aperture, 122° field of view
    • Portrait mode with advanced bokeh, Depth Control, and lighting effects
    • Retina Flash
Connectivity
  • Wi-Fi 6
  • Bluetooth 5.0
  • Wi-Fi 6
  • Bluetooth 5.0
  • 5G (on Cellular model)
Color
  • Silver
  • Starlight
  • Space Gray
  • Midnight
  • Silver
  • Space Gray
Price
  • Starts at $1,199
  • Starts at $1,099

Design: We’ve got a Pro that is lighter and thinner than air!

the iPad Pro 2021 with a white Magic Keyboard on a table.

Let’s start with design. Design is one of the important aspects to consider when buying a new computing device. That’s because it’s the first thing we look at when we’re about to start using a certain product — before we even log in and check its software. Fortunately, both products have futuristic chassis that are very easy on the eyes. Obviously, though, there’s more to consider when it comes to their designs than just them looking modern.

MacBook Air side view in four colors

If you’re looking for the thinner of the two, the iPad Pro is the one to go for. It’s also definitely more portable, thanks to its smaller size and lighter weight. The MacBook Air, though, comes with more ports, a built-in keyboard, and a larger display. So depending on what you’re looking for, you will likely find yourself leaning to one of the two devices and the physical features they offer. It’s also worth noting that you could always buy a separate keyboard for the iPad Pro. And, finally, the MacBook Air comes in Midnight and Starlight in addition to the colors that the iPad Pro offers (Space Gray and Silver). Ultimately — in terms of design — the iPad Pro is clearly cleaner and more minimalistic than the MacBook Air.

Display: Touch-enabled, brighter, clearer, faster — the Pro has got it all!

The notch on the new MacBook

Whether you’re a creative looking to utilize Apple’s mighty M chips or a binge watcher looking for the superior display — there’s a clear winner in this round. The iPad Pro’s dominates that of the MacBook Air from all aspects except when comparing their sizes. For starters, it’s a multi-touch screen, allowing you to doodle using your finger, Apple Pencil 2, or a regular stylus. Secondly, it has a higher resolution and supports the ProMotion technology, which further… ProMote and crown it as the better display.

Apple's iPad Pro with a white Magic Keyboard.

For those unfamiliar with the ProMotion technology, it’s Apple’s marketing name for 120Hz refresh rates. So on the iPad Pro you get to take advantage of these buttery-smooth animation and scrolling speeds that are nowhere to be found on the MacBook Air. Another aspect to consider — especially if you tend to work outdoors — is the peak brightness. That of the notebook is 500 nits, which is obliterated by the 1600 nits the tablet offers. The iPad Pro’s display truly is a pro at what it does. Oh, and it doesn’t have a notch like the MacBook Air.

Performance: Air? More like a hurricane!

Apple M2 specifications graphic

Performance on a computing device can be the top priority for customers looking to get the maximum power their bucks can buy them. This round isn’t as simple as the rest — simply because we have two devices of different natures. Obviously, the MacBook Air wins it, but we have to dissect the specific details nonetheless. Starting with the processor, both devices are powered by an M chip. The Mac goes for 2022’s M2, while the iPad Pro packs the 2020 M1 chipset. As you’d expect, the M2 is faster and more power efficient than the first gen of this SoC.

m1 chip overview

Chips aside, you can get up to 2TB of SSD on both devices. However, the MacBook Air offers more RAM options — 8GB, 16GB, and 24GB. The iPad Pro misses out on the third option. Though, let these insignificant differences not distract us from what I would consider the biggest disadvantage of the iPad — iPadOS.

Yes, iPadOS 16 adds Stage Manager and proper external display support. However, it’s still iPadOS. The MacBook Air runs macOS — which means you don’t have to deal with the restriction Apple bakes into its mobile operating systems. In the iPad Pro’s defense, though, you get stylus and better accessory support. If you’re an illustrator or take plenty of handwritten notes, then the iPad might make more sense to you.

Bottom Line: It’s all about weighing your pros and cons

The Apple MacBook Air M2 (2022) and iPad Pro M1 (2021) are two very, very different products. They’re powerful and lightweight in their own unique ways — epitomes of Apple’s modern design, reflected through reliable, long-lasting, and unsophisticated technologies. Both should be receiving software support for years to come. Ultimately, you should decide if you want a laptop or a Pro tablet. Do you prefer the clearer touch screen or the built-in keyboard? Would you sacrifice macOS for the slimmer, Face ID-enabled design? It really is up to you. We’ve only helped you pick by breaking down what you need to know about the two Apple computing devices.

Both devices are in the same price range, with the MacBook Air starting at $1,199 in the US and the iPad Pro going for a slightly cheaper $1,099 price tag.

    Apple MacBook Air M2 (2022)
    The 2022 MacBook Air offers the M2 chip and a redesigned chassis with MagSafe support. Best Buy can notify you when it's available.
    Apple iPad Pro M1 (2021)
    The 12.9-inch iPad Pro (2021) packs the Apple M1 chip, includes optional 5G support, and houses the TrueDepth camera system in its thin bezels.

Which Apple powerhouse will you be buying, and why? Let us know in the comments section below.

The post Apple MacBook Air M2 (2022) vs Apple iPad Pro M1 (2021): Which M-powered beast should you buy? appeared first on XDA.


from XDA https://ift.tt/jVHkPBI
via IFTTT

Lenovo ThinkPad X1 Yoga Gen 7 review: The best business convertible

There’s a reason that Lenovo ThinkPad is such a powerful brand, dominating in the business market thanks to a reputation for quality and innovation. And when it comes to the ThinkPad X1 Yoga, the product is tried and true, now on its seventh generation. It’s made out of aluminum, has a built-in pen garage, and it passes over a dozen MIL-STD-810G tests, just like any ThinkPad.

XDA Best Award
Not a whole lot has changed since the previous generation, and that’s not a bad thing. There are two key differences. One is that the 4K option is now OLED, which is cool since we haven’t seen an OLED display in the ThinkPad X1 Yoga since the Gen 2 model. It also comes with Intel’s new 28W 12th-gen processors, which are more powerful, have better power management, and unlock other capabilities like how this machine includes LPDDR5 memory.

Ultimately, it’s just a great all-around convertible laptop, which is something that the ThinkPad X1 Yoga has always been.

    Lenovo ThinkPad X1 Yoga Gen 7
    Lenovo's ThinkPad X1 Yoga has all of the bells and whistles you need, like optional 5G, an optional 4K OLED display, 12th-gen processors, LPDDR5, and an overall great build quality.

      Features:

      Pros:

      Cons:

Navigate this review:

Lenovo ThinkPad X1 yoga Gen 7 pricing and availability

  • The Lenovo ThinkPad X1 Yoga Gen 7 starts at $1,589.40 on Lenovo.com, although as a business laptop, it’s available through various other channels.
  • It’s available to purchase now.

Lenovo first announced the ThinkPad X1 Yoga Gen 7 at CES back in January, alongside the new ThinkPad X1 Carbon and ThinkPad X1 Nano. It was slated to arrive in March, so it’s been on sale for a little while.

There were a few key changes. The biggest, interestingly enough, is the spec bump. Intel now makes a 28W processor in the P-series, so that’s included in these flagship products. Along with a new hybrid architecture for more cores and batter power efficiency, there’s just more power. There’s also a new 4K OLED display option, although that’s not included in my review unit.

Being the flagship convertible from the ThinkPad brand, it starts at $1,589.40, so it’s not a cheap laptop. That comes with a Core i5-1240P, 8GB LPDDR5 5200MHz RAM, and a 256GB SSD. It goes up from there.

Lenovo ThinkPad X1 Yoga Gen 7: Specs

Processor Intel Core i7-1260P
Graphics Intel Iris Xe
Display 14.0″ WUXGA (1920 x 1200) IPS, anti-glare, touchscreen, 400 nits
RAM 16GB LPDDR5 5200MHz (Soldered)
Storage 512GB PCIe SSD Gen 4 Performance
Battery
  • 57Whr
  • Rapid Charge (requires 65W PSU or higher)
Security
  • Discrete Trusted Platform Module (dTPM) 2.0
  • Computer Vision with Human-presence detection sensor
  • Facial recognition with IR camera
  • Smart Power On fingerprint reader integrated with power button (match-on-chip)
  • Tile ready
  • Webcam privacy shutter
  • Kensington lock slot
  • Secured-core
Audio
  • Dolby Atmos Speaker System (user facing, 4 x speakers)
  • 4 x quad-array 360-degree far-field microphones
  • Dolby Voice certified for professional conferencing solution
Camera
  • 1080p FHD
Chassis 14.95mm x 315.6mm x 222.5mm x / 0.61″ x 12.38″ x 8.75″, Starting at 1.38kg / 3.04lbs
Connectivity
  • WLAN: Intel Wi-Fi 6E** AX211 802.11AX (2 x 2)
  • Bluetooth 5.2 with vPro™
Ports
  • 2 x USB-C Thunderbolt 4
  • 2 x USB-A 3.2 Gen 1
  • Headphone / mic combo
  • HDMI 2.0b
  • Optional: Nano SIM slot
Input
  • Spill-resistant
  • Glass TrackPad 110mm/4.33″
  • Backlit with white LED lighting
  • Air intake keys
Pen Lenovo Integrated Pen
Color Storm Grey
Material Aluminum
OS Windows 11 Pro
What’s in the box
  • ThinkPad X1 Yoga Gen 7
  • Internal Battery
  • USB-C 65W (supports Rapid Charge)
  • Quick Start Guide
Price $1,987.80

Note that these are the specs of my review unit. As with any ThinkPad, there’s a wide array of configurations. You can get it with a 15W U-series processor instead of the 28W P-series chip, there’s an optional IR camera, and there’s even optional 5G.

Design: The rare aluminum ThinkPad

  • The ThinkPad X1 Yoga is made of aluminum, and the chassis is mostly the same size as it was last year.
  • It has four USB ports, two of which are USB Type-A and two of which are Thunderbolt 4.

Lenovo’s ThinkPad X1 Yoga Gen 4 was the first time that the product was made out of aluminum. And indeed, it’s a rare material to find in a ThinkPad, which is known for using carbon fiber in premium devices. The general design of the product has changed a bit since then, changing up the ports, adding a 16:10 display, and so on, but it still comes in the Storm Grey color.

Top down view of ThinkPad X1 Yoga

It’s not the same chassis as last year though, although it’s very similar. It’s ever so slightly heavier, at 3.04 pounds instead of three pounds, and it’s actually a little bit wider at 315.6mm instead of 313mm. Of course, if you put the two next to each other, you probably wouldn’t even be able to tell which one is which.

As usual, it looks clean and professional, with the only markings on the lid being a metallic ThinkPad X1 logo on the corner, and a Lenovo logo in the opposite corner.

Close up of ThinkPad X1 Yoga ports

Having the pen built in means it's always with you, always charged, and it doesn't get in the way.

It’s a business laptop, and that means that it still has a bunch of ports, including two USB Type-A ports and HDMI 2.0. Indeed, on a consumer laptop, you’re lucky to find one USB Type-A port, let alone two, and you can forget about HDMI. Sadly, those two USB Type-A ports are still USB 3.2 Gen 1, meaning that you get 5Gbps speeds.

One of those USB Type-A ports is on the right side of the device, along with the 3.5mm audio jack. On that side, you’ll also find a pen garage, so you always have the pen with you. Personally, I think this is the best method of pen storage. We’ve seen pens attach magnetically, and while that allows for a larger pen, those often fall off in a bag and just get in the way. This way, the pen is always with you and it’s always charged.

Close up of ThinkPad X1 Yoga pen

Personally, I think this matters. If you’re not going to be using the ThinkPad X1 Yoga as a tablet from time to time, you should ask yourself why you’re considering buying it. Without the convertible functionality, the ThinkPad X1 Carbon is a better option.

Close up of ThinkPad X1 Yoga ports

On the left side, you’ll also find a USB Type-A port and the HDMI port, but there are also two Thunderbolt 4 ports. That means that a single port can connect to up to two 4K displays or one 8K display, or you could connect this laptop to an external GPU. And of course, you’d use one of these ports for charging.

Ultimately, this is a fine design for a laptop. It’s got two USB-A and two USB-C ports, and it comes in a clean-looking aluminum chassis.

Display: The ThinkPad X1 Yoga now comes with optional OLED

  • It has a 14-inch 16:10 display, which can now be configured as 4K OLED.
  • The 1080p webcam is now standard

While the option for 4K OLED is one of the two big changes for this laptop, the model that Lenovo sent me is FHD+, or 1,920×1,200. It’s fine, and it will get you better battery life, something you’ll want with Intel’s new P-series processors. Back in the old days, the OLED options for the ThinkPad X1 Carbon and Yoga were actually 1440p, which was a nice balance between a higher resolution and battery life. With 3,840×2,400 resolution and OLED, you’re going to really feel the difference between battery life on that, and on the FHD model.

Close up of ThinkPad X1 Yoga display

OLED is delightful, and it's the first ThinkPad X1 Yoga to have it since Gen 2.

Of course, 16:10 is also the correct resolution. Pretty much all premium laptops have moved beyond 16:9 aspect ratios now, as 16:10 is taller with more surface area. Screens are measured diagonally, so while it’s still 14 inches, the taller aspect ratio means that you actually get more space.

Lenovo ThinkPad X1 Yoga display test

In my testing, the screen supported 99% sRGB, 77% NTSC, 82% Adobe RGB, and 82% P3. That’s pretty good. In fact, I’d say anything over 80% in the Adobe RGB and P3 departments is solid. I will point out that the OLED model would likely be in the 90s.

Lenovo ThinkPad X1 Yoga display test

Brightness maxed out at 418.1 nits, exceeding the 400 nits that were promised on the spec sheet. Notice that black came in at 0.22 at 100% brightness, and that column will be the biggest difference between OLED and non-OLED. If it as 0.01 at 0% brightness, it would be 0.01 at 100% brightness.

Close up of ThinkPad X1 Yoga webcam

As noted above, the webcam is FHD, and that is standard. Last year, a lot of the ThinkPad lineup for the FHD webcam treatment, but the base model was only 720p. Now, if you buy this very expensive laptop, you’ll definitely get a solid webcam. Indeed, that’s as it should be. It’s about time that OEMs started taking webcam quality seriously.

Keyboard: A wider touchpad, and the same keyboard design

  • The touchpad is 110mm wide, but it still has buttons that take up valuable real estate.
  • The keyboard is still 1.5mm.

Lenovo’s ThinkPads are renowned for keyboard quality, so it’s no surprise that the ThinkPad X1 Yoga has an excellent keyboard. Also, it hasn’t changed from te Gen 6 model; the depth of the keys is still 1.5mm. It’s comfortable and accurate to type on, something that you’d expect from a ThinkPad.

Top down view of ThinkPad X1 yoga keyboard

Lenovo is renowned for its best-in-class keyboards.

The power button the sits above the keyboard doubles as a fingerprint sensor, which is nice since the IR camera is optional. In fact, this review unit doesn’t have an IR camera, so the fingerprint sensor was the only means I had of biometric authentication. Naturally, it scans your fingerprint when you first press it, automatically logging you in after the laptop boots up.

Close up of ThinkPad X1 Yoga TrackPoint

Just like with almost every other ThinkPad, there’s a TrackPoint between the G, H, and B keys. It’s a relic from the era when Windows laptop touchpads were terrible, but there are still some people that use them. In fact, Lenovo undoubtedly has telemetry around how often the TrackPoint gets used, and it has to be considering that when it includes it on every single ThinkPad laptop’s keyboard. ThinkPads still dominate in businesses, so Lenovo is doing something right.

You can easily ignore it if you don’t like it. If you can’t ignore it, then ThinkPads aren’t for you.

Angled view of ThinkPad X1 Yoga toughpad

One result of the TrackPoint that you can’t ignore is the buttons above the touchpad. Those are there so they can be used with TrackPoint navigation, so if you only use the touchpad, it’s a waste of real estate. Of course, you could use the buttons with the touchpad, but that’s up to you.

The touchpad is wider than in previous generations, coming in at 110mm, so Lenovo does see the value of a larger touchpad. I think that at some point, the firm is going to have to release some ThinkPads without the TrackPoint or touchpad buttons, or even if a model like that was released as an option, but that day is not today.

Performance: Intel’s P-series is powerful, but it has limitations

  • It comes with 28W Intel 12th-gen processors

When Intel introduced its 12th-generation processors for ultrabooks, it showed off its all-new P-series. It still offers the more traditional 15W and 9W CPUs that go in laptops, and while there have been 28W U-series processors in the past, this is a specifically 28W series of chips.

It’s basically billed as a way to put more powerful CPUs in the same kinds of laptops that we’ve seen 15W CPUs used in. So now, premium laptops like the entire ThinkPad X1 lineup use P-series chips, and that even includes the ultra-thin ThinkPad X1 Nano, which used 9W processors last year.

ThinkPad X1 Yoga in tent mode with green and yellow lighting

P-series processors are powerful, but there are drawbacks.

Intel’s 12th-gen chips also use a new hybrid architecture. The Core i7-1260P in this laptop has 12 cores and 16 threads, a big change from the quad-core octa-thread CPUs from the U-series of years prior. Out of those 12 cores, four of them are performance cores and eight are efficiency cores, with Intel using a scheduler to direct tasks to different cores as necessary.
ThinkPad X1 Yoga Gen 7
Core i7-1260P
ThinkPad X1 Yoga Gen 6
Core i7-1185G7
Lenovo Yoga 9i
Core i7-1260P
PCMark 10 5,168 5,158 5,616
3DMark: Time Spy 1,458 1,781 1,678
Geekbench 5 1,419 / 6,915 1,592 / 5,518 1,736 / 9,525
Cinebench R23 1,375 / 6,831 1,473 / 4,807 1,638 / 7,757

Here’s the issue with performance. Intel really billed P-series as a way of putting more performance into the same laptops, but that’s just not the case. These processors run hotter and use more battery life. Performance is better than 11th-gen, but it doesn’t really benchmark well because it starts to heat up and throttle. As you can see, the newly redesigned Yoga 9i actually sustains performance a lot better.

Interestingly, while performance wasn’t quite as good as other P-series laptops that I’ve reviewed, battery life was better. I got between 210 minutes and 374 minutes of usage out of it, the latter of which is really impressive. I expect four to five hours out of any regular laptop, so maxing out at six hours and 14 minutes is pretty great.

Lenovo did say that the ThinkPad X1 Yoga is available with U-series processors as well, so there’s a lot of flexibility for the kind of laptop you can get here.

Should you buy the Lenovo ThinkPad X1 Yoga Gen 7?

The Lenovo ThinkPad X1 Yoga Gen 7 is a phenomenal convertible laptop. It’s not the flashiest, but it’s one of the best around.

You should buy the Lenovo ThinkPad X1 Yoga Gen 7 if:

  • You’re looking for a quality convertible with great build quality
  • You like the TrackPoint
  • Keyboard quality is important to you
  • Webcam quality is important to you

You should not buy the Lenovo ThinkPad X1 Yoga Gen 7 if:

  • You’re not willing to spend a lot of money for quality
  • You’re looking for something flashy
  • You’re not planning to use the convertible aspect of it

Like I said, this is a phenomenal laptop. But you should definitely be planning to use it as a tablet from time to time. Otherwise, you should look at the ThinkPad X1 Carbon or X1 Nano, as they’re lighter and better suited to be strictly clamshell laptops.

In fact, for tablet use, the best was the Lenovo ThinkPad X1 Titanium Yoga, a 3:2 ultra-light convertible that was specifically designed to be great at being a tablet and a laptop, while most convertibles are meant to be a laptop first. The Titanium Yoga is no more though, so the ThinkPad X1 Yoga gets the crown of best business convertible.

The post Lenovo ThinkPad X1 Yoga Gen 7 review: The best business convertible appeared first on XDA.


from XDA https://ift.tt/1x87ZlS
via IFTTT

It’s high time Google added fine-grained volume control to Android

I like to listen to podcasts and audiobooks at bedtime as it helps me sleep better. Ideally, you want just the right amount of volume when listening to an audiobook or podcast in a quiet setting — something that remains comfortable to listen to for an extended period. A bit louder, and it becomes a distraction and causes listening fatigue and a bit quieter, and everything becomes unintelligible. I’m quite sensitive to volume changes and loudness, so I always spend some time fiddling with the volume slider to find a comfortable level. However, thanks to how Android handles media volume and volume control, finding the sweet spot is a perpetual struggle. It’s always a bit too loud or too quiet no matter how carefully you try to adjust the volume slider. This issue is more evident with in-ear headphones — both wired and wireless — than with over-ear headphones.

This has remained a struggle on almost every Android phone I have used in recent years. On the iQOO 7 Legend, for example, even the lowest volume level is too loud for listening to sleeping sounds or podcasts at bedtime. In addition, each volume step has a big jump, so you’re always caught between a volume that’s either slightly too loud or slightly too low. If you want just a modest increase or decrease from the current level, it’s nearly impossible. My Xiaomi Mi 10i 5G running Pixel Experience based on Android 12L is better with lower volume levels, but after the third or fourth click, I run into the same situation where each volume jump becomes really huge.

Thanks to how Android handles media volume, finding the sweet volume spot is a perpetual struggle.

The volume issue is further complicated by Android’s “absolute volume” control, which unifies the volume of the connected Bluetooth headphones and the phone media volume. This is a big win for convenience as it takes away the pain of independently adjusting the physical volume control on your Bluetooth headphones and the phone media volume, meaning that changing the volume on your phone controls the volume on the Bluetooth device and vice versa.

However, this convenience comes at a price: the loss of finer control over volume levels.

I’m not sure exactly when Google coupled Bluetooth and phone media volume. I remember being able to adjust the internal volume of my Sennheiser HD 4.50 headphones independent of the phone media volume in earlier Android versions. This offered greater flexibility and precise control over the overall volume output. I could set the phone media volume to 5 and then use the physical controls on the headphones to adjust the internal volume until I find the sweet spot.

The problem is that while Android provides you an option to disable absolute volume control, which decouples Bluetooth and phone volumes, I have had mixed results with this option. While it works with my Sennheiser headphones and OPPO Enco M31 neckband, it does nothing for truly wireless earphones. It’s only really useful if your Bluetooth headphones have their own volume control.

Absolute volume toggle highlighted in Android Developer Settigs

There used to be a very effective solution to this problem in the form of the Precise Volume app. The app hooks into your phone’s audio system to overwrite Android’s 15-step volume limit and add 100 volume steps. It hasn’t been updated in a long time though (since 2017, actually), and it no longer works on devices running Android 9 Pie and above.

Precise Volume (+ EQ/Booster) (Free, Google Play) →

Before you mention it, yes, I have also tried out the build.prop method to increase the volume steps from 15 to 30. However, it didn’t work in my case, adding empty steps instead of evenly spreading the total volume across 30 steps. Not only that, this option isn’t viable for a large portion of the Android community as it requires root access.

Google should take inspiration from Samsung and LG

A simple solution would be to just add more tangible steps to the media volume.

So, what can Google do to give Android users more control over volume output? A simple solution would be to just add more tangible steps to the media volume. As mentioned above, Android currently offers 15 volume steps. In comparison, my Sony Walkman MP3 player had 32 steps. Samsung provides an app called Sound Assistant, which lets Galaxy smartphone users add 150 volume steps. Meanwhile, the LG V30 and V40 offered 75 steps when you enabled the dedicated DAC. If Google doesn’t want to go to the length of Samsung and LG, even 30 steps would be more than enough. By default, Android can continue to use 15 steps while giving power users an option to enable additional steps for finer control over the volume level.

Another option Google could consider adding is a master volume slider that would limit the overall volume output system-wide. So, for example, you could set the master slider to 60% to reduce the overall intensity/loudness for each volume step. Yet another option is to let Android media apps add their own volume slider that works independently of the system media volume. That way, you can play with both sliders to fine-tune the final volume.

Of course, I’m not the first to raise this issue. It’s an age-old problem that many Android users have faced for years and has yet to catch Google’s attention. It’s one that I know particularly bugs some users, and it’s been a problem in my own usage for a long time, too.

While all of us know that Android has come a long way from its early days, it’s important that refinements and quality of life changes like these aren’t overlooked. It’s a mature operating system at this point, but problems like these hold it back.

The post It’s high time Google added fine-grained volume control to Android appeared first on XDA.


from XDA https://ift.tt/3syemiM
via IFTTT