LightBlog

jeudi 7 octobre 2021

OnePlus confirms that it will unveil the OnePlus 9RT and Buds Z2 later this month

While OnePlus has confirmed that it won’t launch a ‘T’ variant of its flagship OnePlus 9 models this year, it is still planning to launch a successor to the OnePlus 9R. The upcoming device, aptly named OnePlus 9RT, will likely be a minor upgrade over its predecessor. Previous leaks suggest that it will be the first phone from the company to launch with OxygenOS 12 based on Android 12 out of the box. While the company is yet to reveal any information about the device, it has now confirmed that it will launch it in China on October 13.

In a recent post on Chinese microblogging platform Weibo (via Ishan Agarwal), OnePlus has announced that it will launch the OnePlus 9RT and the OnePlus Buds Z2 in China on October 13. The post includes images that give us a glimpse of the phone and earbuds’ design.

OnePlus 9RT announcement poster Weibo

As you can see in the attached image, the OnePlus 9RT features the same camera module design as the flagship OnePlus 9, and its back panel finish resembles the Morning Mist colorway of the OnePlus 9 Pro. While the official image doesn’t reveal much else about the phone, the following leaked renders from Evan Blass give us a closer look.

OnePlus 9RT leaked render evleaks

(Image: @evleaks)

The leaked renders reveal that the OnePlus 9RT will feature a triple camera setup with a 50MP primary camera. This falls in line with information that we’ve seen in previous leaks. It will include OnePlus’ iconic alert slider on the right edge, along with the power button, and a volume rocker on the left edge.

OnePlus 9RT leaked render evleaks

(Image: @evleaks)

Although the renders reveal no further information about the device, previous leaks suggest that it will pack a higher-binned version of the Qualcomm Snapdragon 870, a 4,500mAh battery, and 65W fast charging support. The OnePlus 9RT will feature a 50MP Sony IMX766 primary camera and a 120Hz AMOLED display.

OnePlus 9RT leaked retail packaging evleaks

(Image: @evleaks)

At the moment, we can’t confirm if the OnePlus 9RT will launch with OxygenOS 12 based on Android 12 out of the box. It seems unlikely, though, given Google is yet to release Android 12 for its Pixel lineup.

OnePlus Buds Z2 announcement poster Weibo

Along with the OnePlus 9RT, the company has also confirmed that it will launch the OnePlus Buds Z2 at its upcoming event in China. OnePlus’ announcement post for the earbuds confirms the design that we saw in leaked renders earlier this month. However, it doesn’t confirm any specifications. Evan Blass has also shared an image of the retail packaging of the Obsidian Black OnePlus Buds Z2, which reveals everything you’ll get inside the box. The packaging also confirms that the earbuds will feature a 520mAh, presumably in the charging case.

OnePlus Buds Z2 retail packaging evleaks

(Image: @evleaks)

According to previous leaks, the OnePlus Buds Z2 will offer ANC support, IP55 water and dust resistance, 11mm drivers, and up to 38 hours of battery life with the charging case. The TWS earbuds will also feature fast charging support, allowing users to charge them up to full in just 90 minutes. Like the original OnePlus Buds Z, the upcoming model will likely be more affordable than the OnePlus Buds Pro.

OnePlus is yet to announce when it will launch the OnePlus 9RT and the OnePlus Buds Z2 outside China. But we expect the company to share more information following the upcoming launch event.


Update: Additional renders

Ishan Agarwal has shared more renders of the OnePlus 9RT and OnePlus Buds Z2. The latest renders give us a complete look at the phone and earbuds. Check them out in the gallery below.

OnePlus 9RT leaked render ishan agarwal

The post OnePlus confirms that it will unveil the OnePlus 9RT and Buds Z2 later this month appeared first on xda-developers.


from xda-developers https://ift.tt/2YAKpiD
via IFTTT

First 10 things to do with an M1 Mac

For a long time, Apple depended on Intel to provide processors for its Macs. However, that all changed about a year ago in November 2020. On the 10th of that month, Apple announced its own SoC (system-on-chip), the M1 chip. Particularly designed for the Mac, the M1 chip offers tremendous power while running efficiently, energy-wise. It’s so energy-efficient to the point of Apple literally removing the cooling fans from the M1 MacBook Air models. This only proves how the M1 is the beginning of something significantly brighter for Apple.

If you’ve bought or plan on buying an M1 Mac, you must be wondering what to do with it. So here’s a list of the first 10 things to do with an M1 Mac.

Navigate this article:

  1. Install iOS and iPadOS apps
  2. Set up Touch Alternatives
  3. Allow your Mac to sleep in peace
  4. Make sure you’re downloading the correct apps
  5. Unleash the true potential of Dictation
  6. FaceTime more confidently
  7. Listen to Spatial Audio with head tracking support
  8. Take advantage of Siri’s extra polyglot skills
  9. Enjoy hovering over our precious planet with Apple Maps’ Globe View
  10. Treat your new M1 Mac to some accessories

1. Install iOS and iPadOS apps

Introduction

One of the most known characteristics of the Apple M1 chip is its ability to run apps designed for iPhone and iPad natively. This means you don’t need to install any software or emulators to run iOS and iPadOS apps on macOS. You just install the mobile app and run it on the spot. It’s as effortless and convenient as it can get.

Searching for apps

mac app store search

The Mac App Store search results page now has two sections — “Mac Apps” and “iPhone & iPad Apps”. It defaults to the former, since Mac apps obviously work better on macOS than iOS/iPadOS apps. However, if there aren’t enough search results for Mac Apps, then it switches to iPhone & iPad apps. Note that you can manually switch between both sections yourself at any time.

Downloading apps

Once you pick a mobile app of your choice, you can buy and download it as you normally would do on an Apple device. And if you have already bought some apps on an iPhone, then you can view these purchases on your M1 Mac and re-download them on it. Now you may be wondering why some of your favorite apps, like Netflix and YouTube, aren’t showing up. This brings us to the restrictions part.

Restrictions

app store mac restrictions

I think we can all agree that restrictions suck, but they’re there for a reason. Developers have the right to choose whether they want their mobile app(s) to be deployed on desktop computers. So Apple has provided developers with an option to choose whether an iOS/iPadOS app can be downloaded on an M1 Mac or not. As long as developers allow it, you should be able to download and run your favorite mobile apps on your M1 Mac.

Why do restrictions exist?

If you’re wondering “why do devs care so much about where I install their app if I’m subscribing to or buying it anyway?!”, it’s because it can cause some complications. First, you should know that mobile apps that aren’t specifically optimized for the Mac might not work as expected. They’re available to download and run, but bugs, mostly ones related to their UIs and layouts, are to be expected. That’s because the developers didn’t intend for their app to run on a big screen.

So, once users start facing these Mac-exclusive bugs and issues, they’ll head over to the support channels to report them to the companies and ask for fixes. These companies that are restricting their mobile apps from running on an M1 Mac almost always have a separate web or desktop app. They want to maintain their desktop website only, rather than having to deal with a desktop app that was originally designed for a mobile device.

Hence developers block downloads on Macs to spare themselves the headaches caused by angry users. It also stops users from taking advantage of features exclusive to the mobile app, such as downloading Netflix content. Netflix only allows subscribers to download series and movies on their mobile apps. Their desktop website offers no offline caching solution. So by allowing users to install Netflix on Macs, they’ll be able to download content through the app on desktop, which Netflix doesn’t want — for whatever reason.

Now you’ve downloaded your favorite mobile apps on your M1 Mac, you must be wondering how to fully control an app designed for a touchscreen with a keyboard and trackpad. This brings us to our second point.

2. Set up Touch Alternatives

Introduction

As previously mentioned, mobile apps aren’t meant to be run on desktop computers, especially ones without a touch screen. iPhone and iPad apps almost completely depend on touch controls. So installing them on the Mac brings us to the next obstacle — how do we control them fully? Touch Alternatives are Apple’s answer to that.

Setting up Touch Alternatives

setting up touch alternatives m1 mac 1 setting up touch alternatives m1 mac 2

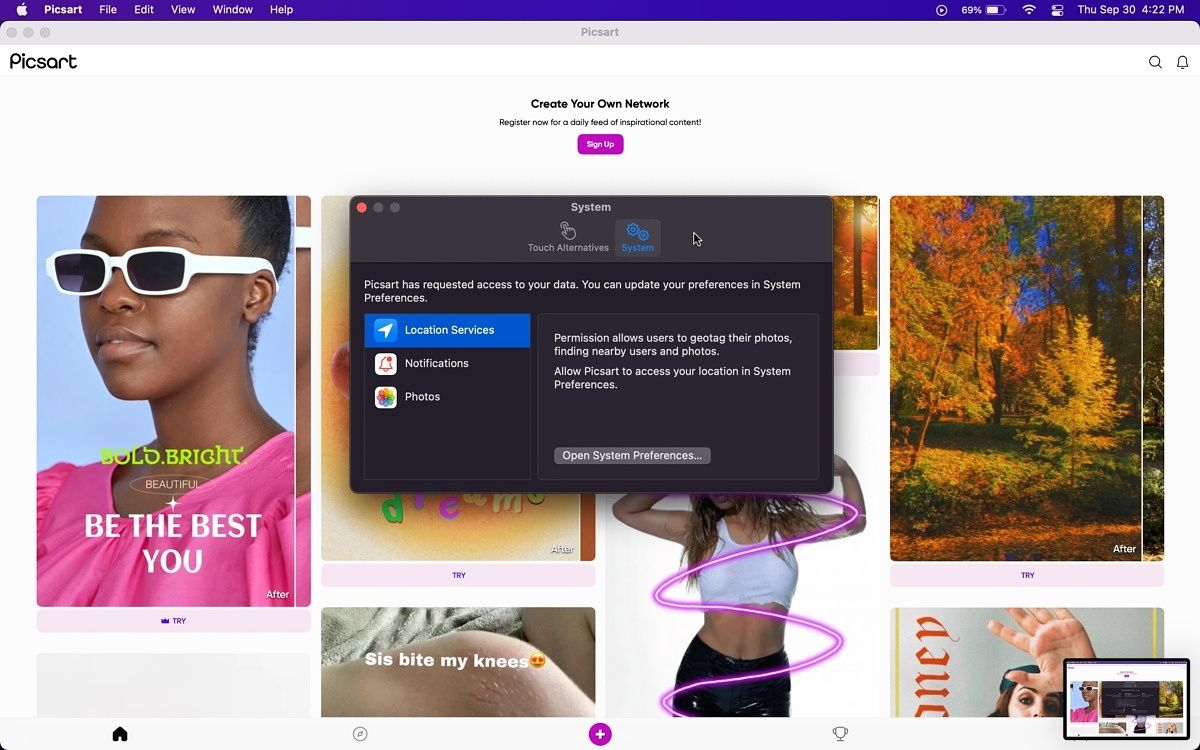
Setting up Touch Alternatives is a very basic process, thanks to Apple’s simplified approach. When you first launch a mobile app on your M1 Mac, you will find the app’s name in the Menu Bar. It’s located to the right of the Apple logo in the top left corner. Once you click on the app’s name, you will see a list of options:

  • About [App’s Name]
  • Preferences…
  • Services
  • Hide [App’s Name]
  • Hide Others
  • Show All
  • Quit [App’s Name]

Preferences… is what you’re looking for to set up Touch Alternatives. Once you click on it, a page will show up with two sections:

  • Touch Alternatives
  • System

The latter includes permissions requested by the app, such as location to notifications. The former however is where you’ll set up the equivalent of touch controls. When you turn it on, it’ll highlight that:

  • WASD keys are for tilting your device.
  • Holding the Option key while using the trackpad turns it into a multi-touch screen.
  • Pressing Space acts as a tap.
  • Pressing the Arrow keys acts as a swipe from the middle of the screen to the respective direction.
  • Scrolling on the trackpad drags from the mouse pointer.

These controls enable you to control a mobile app as if you’re using an iPhone an iPad. We know it’s not perfect and as natural as using a mobile device with a touch screen, but it works.

3. Allow your Mac to sleep in peace

Introduction

One of the lesser known facts about the Apple M1 chip is it has an always-on processor. This means that even when your Mac goes to sleep, it isn’t really completely asleep. Macs with Intel chips have had a feature called Power Nap for a while now. M1 Macs don’t need that feature because it’s built-in and automatically running at all times.

So what’s a Power Nap, and what does Allow your Mac to sleep in peace even mean?

What is a Power Nap?

power nap on intel macs

A Power Nap is a feature Apple added to Intel Macs years ago. It lets your sleeping Mac do some background tasks, such as fetching Mail, refreshing your Calendar, downloading software updates, and doing Time Machine backups.

However, this only works when your Mac is asleep and connected to power. So once you unplug it from a power source, it stops the background tasks to save battery energy and avoid excessive drain.

Why don’t M1 Macs need Power Naps?

Thanks to an always-on processor, M1 Macs never really sleep. See it as sleeping with one eye open. When you put them to sleep, they’ll pause whatever tasks you’re doing, but they’ll still do the aforementioned background refresh activities. So Power Naps on M1 Macs are on by default, can’t be turned off, and don’t require your device to be connected to a power source.

What does Allow your Mac to sleep in peace mean?

Some people — who are used to keeping their Macs awake when awaiting an email or syncing iCloud data — would keep their Macs awake to make sure these background tasks aren’t interrupted. With your M1 Mac, you can allow your Mac to sleep without having to worry about any interruptions to said tasks. So — allow your Mac to sleep in peace!

4. Make sure you’re downloading the correct apps

Introduction

Chrome app versions for mac

Depending on your computer’s processor, some developers offer different versions of their apps. So, for example, if you head over to download — from a website, not the Mac App Store — Chrome, you’ll notice a note from Google. It asks you whether you have an Intel or M1 Mac, and lists the steps needed to check, if you’re unsure.

Why different app versions exist

The reason there are two variations of the same Mac app is optimization. An app built specifically for an M1 Mac works faster and is more efficient than one aimed at Intel Macs. While an an app optimized for Intel Macs will work on your M1 Mac, it’s advised to use the M1 version of the app, if available.

5. Unleash the true potential of Dictation

Introduction

Dictation is Apple’s speech-to-text solution. It’s a reliable way to jot down some notes or get a message typed hands-free. Whether you’re using an iPhone or a Mac, Dictation works pretty much the same way, for the most part. You hit the microphone button, start speaking, and the words magically appear in the text field simultaneously.

How to start Dictation on a Mac

The microphone button is the F5 keyboard button on newer Macs. You can also activate dictation through clicking Edit in the Menu Bar then hitting Start Dictation. A third way would be going to System Preferences > Keyboard > Dictation and setting your own keyboard shortcut to activate it.

What makes Dictation so special on M1 Macs

On Intel Macs, Dictation has a 60 second limit. This means if you’re using it, it’ll interrupt you after one minute. Then you would have to start it again and resume speaking. This is a hassle, especially for those of us who use it to type long articles.

M1 Macs give you the luxury of a limitless Dictation experience. You may use it for as long as you want, without any interruptions or needing to enable it again every X number of minutes.

macos sierra system preferences keyboard dictation

That’s not all! Offline Dictation was a macOS feature — branded as Enhanced Dictation — that Apple removed in macOS Catalina. Why? Who knows. A conspiracy theorist would probably tell you it’s Apple pressuring you into buying a new M1 Mac. What matters is that this feature is back — exclusively for M1-powered machines.

Of course, not all languages are supported, but if your main language is, then you may use it offline. It may take a while to activate the first time you set up a Mac. That’s because it has to download some files in the background for the offline Dictation to work. Once it’s done downloading, you may use Dictation without having a connection on your computer. The results though may not be as accurate or quick as online Dictation, obviously.

6. FaceTime more confidently

portrait mode video effect on mac

Introduction

macOS 12 Monterey and iOS 15 bring a feature online conferencing services have had for a while now — background blur. Branded as Portrait mode in video effects, this feature lets Mac and iPhone users blur their backgrounds during FaceTime video calls. Unlike other similar services, users still won’t be able to choose custom backgrounds, but a blur is still better than nothing.

Compatibility

However, (of course, there’s always a but) this feature is exclusive to Macs with the Apple M1 chip and iPhones with Face ID. If you’re reading this article, we’re going to assume that you either have already bought an M1 Mac or are planning on buying one. If not, then you’re one of the unlucky people who will still have to pay extra attention to their backgrounds before and during a video call.

It’s worth mentioning that this feature has an API that developers can take advantage of. So your favorite video calling apps that don’t already have this feature will be able to implement it. They won’t be needing to develop their own algorithms to detect you and blur the rest out. So now you can FaceTime others without needing to worry if you’re in a somewhat messy environment.

7. Listen to Spatial Audio with head tracking support

Spatial Audio settings on mac

Apple recently introduced Spatial Audio in Apple Music. When using a supported headset and Apple device, music will play in 3D Dolby Atmos instead of stereo. This feature has been present in the Apple TV app for much longer though. While Spatial Audio is supported on a wide range of headsets, head tracking is currently limited to the AirPods Pro and AirPods Max.

The two aforementioned AirPods models have gyroscopes in them, making it possible for the feature to work. But only M1 Macs will support Spatial Audio playback with head tracking support. So if you’ve got yourself an M1 Mac (and supported AirPods), get ready to have music follow and adapt to you, whichever way you turn!

8. Take advantage of Siri’s extra polyglot skills

Swedish text-to-speech option on mac

If you happen to speak Danish, Finnish, Norwegian, or Swedish, then this one’s for you. On macOS 12 Monterey, Siri supports natural text-to-speech in these four languages. But only M1 Macs support these additional languages, for some reason.

To set up text-to-speech, head over to System Preferences > Accessibility > Spoken Content.

9. Enjoy hovering over our precious planet with Apple Maps’ Globe View

One new feature included in macOS 12 Monterey and iOS 15 is Globe View in Apple Maps. This feature lets you hover over our planet from above — virtually, of course. Google Maps has had this for years, but if you’re interested in Apple’s execution of the feature, you’ll be needing an M1 Mac.

Detialed map of london apple maps macos

Another M1-exclusive feature is more detailed maps in some cities, such as San Francisco, Los Angeles, New York, and London. You’ll be able to view more realistic versions of these cities’ maps. So if that’s your thing, go ahead and do some exploration. You might end up bumping into your next holiday destination.

10. Treat your new M1 Mac to some accessories

MacOS dock

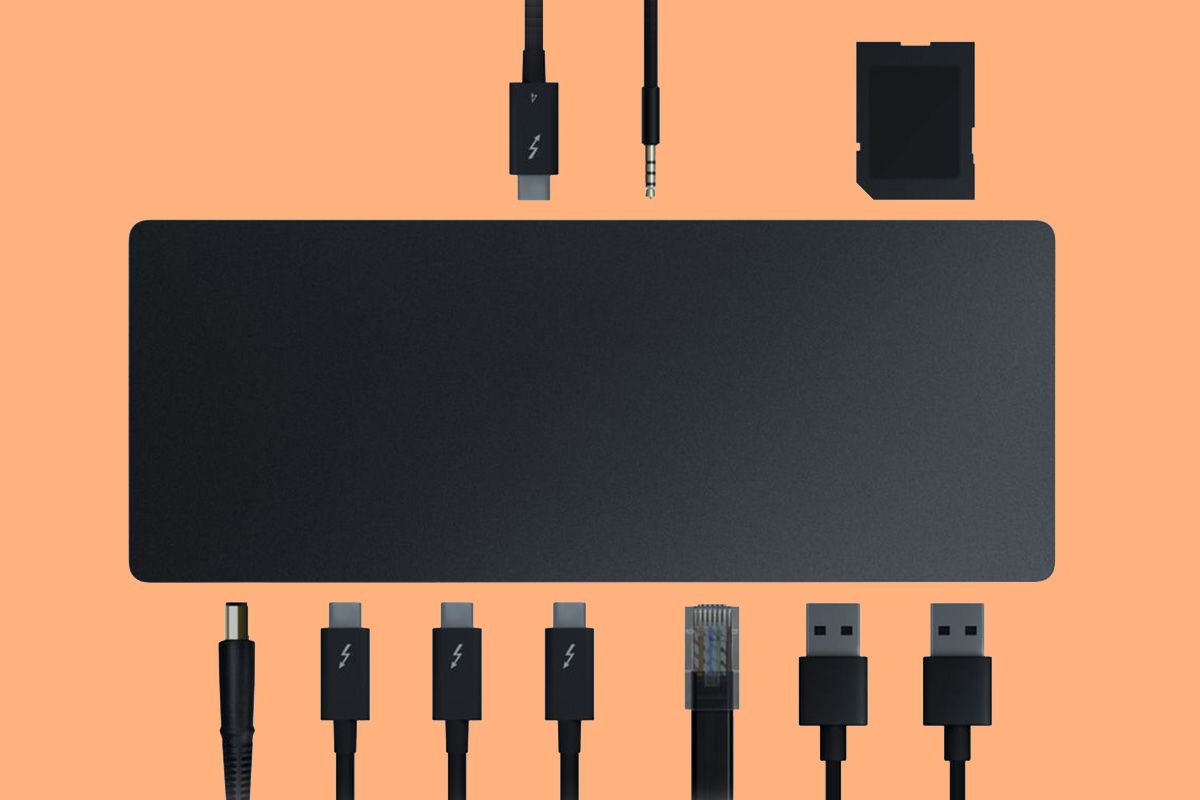
Apple is notorious for ditching ports on its devices in the name of minimalism and courage. The M1 MacBooks Air and Pro, in particular, don’t have enough ports. They only include two USB-C ports and — surprisingly — a headphone jack. For this reason, we have prepared for you a list of the best Thunderbolt docks for your shiny new Mac. A chip as mighty as the M1 shouldn’t have its power wasted. Make the most out of your Mac by turning it into a more adaptable device.


We hope you’ve enjoyed reading our guide on the first 10 things to do with an M1 Mac. Have you upgraded to an M1 Mac yet? Which M1-exclusive Mac feature is your favorite? Let us know in the comments section below.

The post First 10 things to do with an M1 Mac appeared first on xda-developers.


from xda-developers https://ift.tt/3oHjvk0
via IFTTT

Nvidia GeForce RTX 3090 Ti said to launch with 450W TDP and a new power connector

While we are waiting for Nvidia to restock its existing GPUs like the GeForce RTX 3080 and the RTX 3060, the company seems to be hellbent on releasing newer and more powerful units on the market. Rumors are now pointing towards a new flagship GPU, the RTX 3090 Ti. This is the same GPU that was originally said to launch as RTX 3090 SUPER.

According to the new information obtained by the folks over at Videocardz, The RTX 3090 Ti is going to be the new flagship GPU aimed at enthusiasts, and it is going to bring a lot more than just more cores to the table. We are looking at a higher TDP rating, a new power connector, and more.

Nvidia GeForce RTX 3090 Ti Rumored Specifications

a closeup shot of RTX 3090 GPU's heatsink

The RTX 3090 Ti will allegedly have a TDP of up to 450W, 100W more than RTX 3090’s 350W TDP. 450W sounds like overkill, but it’s not the first time we are hearing about such extreme TDP ratings for this upcoming GPU. It could be for a custom card, though. The higher TDP, however, will allow the new GPU to have higher clocks for both GPU as well as VRAM.

Additionally, this upcoming GPU is also said to feature a new power connector. Rumor has it that it’s a new standard for PCIe Gen 5. Information about the Gen 5 ready 16-pin connectors is still in uncharted territory, and they will only be revealed once we see some compatible motherboards on the market.

The upcoming flagship GPU is also said to feature 21Gbps memory with 2GB modules instead of 1GB modules on the current models. The rumored RTX 3070 Ti GPU with 16GB VRAM is also expected to have 2GB modules, but it will not have a new PCB, unlike the RTX 3090 Ti. Yes, a lot of changes are in cards for this new rumored new flagship GPU. Here’s a quick look at RTX 3090 Ti’s rumored specs –

Specification Rumored GeForce RTX 3090 Ti GeForce RTX 3090
GPU GA102-350 GA102-300
GPU Clusters 84 82
CUDA Cores 10752 10496
RT Cores 84 82
Tensors/TMUs 336 328
Memory 24GB GDDR6X 24GB GDDR6X
Bus 384-bit 384-bit
Memory Clock 21 Gbps 19.5 Gbps
Bandwidth 1008 GB/s 936 GB/s
TDP 450W 350

The RTX 3090 Ti is now expected to arrive in January next year alongside the new RTX 3070 Ti and the 2060 GPU with 12GB VRAM. Given how difficult it is to buy the existing lineup, we may or may not see new SUPER variants of the existing GPUs this time around.

The post Nvidia GeForce RTX 3090 Ti said to launch with 450W TDP and a new power connector appeared first on xda-developers.


from xda-developers https://ift.tt/3uRRs24
via IFTTT

OnePlus Android 12 Tracker: Here are all the official OxygenOS 12 beta builds to download and install

Android 12 is finally here (though there’s no release for Pixels yet), and many of us are looking forward to getting it on our phones. Eyes are on all popular phone makers — including OnePlus — to see when they will begin rolling out updates. Matter of fact, the Chinese OEM has already kicked off an Open Beta program for evaluating OxygenOS 12, the upcoming iteration of the in-house skin that borrowed a significant portion of its DNA from OPPO’s ColorOS on top of Android 12.

Hands-on with Android 12 DP 2 on the OnePlus 9 Pro: OxygenOS makes way for ColorOS

As of now, the OxygenOS 12 Open Beta program is limited to the OnePlus 9 series. Naturally, the OnePlus 9 and 9 Pro will be the first in the company’s portfolio to get the stable Android 12-based update when it becomes ready. OnePlus says that the following devices will also get the Android 12 update in the future: OnePlus 8, OnePlus 9R 5G, OnePlus 8 Pro, OnePlus 8T, OnePlus 7 Pro, OnePlus 7, OnePlus 7T, OnePlus 7T Pro, Nord 2 5G, Nord 1, and the Nord CE 5G.

This article will serve as the central repository of download links for all OnePlus devices that have received their official Android 12 updates in the form of OxygenOS 12, including both the Open Beta and the stable builds.

Navigate this article:


List of OnePlus phones that have received stable Android 12

This article covers OnePlus devices that have received a stable Android 12 update — be it Open Beta or stable — in any region. To avoid confusion with the nomenclature, here is something you should note: the builds mentioned here are essentially based on the stable Android 12 codebase with finalized developer APIs. OnePlus prefers to tag some of them as “(Open) Beta” due to the fact that the initial release won’t have all the new software features you’ll come to associate with the OxygenOS UX skin. Everything that we have covered in the Android 12 Developer Preview phase has been refined for the stable version, but we will continue to see small improvements over the course of time. These improvements will then be available in the stable OxygenOS 12 builds.

Android 12 Developer Preview Builds

In case you are looking for the previous Developer Preview builds shipped by OnePlus, you can find them below:

Note that these builds are now considered old. You are advised to make use of the Open Beta builds below.

OnePlus phones receiving OxygenOS builds based on stable Android 12

Here are the devices that currently have an Android 12 build based on the stable Android branch available. Note that the devices are sorted alphabetically for their retail name.

  1. OnePlus 9 (lemonade) — Added on 10/04/2021
  2. OnePlus 9 Pro (lemonadep) — Added on 10/04/2021

Generic flashing instructions are available at the bottom of this article. However, we advise users to refer to the device forums for specific flashing instructions for their device, in case there are any variations or special instructions that need to be followed.


You can find download links of OxygenOS Open Beta and stable releases below. These builds are first sorted with device names, and then according to their regional variants and release. Downgrade packages are also included wherever present, in case you want to go back to Android 11. Note that the Open Beta builds are not compatible with the carrier models.

1. OnePlus 9 (lemonade)

Sr. No. Channel, Build Number, and Region Recovery ROM Downgrade ROM Added On/Status Last Updated
OxygenOS Open Beta
1.1. Open Beta 1 Download Link: Download Link: October 4, 2021

2. OnePlus 9 Pro (lemonadep)

OnePlus 9 Pro

Sr. No. Channel, Build Number, and Region Recovery ROM Downgrade ROM Added On/Status Last Updated
OxygenOS 11 Open Beta
1.1. Open Beta 1 Download Link: Download Link: October 4, 2021


Flashing Instructions for OxygenOS 12

Note that these are generic flashing instructions meant for the carrier unlocked OnePlus devices.

Recovery/Downgrade ROM Installation for OxygenOS 12

Both the Recovery and the Downgrade ROMs come as a standard ZIP archive and can be installed through the Local Upgrade method from within OxygenOS. You can also use a custom recovery like TWRP for installing these ROMs, though do note that device-specific instructions may differ in that case.

  1. Transfer the downloaded ZIP file to your phone and place it in the root of the internal storage
  2. Within your phone, go to Settings > System > System Updates, and then click on the top-right icon and select Local Upgrade option.
  3. From there, select the ZIP file that you have downloaded and proceed.
  4. Wait for the install process to finish.

The post OnePlus Android 12 Tracker: Here are all the official OxygenOS 12 beta builds to download and install appeared first on xda-developers.


from xda-developers https://ift.tt/2YqQHBG
via IFTTT

The Samsung Internet Browser is now available on the Galaxy Watch 4

The Samsung Galaxy Watch 4 addresses one of the main issues Android users have had with older Samsung smartwatches — third-party app support. Thanks to One UI Watch based on Wear OS 3, Samsung’s latest wearables give users access to a wide array of apps through the Play Store. In addition, Samsung has also started updating its old wearable apps to support the new Galaxy Watch 4 duo, giving users access to even more options. Last month, the company updated the PPT Controller app to support the Galaxy Watch 4 and Galaxy Watch 4 Classic. Now, it’s releasing a similar update for the Samsung Internet Browser.

According to a recent report from Tizen Help, Samsung has started rolling out an update for the Samsung Internet Browser app on the Google Play Store. The update brings support for Wear OS-based smartwatches. However, it only supports the Galaxy Watch 4 and Galaxy Watch 4 Classic at the moment. That’s a bit disappointing as the Play Store has limited browser options for Wear OS smartwatches.

Samsung Internet WearOS Samsung Internet browser on watch Searc on Samsung internet

As you can see in the attached screenshots, the Samsung Internet Browser on the Galaxy Watch 4 will let you open any website, watch YouTube videos, add bookmarks, and even conduct a quick search. The app features a Zoom mode to help users easily read text while browsing on their Galaxy Watch 4, and it offers support for voice input, swipe gestures, and a keypad to make the experience as convenient as possible. Furthermore, the app also includes a Show on phone option to let you seamlessly transition from the watch to your phone.

While browsing the web on such a tiny screen doesn’t sound intuitive, it’s a great option to have when you’re in a pinch and can’t pull out your phone to look something up. You can download the Samsung Internet Browser on your Galaxy Watch 4 or Galaxy Watch 4 Classic by following the link below.

Samsung Internet Browser (Free, Google Play) →

The post The Samsung Internet Browser is now available on the Galaxy Watch 4 appeared first on xda-developers.


from xda-developers https://ift.tt/3AfxY8Z
via IFTTT

Xbox celebrates 20th anniversary with a translucent controller and headset

Microsoft is celebrating the 20th anniversary of the Xbox brand with a handful of new products for fans. The original Xbox console launched on November 15th, 2001, and paved the way for Microsoft to become one of the biggest names in gaming.

Headlining today’s announcements is the new 20th Anniversary Special Edition Xbox Wireless Controller. This is a custom version of the modern Xbox Wireless Controller – the model that launched with the Xbox Series X|S – but now with design elements that celebrate the occasion. The faceplate is translucent, and there’s a small 20th anniversary emblem below the face buttons. All the buttons have gray labels, except the Xbox button now has a green accent, and the rubberized handles on the back of the controller are also green.

Xbox Wireless COntroller 20th anniversary edition front and back

At its heart, it’s still the modern Xbox Wireless Controller, so it’ll work the the current generation of Xbox consoles, the Xbox One, and Bluetooth-enabled devices including Windows PCs, Android, and iOS. If you connect this controller to the Xbox Series X|S consoles, you also unlock an exclusive dynamic background for the console’s dashboard.

This special edition Xbox Wireless Controller will cost $69.99 and be available on November 15th. Pre-order pages are already live.

    20th Anniversary Special Edition Xbox Wireless Controller
    The 20th Anniversary Special Edition of the Xbox Wireless Controller has a translucent faceplate, green accents, and grey button labels. It supports all the features of the original, too.

There’s also a special edition of the Xbox Stereo Headset, a wired headset that Microsoft recently launched for Xbox users. Similar to the Xbox Wireless Controller, this special edition of the headset features translucent earcups, and bright green accents on the microphone and other places.  Otherwise, it’s the same as the original headset, with easy-to-use volume controls on the earcups and support for spatial sound technologies  like Dolby Atmos.

Xbox Stereo Headset 20th anniversary edition all angles

The Xbox Stereo Headset celebrating the Xbox anniversary will be available on November 15th, but you can pre-order it today for $69.99.

    20th Anniversary Special Edition Xbox Stereo Headset
    The 20th Anniversary Special Edition of the Xbox Stereo headset features green accents, translucent earcups, and all the features of the original.

Aside from that, Razer is joining the fray with its own 20th anniversary limited edition of the Universal Quick Charging Stand for Xbox, which originally launched just last month. This charging stand allows you to display your controller while it’s charging, and just like the special edition controller, it features a translucent faceplate and a green logo celebrating the 20th anniversary of Xbox. It’s not known when this one will be available yet, but you can sign up on Razer’s website to be notified when it happens.

Finally, Microsoft also announced some 20th anniversary Xbox gear, including t-shirts, long sleeves, and hats, which you can buy today on the Xbox website.

The post Xbox celebrates 20th anniversary with a translucent controller and headset appeared first on xda-developers.


from xda-developers https://ift.tt/2YqcSYF
via IFTTT

Stardock’s Start11 lets you fix the Start Menu in Windows 11

You know that thing you hate in Windows that you really wish you could change? Right, that thing. That’s the thing that Stardock aims to fix with its wide array of customization products, and Start11 tries to fix the Windows 11 Start Menu. If you’re one of the people that think that the Start Menu in the new OS is bad, you’re in the right place. Having been in beta since August, the Start11 release candidate is now available.

For starters (that’s right; I went there), you can change the Start Menu to either the Windows 7 or Windows 10 design. Sorry, Windows 8 fan.

Windows 10 Start Menu on Start 11

There are other customization options as well. For example, you can change the taskbar around. you can add textures like fabric, dark wood, carbon fibre, and more. But that’s not all, as you can actually change the taskbar size and change the position.

That’s right; the ability to place the taskbar on the side or top of the screen was removed in Windows 11, and Start11 brings the feature back. You can even put it on different sides on different monitors. It also fixes another big complaint, allowing you to use the Windows 10 context menu when you right-click on the taskbar.

Windows 7 Start menu on Windows 11

Stardock gained some popularity in this particular area when it released Start8 as a fix for Windows 8. You might recall that Windows 8 was one of the most controversial versions of the OS, killing off the Start Menu completely in favor of a Start Screen, and removing the Start button. Start8 offered a utility to return the Start Menu that everyone was comfortable with.

But Stardock actually has a wide range of customization products that falls under its Object Desktop suite of apps. Groupy is an app that lets you group apps into tabs, similar to Microsoft’s Sets back when that was going to be a thing. Curtains lets you go deeper into customization with theme creation. There’s a lot more, which you can check out here.

The release candidate for Start11 is available now, and you can purchase the product for $4.99. You can check it out here.

The post Stardock’s Start11 lets you fix the Start Menu in Windows 11 appeared first on xda-developers.


from xda-developers https://ift.tt/3oH6DtW
via IFTTT