LightBlog

mercredi 2 juin 2021

What is Unified Memory and how does it work on Apple Silicon?

With the release of Apple’s new M1-powered iPad Pro and 24-inch iMac, there’s renewed interest in the amazing efficiency of the M1 chip. The launch of the M1 chip brought Apple’s first use of unified memory architecture (UMA) on Apple silicon. This new approach to memory enables Apple to squeeze out higher performance from less total RAM. So how exactly does unified memory on Apple Silicon really work? Let’s take a look, starting with a few basics about memory in general and how things are new with the M1 Mac design.

What is RAM and how is the M1 different here?

RAM stands for “Random Access Memory”. This is the main component of the system memory on any computer. System memory provides a temporary repository for data used by your computer at a given instant. Data stored in system memory can include files you’re currently viewing, as well as files needed by macOS. Traditionally, RAM exists physically as a long stick that fits into a slot on your motherboard. The M1 is actually a revolution in this way as well.

Apple designed the M1 as a system on a chip (SoC), with the RAM included as part of this package. While integrating RAM with the SoC is common in smartphones such as the iPhone 12 series, this is a relatively new idea for desktop and laptop computers. Adding RAM to the SoC design enables faster access to memory, improving efficiency.

This image shows the new M1 SoC design, with RAM integrated.

Credit: Apple

In addition to physically adding the RAM to the SoC, Apple has changed the fundamental way the system uses memory. This is where unified memory on Apple silicon comes into play.

What is Unified Memory and how does it work?

Unified memory is about minimizing the redundancy of data copied between different sections of memory used by the CPU, GPU, etc. Copying is slow and wastes memory capacity. With a traditional memory implementation, part of your RAM is reserved for the GPU. If your laptop is advertised with 16GB of RAM, and 2GB is allocated to the GPU, you only have 14GB available for system tasks. Apple solves this problem with UMA, making memory allocation more fluid and increasing performance.

Gaming provides the best example to understand the benefits of unified memory. When you play a game on your Mac, the CPU first receives all the instructions for the game and then pushes the data that the GPU needs to the graphics card. The graphics card then takes all that data and works on it within its own processor (the GPU) and built-in RAM.

If you have a processor with integrated graphics, the GPU still maintains its own chunk of memory, as does the processor. The CPU and GPU work on the same data independently and then passes the results back and forth between their memory repositories. If you drop the requirement to move data back and forth, it’s easy to see how keeping everything in the same storage area could improve performance. The unified memory approach truly revolutionizes performance by allowing all components access to the same memory at the same place.

seamless allocation of high bandwidth unified memory

Credit: Apple

Apple truly achieved greatness with the M1 SoC. In addition to integrating RAM physically, the new unified memory architecture allows more efficient use of available memory. Using this new memory implementation, the new M1 iMacs can do just about anything, including running Windows 10. Placing all memory in a single pool means that any component can ramp up usage when needed, seamlessly allocating resources where needed.

    Apple iPad Pro 11-inch
    The 11-inch model of the iPad Pro may not have that Mini LED screen, but it still has the game-changing M1 processor and comes in a highly portable size.
    Apple iPad Pro 12.9-inch
    The screen on this 12.9-inch iPad Pro has to be seen to be believed. Add the M1 chip and this is almost too powerful for just an iPad.
    24-inch iMac with 4.5K display
    Apple's new all-in-one has a 4.5K display, an M1 chipset, and comes in pretty colors

The post What is Unified Memory and how does it work on Apple Silicon? appeared first on xda-developers.


from xda-developers https://ift.tt/3fGQj7G
via IFTTT

Verizon wants to get old phones off its network by offering a free 5G phone

The most annoying part about rolling out new mobile technology is actually getting people to adopt it. This is a problem pretty much everywhere in tech. Operating system adoption is a pretty good example of this: after a new version of an operating system gets released, it can be particularly cumbersome sometimes to get everyone on it, especially given how some older devices are not able to get them. Something similar is happening with 5G. Carriers want people to use 5G, but 5G requires new hardware, and a lot of people are using older phones. Verizon is apparently bringing out the big guns to handle this situation: now, it’s offering customers a chance to get a free 5G phone in order to get older phones off its network.

This was announced by Verizon with a big announcement blog post. From today onwards, every Verizon user (we must note that this benefit is available for users as long as they’re on a “select Unlimited” plan, which includes the Do, Get, & Play More unlimited plans) will be able to trade in their old phone (any phone, including broken and cracked ones) and get a new 5G device for free. If you’re not currently a Verizon user, Verizon says they’ll also help you cover the costs to switch. In the fine print, it seems that Verizon is offering a free iPhone 12 mini with 64 GB of storage or a Samsung Galaxy S21 5G with 128 GB of storage.

Both options are probably as good as they get on both the Android and iOS side of budget flagship smartphones, so being able to get them completely for free is actually a cool bonus—then again, as long as you don’t mind paying for Verizon’s unlimited plans. This is similar to what T-Mobile is offering, except that their bonus includes a free Galaxy A32 5G. Each option has its pros and cons. Verizon still limits 5G access to certain plans, while T-Mobile offers 5G access on all their plans. You’re also getting a more expensive device with Verizon, whereas T-Mobile is giving you a mid-range Samsung device—a pretty good mid-range device, but a mid-range device nonetheless.

This is not the only benefit Verizon has started to offer to its users. More recently, they started offering free Google Play Pass or Apple Arcade to Verizon subscribers. Perks like these are helpful in making Verizon seem like an enticing option to switch, and for current users to stay.

The post Verizon wants to get old phones off its network by offering a free 5G phone appeared first on xda-developers.


from xda-developers https://ift.tt/3wUdvF9
via IFTTT

How to install TWRP recovery on Android smartphones

TeamWin Recovery Project, more widely known by its TWRP abbreviation, is the most popular custom recovery solution for Android devices. For the unaware, TWRP replaces the default recovery environment that came with your device, so you can root your device via Magisk, flash custom ROMs and kernels, create full backups, and so on. If you’re wondering how to get TWRP on your device, this guide should help you with that. In case you don’t see your device listed or you see a misplaced link, send a message to Skanda Hazarika (SkandaH on the forums) with the device details.

Table of Contents:


Why TWRP?

One of the reasons Android modders swear by TWRP is its active development and support for a wide variety of devices, with new devices being added to the official build roster regularly. Thanks to the open-source nature of the project, aftermarket developers can also port TWRP unofficially to many other devices. The internal structure of the custom recovery is quite modular, which is why you can find numerous forks as well as further functionality enhancements such as dual boot mods based on TWRP.

DISCLAIMER: Replacing the stock recovery with TWRP usually needs an unlocked bootloader, which may void the warranty on the device. It may also make the device unstable or if not done properly, may completely brick the device. XDA and the author do not take any responsibility for your device. Install TWRP at your own risk and only if you understand what you are doing!


How to install TWRP on a popular Android smartphone

Have you already unlocked the bootloader of your device? Eager to enjoy the first step towards the aftermarket development scene? Head to the following section to begin the journey. You should find device-specific TWRP installation guides for the latest flagship models from every major OEM below.

ASUS

Sr. No. Device Codename and Device Forum TWRP Installation Guide
1. ASUS ROG Phone 3 I003D Click Here
2. ASUS ZenFone 7 / 7 Pro I002D Click Here

For other ASUS devices, kindly check out the ASUS section of our forums. You should be able to find similar fine-tuned guides for your device under the device sub-forums. You can also follow the generic TWRP installation guide from this tutorial.

Google

Sr. No. Device Codename and Device Forum TWRP Installation Guide
1. Google Pixel 5 redfin Click Here

For other Google devices, kindly check out the Google section of our forums. You should be able to find similar fine-tuned guides for your device under the device sub-forums. You can also follow the generic TWRP installation guide from this tutorial.

Motorola

Sr. No. Device Codename and Device Forum TWRP Installation Guide
1. Motorola Edge+ burton Click Here

For other Motorola devices, kindly check out the Motorola section of our forums. You should be able to find similar fine-tuned guides for your device under the device sub-forums. You can also follow the generic TWRP installation guide from this tutorial.

OnePlus

Sr. No. Device Codename and Device Forum TWRP Installation Guide
1. OnePlus 8 instantnoodle Click Here
2. OnePlus 8 Pro instantnoodlep Click Here

For other OnePlus devices, check out the OnePlus section of our forums. You should be able to find similar fine-tuned guides for your device under the device sub-forums. You can also follow the generic TWRP installation guide from this tutorial.

Samsung

For other Samsung devices, kindly check out the Samsung section of our forums. You should be able to find similar fine-tuned guides for your device under the device sub-forums. You can also follow the generic TWRP installation guide from this tutorial.

Sony

Sr. No. Device Codename and Device Forum TWRP Installation Guide
1. Sony 1 II pdx203 Click Here

For other Sony Xperia devices, kindly check out the Sony section of our forums. You should be able to find similar fine-tuned guides for your device under the device sub-forums. You can also follow the generic TWRP installation guide from this tutorial.

Xiaomi

Sr. No. Device Codename and Device Forum TWRP Installation Guide
1. Xiaomi Mi 11 venus Click Here

For other Mi, Redmi, and POCO branded devices, kindly check out the Xiaomi section of our forums. You should be able to find similar fine-tuned guides for your device under the device sub-forums. You can also follow the generic TWRP installation guide from this tutorial.


How to install TWRP on any Android device

Before getting started with TWRP, make sure that:

  1. You have access to a PC/Mac with adb and fastboot installed.
    • On your device, go into Settings -> About and find the Build Number. Tap on it 7 times to enable Developer options. Go back to the Settings menu and find the Developer options entry (on older Android versions), or tap on System -> Advanced, and go into Developer options. Finally enable USB debugging.
  2. The bootloader of the target Android device is unlocked.
    • For Samsung devices, unlocking the bootloader will trip KNOX.

Step 1: Downloading TWRP for your device

Let’s start by downloading the appropriate TWRP image for your device. You can find a list of devices that are officially supported by following the link below.

Download TWRP

As mentioned earlier, you may also find unofficial TWRP builds for your device in our forums.

Step 2: Flashing TWRP

Since TWRP replaces the stock recovery image of your device, the installation process depends on the target device’s partition scheme. Users can easily check it by running the following command in ADB shell or a Terminal Emulator app:

getprop ro.build.ab_update

This will return “true” if the device supports A/B partitions. On legacy A-only devices, the output should be blank.

Case I: Devices with A-only partition scheme

If you have a device that still uses the A-only partition scheme, then you should be able to directly replace the stock recovery image with TWRP via Fastboot.

  1. Copy the TWRP image to a suitable location on your PC. You can even put it on the folder where the Fastboot binary is located.
  2. From your PC, open a command prompt/terminal and type:
    adb reboot bootloader
  3. Rename the TWRP image to twrp.img and type:
    fastboot flash recovery twrp.img
    fastboot reboot
    • Many devices will replace a custom recovery automatically during first boot. To prevent this, search to find the proper key combo for your device to enter recovery. After typing ‘fastboot reboot’, hold the key combo and boot to TWRP.
    • You can also try to temporary boot the downloaded image using the following command:
      fastboot boot twrp.img
    • Once TWRP is booted, TWRP will patch the stock ROM to prevent it from replacing TWRP. If you don’t follow this step, you will have to repeat the install.
  4. Congrats! TWRP is now successfully installed on your device.

Power users can also flash the custom recovery without using a PC, but the process needs root access. To do so, download the appropriate TWRP image file to your phone, rename it to twrp.img, and place it in the root of the internal storage (/sdcard). Run the following commands via adb shell or a terminal emulator app:

su
dd if=/sdcard/twrp.img of=/dev/block/bootdevice/by-name/recovery

On some rare occasions, your device doesn’t feature a standalone recovery partition. Instead, the recovery is part of the boot image. The TWRP maintainers for such devices may repurpose a different partition as the recovery environment. As a result, the aforementioned flashing process might need some tweaking on those devices.

Case II: Devices with A/B partition scheme

In case of a device having A/B partition scheme, the recovery environment is fused with the boot image. Due to this design, you need to temporarily boot TWRP first and later perform a more permanent installation within the custom recovery environment.

  1. Copy the TWRP image to a suitable location on your PC. You can even put it on the folder where the Fastboot binary is located.
  2. From your PC, open a command prompt/terminal and type:
    adb reboot bootloader
  3. Rename the TWRP image to twrp.img and type the following to boot it temporarily:
    fastboot boot twrp.img
  4. Copy the twrp.img file to the device:
    adb push twrp.img /sdcard
  5. Navigate to the Advanced menu of TWRP and tap on “Install Recovery Ramdisk”:
    Install recovery ramdisk option under TWRP
  6. Choose the twrp.img file from the device’s internal storage.
  7. Swipe to install and then reboot.
  8. Congrats! TWRP is now successfully installed on your device.

Special Case: Samsung

Samsung Galaxy devices don’t a traditional Fastboot interface, hence the installation process of TWRP on them is quite different.

  1. Download and extract Odin (Samsung’s Flash Tool) to your computer.
  2. On your PC, download the *.tar image of TWRP for the target device.
  3. Reboot to download mode. Open Odin on your PC, and flash that tar file in the [AP] slot.
  4. Hold the recovery mode key-combo (usually volume up and power) while Odin is flashing until you are in TWRP environment.
  5. Once you’re in, you may need to flash Multidisabler to semi-permanently disable a number of device protection features and services that become problematic on a modified device.
  6. Congrats! TWRP is now successfully installed on your device.

Step 4: Verification

The last step is to verify that the custom recovery is working properly. Use the device-specific key-combo or the adb reboot recovery command on an already running device to boot to the recovery mode. If you can see the menu like the one shown below, it means you have successfully install TWRP. Great job!

TWRP main menu

Lastly, be sure to download the official app for the custom recovery project from Google Play. The app will alert you when new versions of the custom recovery are available. It’ll also let you download the latest version right from your device, provided you’ve root access.

Official TWRP App (Free+, Google Play) →


We hope this guide not only points you towards the right threads for installing TWRP on your device but also provides general TWRP installation instructions that can be applied for a large majority of Android devices generally. We’ll be updating this guide with links to further guides for specific phones, so check back again in the future!

The post How to install TWRP recovery on Android smartphones appeared first on xda-developers.


from xda-developers https://ift.tt/3fGGsyQ
via IFTTT

Huawei launches a pair of premium MatePad tablets running HarmonyOS

At Huawei’s HarmonyOS event today, the company unveiled two new tablets: the Huawei MatePad Pro and MatePad 11. Both tablets are flagship offerings, packing powerful internals, a premium design, and stylus support.

Huawei MatePad Pro and MatePad 11: Specifications

Specification MatePad Pro MatePad 11
Dimensions & Weight
  • NA x NA x 6.7mm
  • 609g
  • NA
Display
  • 12.6-inch OLED FHD+
  • 60Hz refresh rate
  • 90% screen-to-body ratio
  • 1,000,000:1 contrast ratio
  • 100% DCI-P3
  • 11-inch LCD
  • 120Hz refresh rate
SoC
  • Kirin 9000E SoC
    • 1x Cortex-A77 @ 3.13GHz
    • 3x Cortex-A77 @ 2.54GHz
    • 4x Cortex-A55 @ 2.05GHz
  • Qualcomm Snapdragon 865 SoC
RAM & Storage
  • NA
  • NA
Battery & Charging
  • 10,050mAh battery
  • 40W wired fast charging
  • 27W fast wireless charging
  • NA
Security Side-mounted fingerprint scanner Side-mounted fingerprint scanner
Rear Camera(s)
  • Primary:
  • Secondary:
  • Tertiary:
  • NA
Front Camera(s) NA NA
Port(s)
  • USB Type-C
  • USB Type-C
Connectivity
  • Wi-Fi 6
  • Bluetooth 5.0
  • 802.11 a/b/g/n/ac dual-band WiFi
  • GPS, GLONASS, BeiDou, Galileo
  • Wi-Fi 6
  • Bluetooth 5.0
  • 802.11 a/b/g/n/ac dual-band WiFi
  • GPS, GLONASS, BeiDou, Galileo
Software HarmonyOS based on Android HarmonyOS based on Android
Other Features
  • 8 speakers
  • 4 microphones
  • Huawei M-Pencil support
  • Full-size keyboard (optional)
  • Mouse and trackpad support
  • 4 speakers
  • Huawei M-Pencil support
  • Smart Magnetic Keyboard (optional)
  • Mouse support

MatePad Pro

The Huawei MatePad Pro is the more powerful of the duo. The tablet’s front is covered by a 12.6-inch OLED display, offering a 90% screen-to-body ratio, 1,000,000:1 contrast ratio, and 100% DCI-P3 wide color gamut coverage. And no, it’s not a high refresh rate panel — it maxes out at 60Hz. Under the hood, the Huawei MatePad Pro is powered by the company’s in-house Kirin 9000E SoC, Huawei’s latest flagship chipset. The chipset employs 1x Cortex-A77 core clocked at 3.13GHz, 3x Cortex-A77 cores @ 2.54GHz, and 4x Cortex-A55 cores running at 2.05GHz speed. The Kirin 9000E is the same as the Kirin 9000 but packs lower GPU and NPU cores.

Huawei MatePad Pro sitting on a desk propped up

The Huawei MatePad Pro supports Huawei M-Pencil, which can be used for taking notes, drawing, and other creative use cases. The tablet can be hooked up with Huawei laptops to further expand its usability. For example, in Mirror mode it can act as a sketch pad while in Extend mode it can double as an external monitor. Huawei also offers an optional full-size keyboard folio to turn the tablet into a mini laptop. Moreover, the tablet also supports mouse and trackpad input with left and right button support.

The MatePad Pro also boasts a capable triple camera system comprising a primary, ultra-wide, and depth sensor. Powering all these components is a sizeable 10,050mAh battery, which Huawei claims lasts up to 14 hours on a single charge. The battery can be charged via a 40W fast charger or a 27W wireless charger. Reverse wireless charging is also supported.

The Huawei MatePad Pro has eight powerful speakers for an immersive multi-media experience and four microphones for better video calls. On the software side of things, the MatePad Pro comes running the latest iteration of Harmony OS with a new tablet desktop UI optimized for large displays of tablets. The new UI looks a lot like iPadOS, especially the dock at the bottom and the new Control Panel. At the end of the day, HarmonyOS is still a fork of Android, so Huawei says you should be able to run most Android apps, barring those that rely on Google Mobile Services (GMS).

MatePad 11

Alongside the MatePad Pro, Huawei also unveiled the MatePad Pro 11, a successor to the last year’s MatePad 10. The new MatePad 11 differs from the Pro model in key areas. For one, it comes with an 11-inch 120Hz LCD instead of a 60Hz OLED and supports adaptive frame rate, TUV Rheinland certification for reduced blue light emission and flicker, and 100% coverage of DCI-P3 wide color gamut. Second, it swaps the Kirin 9000E chipset for the Snapdragon 865 SoC. And finally, it packs four speakers instead of eight. The rest of the specifications of the MatePad 11 are more or less the same as the Pro model.

The tablet supports Huawei M-Pencil input and can be hooked to Huawei’s Smart Magnetic Keyboard.

Pricing & Availability

Huawei has yet to reveal pricing and availability details for both tablets.


The post Huawei launches a pair of premium MatePad tablets running HarmonyOS appeared first on xda-developers.


from xda-developers https://ift.tt/3ibQAkL
via IFTTT

What is Signal and How to Use it: Everything you need to know about the secure IM service

At a time when mass surveillance by corporations and governments is increasingly becoming commonplace, consumers are looking for messaging apps that can keep their private conversations away from prying eyes. While there are plenty of messaging apps available to consumers, not all have the same level of protection or consumer interest at heart. This is where Signal comes into play.

What is Signal?

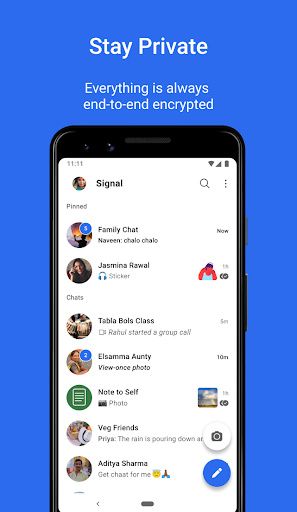
Signal is a cross-platform messaging app with a deep focus on privacy and security. It’s free-to-use and is run by the non-profit Signal Technology Foundation. Moreover, it’s end-to-end encrypted, so all your chats and calls are inaccessible to everyone barring you and the intended recipient.

Thanks to its privacy protections, Signal has gained prominence in recent years, especially after the Black Lives Matter protests in the US and the WhatsApp privacy policy snafu. It has also been championed by the likes of Elon Musk. According to some estimates, the app had 40 million monthly active users as of January 2021.


How to download and install Signal

Signal on Google Play and App Store

Signal is available for Android, iPhone/ iPad, Windows, Mac, and Linux users. It’s pretty straightforward to install — Android users can download the messaging app from Google Play, whereas it’s available for iPhone and iPad users via the Apple App Store. Google Play and the App Store will automatically take care of the installation process. Notably, Signal can only be used on phones running Android 4.4 or newer, iPhones running iOS 11.1 or newer, and iPads running iOS 11.1/ iPadOS 13 or newer.

Signal Private Messenger (Free, Google Play) →

For other platforms like Windows, Mac, and Linux, you’ll have to download Signal by going to its website. If you’re using Windows, run the downloaded executable (.exe) file and follow the onscreen instructions. macOS users will have to do the same with the downloaded disk image file (.dmg). Signal supports the 64-bit version of Windows 7 or newer, and macOS 10.11 or newer.

The process is slightly different for Linux users and the app can only be installed on 64-bit Debian-based Linux distributions like Ubuntu, Linux Mint, and Kali Linux. To install Signal on Linux, run the following three commands in Terminal.

wget -O- https://updates.signal.org/desktop/apt/keys.asc | gpg --dearmor > signal-desktop-keyring.gpg
cat signal-desktop-keyring.gpg | sudo tee -a /usr/share/keyrings/signal-desktop-keyring.gpg > /dev/null

echo 'deb [arch=amd64 signed-by=/usr/share/keyrings/signal-desktop-keyring.gpg] https://updates.signal.org/desktop/apt xenial main' |\
  sudo tee -a /etc/apt/sources.list.d/signal-xenial.list

sudo apt update && sudo apt install signal-desktop

How to set up Signal on an Android phone or iPhone

Signal for Android setup

  • Once you’ve installed Signal on Android or iPhone, open the app. You’ll be asked to give Signal permission to access contacts and phone calls. Signal for iPhone also asks for permission to send notifications.
  • After you’ve given the necessary permissions, Signal will ask for your mobile number. This mobile number is necessary to sign up for the service.
  • Signal will then send a six-digit code to your mobile number. You have to enter this code to progress further.
  • After the code, the app will ask you to set up your Signal profile by adding your name and uploading a profile picture. You can choose to skip the profile photo and last name but a first name is required.
  • Then Signal will ask you to create a PIN. This PIN is used to encrypt your profile information and conversations. You won’t be asked for this PIN to log into the app but it’ll be required to restore your account if you re-install the app. The PIN can be numeric or alphanumeric but at least 4-digits long. You will then have to reenter the PIN to confirm.
  • After completing the PIN generation, you’re ready to use the app.

How to set up Signal on iPad

There are two ways in which you can set up Signal on iPad. You can either choose to link the iPad app to your existing Signal account or you can set the iPad up as a separate device.

Signal app linking on Android

  • To link Signal’s iPad version to your existing account, open the app on your iPad and select Continue.
  • You’ll then be asked to give the necessary permissions. Tap Allow for these permissions.
  • After the permissions, it’ll ask you whether you want to transfer your existing account from another iPad or add the iPad as a new device. Since this is your first time installing the app on an iPad, choose Add as New Device. You’ll then be asked to open the app on your phone. Make sure your Signal setup is complete on your phone before attempting to link it on iPad.
  • Open the app on your phone and navigate to Linked devices under its settings.
  • Tap the plus (+) icon on Android or Link New Device on iOS. You may be asked to give the camera permissions to the app.
  • Tap Next on the iPad app and scan the QR code using your phone.
  • Pick a name for the linked iPad and select Finish. You can now use the app on your iPad.

If you plan to set up the iPad as a separate device for Signal, open the app and tap on the unlink icon in the top right. Now you can just follow the instructions given in the “How to set up Signal on an Android phone or iPhone” section to complete the setup.

How to set up Signal on desktop

Signal setup on desktop

Signal for desktop can only be used as a linked version. So make sure you’ve set up the app on your Android or iPhone and then attempt to set it up on your desktop. After that, setting up Signal on desktop – Windows, macOS, and Linux – is pretty easy.

Just open it and you’ll be asked to scan a QR code using the app on your phone. Open Signal on your phone and navigate to Linked devices under its settings. Then tap the plus (+) icon on Android or Link New Device on iOS. You can now scan the QR code and give a name to the linked device. That’s it, you’re done. You can now start using Signal on your Windows, Mac, or Linux machine.

Is there multi-device support on Signal, and what about Android tablets?

Signal offers multi-device support but it’s restricted. You can install Signal on an Android phone, iPhone or iPad. After that, you can link it to desktop devices. So this way, you are getting Signal on multiple devices, but you can’t use the same Signal account on multiple mobile devices. Also, Signal doesn’t officially support Android tablets.


How to use Signal

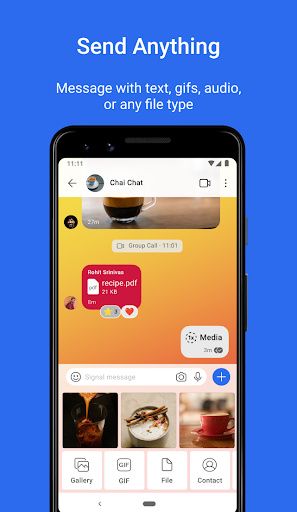
Now that you have Signal up and running on any of the platforms, it works similarly to other chat apps like WhatsApp or Telegram. To send a new individual message, tap the pencil icon. Depending on your platform, the pencil icon may be present on the bottom right or top right. Tapping on the pencil icon will pull up all your contacts who are already present on Signal. You can also use the pencil icon to start a new group conversation or invite a contact to Signal. Just tap on a contact in the list and a chat window will open. You can then start exchanging messages.

Signal New Group Screen Signal Conversation Screen with Disappearing Messages Signal Conversation Screen with Media Signal Group Video Call Screen

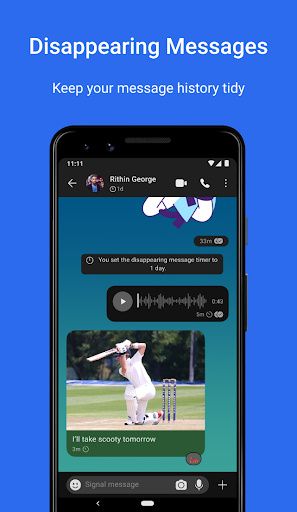
On top of the chat window, you’ll also see video and voice call icons that can be used to initiate a video or voice call, respectively. Moreover, you can tap on a contact’s name in the chatbox to get the settings specific to that contact. Here, you’ll have the option to switch on Disappearing Messages, change the chat wallpaper and modify the sound and notifications settings.

Signal also supports group video and voice calls for up to eight people. You can tap on the video call icon on top of a group chat box to initiate a group call. On the Start Call screen, tap on the camera icon to switch it off for a group voice call otherwise continue for a group video call.

Apart from these basic messaging features, Signal packs a number of other useful features, especially on the privacy front that you may not find on other messaging apps, like Incognito Keyboard, proxy support, Screen Security, and safety number.


How secure are the Signal conversations?

Signal app on Android

As mentioned earlier, Signal is an end-to-end encrypted messaging app, meaning all your conversations are always secure. Your Signal conversations can only be read or heard by the intended receiver. This isn’t an optional feature — all your messages, images, calls, files, and other content are always encrypted.

Signal Private Messenger uses its own open-source Signal Protocol for this end-to-end encryption. This protocol is known for its “perfect forward secrecy” implementation that makes messages encrypted with it very secure. Unlike most encrypted systems that create a permanent key pair to encrypt and decrypt messages on a particular device, Signal Protocol uses ratcheting encryption that changes the key after every message. There are permanent key pairs in this protocol but the system combines temporary keys with permanent keys to create a new shared secret key with every message.

The “perfect forward secrecy” implementation has made Signal Protocol quite popular. Apart from Signal, WhatsApp and Google Duo also use the protocol for their end-to-end encryption implementation.


Does Signal support chat backup/ restore?

Yes, you can backup and restore messages, pictures, files, and other content on Signal. However, chat backup support is limited to Android. You can’t back up chats on iOS or on a desktop version. Also, all the backups reside locally on the device, and the app doesn’t support online backups because of privacy concerns.

You can enable backups on Android by navigating to Signal Settings > Chats > Chat backups and tapping Turn On. You will be asked for a location to save this backup on your phone. The backups are encrypted with a 30-character passphrase. Without this passphrase, you won’t be able to restore the backup. Note down the passphrase and then tap Enable Backups.

If you reinstall the app on your phone, you can use a backup to restore your messages. The backups can also be used while transferring Signal from one device to another on Android. You can’t use backups across platforms.

Fortunately, Signal for iOS does support chat migration to other iOS devices, so if you have your old iPhone with the app, you can use it to migrate messages to your new iPhone.


These are some of the things that you need to know about Signal Private Messenger. It packs plenty of other features and enhancements that we were unable to cover here, but if you want to explore more about the app, you can visit Signal’s official website. Are you planning to migrate to Signal from another messaging service or if you have already been using it for some time, do let us know about your experiences in the comments section.

The post What is Signal and How to Use it: Everything you need to know about the secure IM service appeared first on xda-developers.


from xda-developers https://ift.tt/2SPW7CS
via IFTTT

Amazon Prime Day sales will start on June 21 this year

Amazon postponed last year’s Prime Day sale from July to October due to the COVID-19 pandemic. But this year, the company is moving the sale back to its typical summer timeframe as things have improved to a great extent, at least in some parts of the world.

Just a month ago, we saw reports suggesting that Amazon would host the Prime Day sale sometime in June this year. Now, the company has finally confirmed that this year’s Prime Day sales will kick off on June 21st. As per the Prime Day page on Amazon’s website, buyers will be able to get their hands on amazing deals, like Fire TVs starting at just $99.99, during the sale period. The company has also announced that Amazon Prime credit card users will be eligible for an additional 1% reward for all purchases made during the sale period.

On top of that, the company has revealed that its voice assistant Alexa will help users get early access to some major Prime Day deals, and buyers will get $40 for making purchases through the Amazon app. In a press release on the matter, Amazon has announced that Prime members will get access to over 2 million deals across all categories during the sale from major brands like Levi’s, iRobot, Samsung, and more. As part of Amazon’s new initiative to promote small businesses, the company has announced that it will offer users $10 credit to spend during Prime Day when they spend $10 on items sold by select small businesses between Jun 7 to June 20.

If you’ve been thinking of making a big purchase, you should check out the Prime Day sale later this month. The deals will go live on June 21st at midnight PDT (3 a.m. EDT) in the U.S., the U.K., the United Arab Emirates, Turkey, Spain, Singapore, Saudi Arabia, Portugal, Netherlands, Mexico, Luxembourg, Japan, Italy, Germany, France, China, Brazil, Belgium, Austria, and Australia. If you have an Alexa-enabled device, you can ask Alexa to “keep me posted on Prime Day” to get a notification as soon as the sales go live.

Ahead of the 48-hour Prime Day sale, Amazon will offer shoppers some early exclusive offers and deals. These offers will go live today. You can read more about them in Amazon’s press release linked above.

The post Amazon Prime Day sales will start on June 21 this year appeared first on xda-developers.


from xda-developers https://ift.tt/3uSgSeJ
via IFTTT

Latest update for Fitbit Sense and Versa 3 brings audible Google responses

Owners of Fitbit Sense and Versa 3 are in for a treat. A new FitbitOS update is now rolling out to your device, packed with many new features and improvements. Among other things, the latest update makes it easier to access your SpO2 data, adds high and low heart rate notifications, enables audible Google responses, and more.

Both Fitbit Sense and Versa 3 come equipped with an SpO2 sensor that can track your blood oxygen levels. Right now, you can see your average nightly blood oxygen level and trends from the Health and Metrics Dashboard in the Fitbit app and the SpO2 clock face. With this update, you can now access these data right from the on-wrist Today Dashboard.

Fitbit Sense showing SpO2 data

Next up, the new update is adding the high and low heart rate notifications. Fitbit Sense users already have this feature, and now it’s finally making its way to the Versa 3. If you have 24/7 heart rate tracking enabled, your Versa 3 can now detect and notify you if your heart rate is unusually low or high. Another nifty addition in this update is audible Google responses:

With this latest update you can now get audio responses from Google—if you ask to set an alarm, Google responds with: “Done. Your alarm’s set for tomorrow at 7am.” If you ask Google how you slept, Google responds with: “Since yesterday, you slept a total of 8 hr and 15 mins.”

Google Assitant on Fitbit Sense

The process of changing clock faces is now easier. You can swap clock faces right from the home screen. Just long-press on the current watch face, and it will open up the Clocks app with all available watch faces. Finally, the latest FitbitOS update also adds several new on-wrist celebrations, which will be shown on the display when you achieve your health and fitness goals to keep you inspired.

Aside from this update, Fitbit is also working on adding a new Snore & Noise Detect feature to the Fitbit companion app. This feature will use the microphone on your Fitbit device to tell you how much time you spent snoring during your sleep.

The post Latest update for Fitbit Sense and Versa 3 brings audible Google responses appeared first on xda-developers.


from xda-developers https://ift.tt/3cbqOcE
via IFTTT