When you’re dealing with the constant evolution of network technology, it’s not uncommon to face issues between your cellular service provider and your phone. This is especially true for advanced cellular features that are based on the IP Multimedia Subsystem (IMS), like Voice over LTE (VoLTE), Video over LTE (ViLTE), and Wi-Fi Calling (VoWiFi). As a result, there’s inevitably some confusion over what works and what doesn’t between your shiny new phone and the carrier of your choice. Thankfully, though, members of the XDA community love to poke around and come up with handy tricks to overcome such obstacles. This is exactly what happened with the ASUS ZenFone 8 and the OnePlus 9 Pro, as we have now access to methods that can be used to enable VoLTE and VoWiFi support on unsupported carriers for these two flagship smartphones.
ASUS ZenFone 8
The ASUS ZenFone 8 has managed to turn heads and serve as a refreshing surprise to the smartphone ecosystem. The ZenFone 8 serves as the Taiwanese OEM’s current-gen “compact” flagship device, and with features like a 120Hz AMOLED display with a hole punch in the top left corner for the selfie camera, up to 16GB of LPDDR5 RAM, up to 256GB of UFS 3.1 storage, and a renewed ZenUI skin that keeps things simple with a stock Android 11 interface, this phone is markedly different from anything ASUS has ever put out before.
There are few small phones on the market with flagship specifications, but the ASUS ZenFone 8 is one of those rare devices. Surprisingly, it doesn't skimp on battery life or performance and doesn't cost a fortune, either.
ASUS has already rolled out a couple of software updates to the ZenFone 8, the latest of which introduced official VoLTE support on several European carriers. Since carrier certification is a lengthy process, you may want to force-enable VoLTE/VoWiFi using the previously demonstrated “setprop” method — only to find that it doesn’t work on this phone.
Worry not, as XDA Recognized Developer Freak07 has managed to solve the puzzle. As it turns out, ASUS decided to change the variable names, so the setprop commands need to be revised a bit.
Enable VoLTE/VoWiFi in Settings on the ASUS ZenFone 8
Unlock the bootloader of the device and gain root access by patching the stock boot image using Magisk.
Start an elevated shell using ADB or a terminal emulator app on your phone. To do so, you need to type su in the command prompt and grant root access via Magisk.
Now you should get the VoLTE/VoWiFi option in Settings.
Keep in mind that toggling the options alone might not be sufficient to get the VoLTE/VoWiFi service. This tutorial will only work if the ZenFone 8 contains the appropriate configuration data for your carrier in its modem firmware.
The OnePlus 9 Pro is OnePlus’ latest flagship and inarguably the best smartphone yet from the company. You can even run Android 12 right now on the phone in the form of a beta. Thanks to its tinkering-friendly nature, the VoLTE activation part is also quite straightforward.
With a large, 6.7-inch Quad HD OLED display and a Smart 120Hz refresh rate, the OnePlus 9 Pro may have the best display on the market. The cameras, tuned in collaboration with Hasselblad, produce excellent still photos and capture superb 4K video.
Unlike the ASUS ZenFone 8, you can force-enable VoLTE and VoWiFi on the OnePlus 9 Pro without root access. This is possible because some official OnePlus tools let you access the Qualcomm Snapdragon modem’s internal diagnostic interface and manually set the required parameters to support advanced IMS services.
Enable VoLTE/VoWiFi on the OnePlus 9 Pro
Grab the OnePlus Logkit and the OnePlus Engineering Mode APKs from this thread.
Manually install the two APK files.
Open the Phone app, dial *#800#, and select EngineeringMode.
Once you’re inside OnePlusLogKit, scroll down a bit and check the “VoLTE switch” and “VoWifi switch” options. You may also need to check “VT switch” for some carriers.
Do a reboot.
Open Settings and enable VoLTE and VoWiFi.
Open the Phone app again, dial *#801#, and select EngineeringMode.
Tap on the “Full-port switch” option to turn it on.
Turn on USB debugging and connect the phone to your PC. Make sure ADB is installed properly.
Execute the following command to reboot into Field Test Mode:
Amazon’s new Sidewalk feature is going live on June 8. Announced all the way back in 2019, Amazon Sidewalk is an ambitious project that aims to create a shared network of connected devices. Amazon has been testing the feature for some time now, but it finally appears to be ready for its prime-time launch.
As part of the rollout, Amazon will enroll millions of supported Amazon devices in the U.S. into Sidewalk to form a mesh network. To form this mesh, Amazon will share a fraction of your Internet bandwidth with your neighbors. Naturally, anything that involves sharing your home network with outsiders will trigger privacy and security concerns. And these concerns are further compounded by the fact that Amazon is making Sidewalk an opt-out service rather than opt-in.
In other words, Amazon won’t ask you whether you want to be part of this experiment. Instead, the company will just straight up enroll every supported device into Sidewalk starting June 8. But the good thing is that it’s possible to opt out of this initiative before it goes live. Before you go ahead and disable the feature, though, it’s worth reading about how it works so you can decide if it’s really a threat to your privacy.
How Sidewalk works
Conceptually, Amazon Sidewalk works similarly to Apple’s Find My network but with a bigger scope in mind. While Apple’s “Find My” service only helps locate AirTags and lost Apple devices, Amazon Sidewalk can do much more than that. For example, it can extend the working range of your connected devices beyond your home Wi-Fi, locate your pets and valuables, and more. Sidewalk employs Bluetooth Low Energy, the 900Hz band, and other frequencies to enable Echo speakers, Tile trackers, Ring security cameras, and other supported Amazon devices to communicate over a low-bandwidth network created using participating devices. Each participating device, referred to as Sidewalk Bridge, contributes a small portion of internet bandwidth. This bandwidth is pulled together to create a shared network that supported devices can use to help each other out.
Amazon says the maximum bandwidth of a Sidewalk device to the Sidewalk server is 80Kbps, while the monthly bandwidth per account is capped at 500MB. In response to privacy concerns, Amazon says all communications over Sidewalk Bridges are secured by three layers of encryption. Amazon also limits the amount and type of metadata it collects from participating devices to protect user privacy. And although users can see they’re connected to Sidewalk, they can’t see exactly which Bridge they’re connected to. For a detailed explanation of the various mechanisms employed by Amazon to protect the privacy and security of Sidewalk users, check out this whitepaper.
How to opt out of Amazon Sidewalk
If you don’t want to be a participant in Amazon’s Sidewalk network, you can opt-out of the experiment using the Alexa app or Ring app.
In the Alexa app, open the “More” tab > tap Settings > Account Settings > Amazon Sidewalk > and turn off the toggle.
In the Ring app, open the hamburger menu > Control Center > Sidewalk > toggle off the slider.
Apple doesn’t make too many products, so if you’ve already decided on getting a Mac, you’re halfway towards buying the thing you want. Now you just have to decide which Mac you’re going to get. Steve Jobs famously divided the Mac lineup into four quadrants. There’s laptop and desktop, and for each one, there’s consumer and professional. After returning to Apple, he asked the team which one he should tell his friends to buy, and that’s when it was decided that things should be simpler.
With some exceptions, not much has changed. In the procategory, there’s the MacBook Pro laptop and the Mac Pro desktop. For consumers, we have the MacBook Air and the iMac. Of course, we can throw the Mac mini in there too.
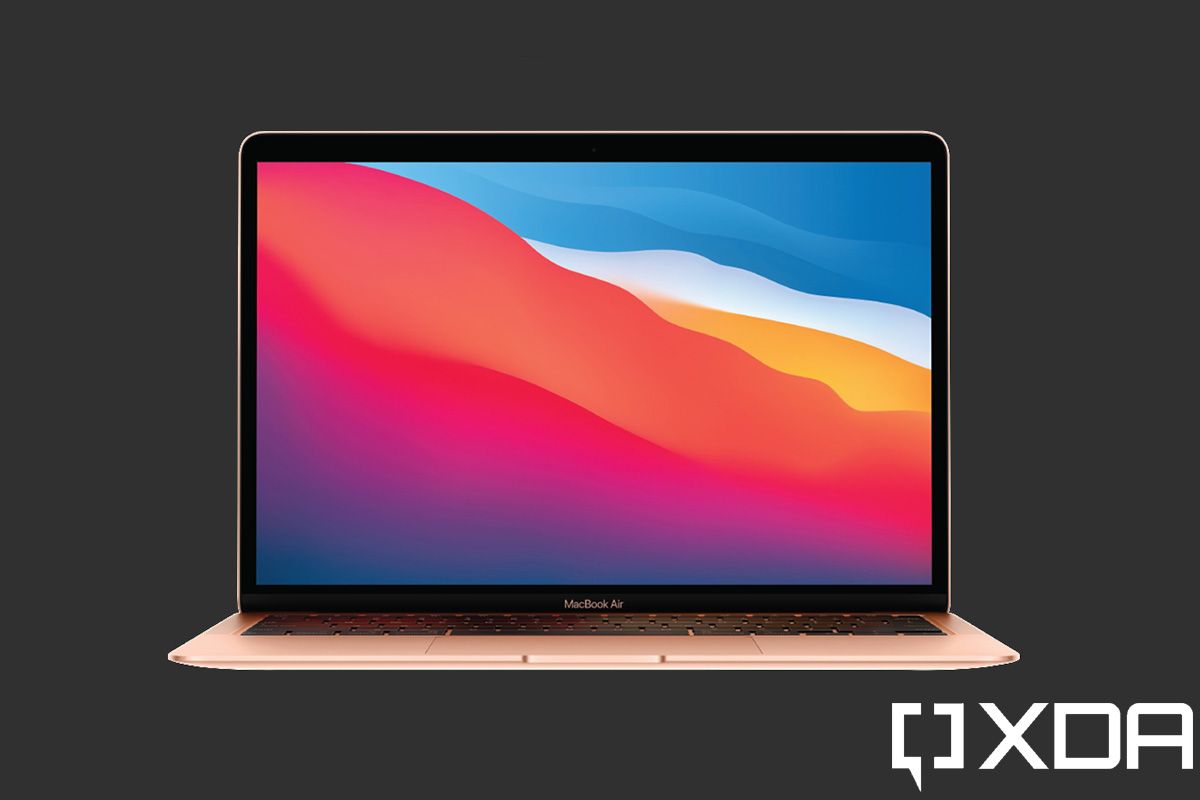
The MacBook Air is one of the first to use Apple Silicon, and the M1 processor is a beast. Not only does that make this one of the best Macs around, but it’s also one of the best laptops around. It comes with a beautiful 13.3-inch 2560 x 1600 display, Thunderbolt 3, and Touch ID.
Along with 8GB unified memory and a 256GB SSD, all of that comes in at $999. Seriously, with performance like that, a display like that, Thunderbolt, and a fingerprint sensor, you’re just not going to find anything on this level in the Windows world at that price. It comes in Gold, Silver, and Space Gray.
When I was considering what to make the best overall pick, I really wanted to make it the 24-inch iMac. The truth is that for most people, a desktop PC just doesn’t fit into their lifestyle. But if you want a mainstream desktop PC, this is the one for you.
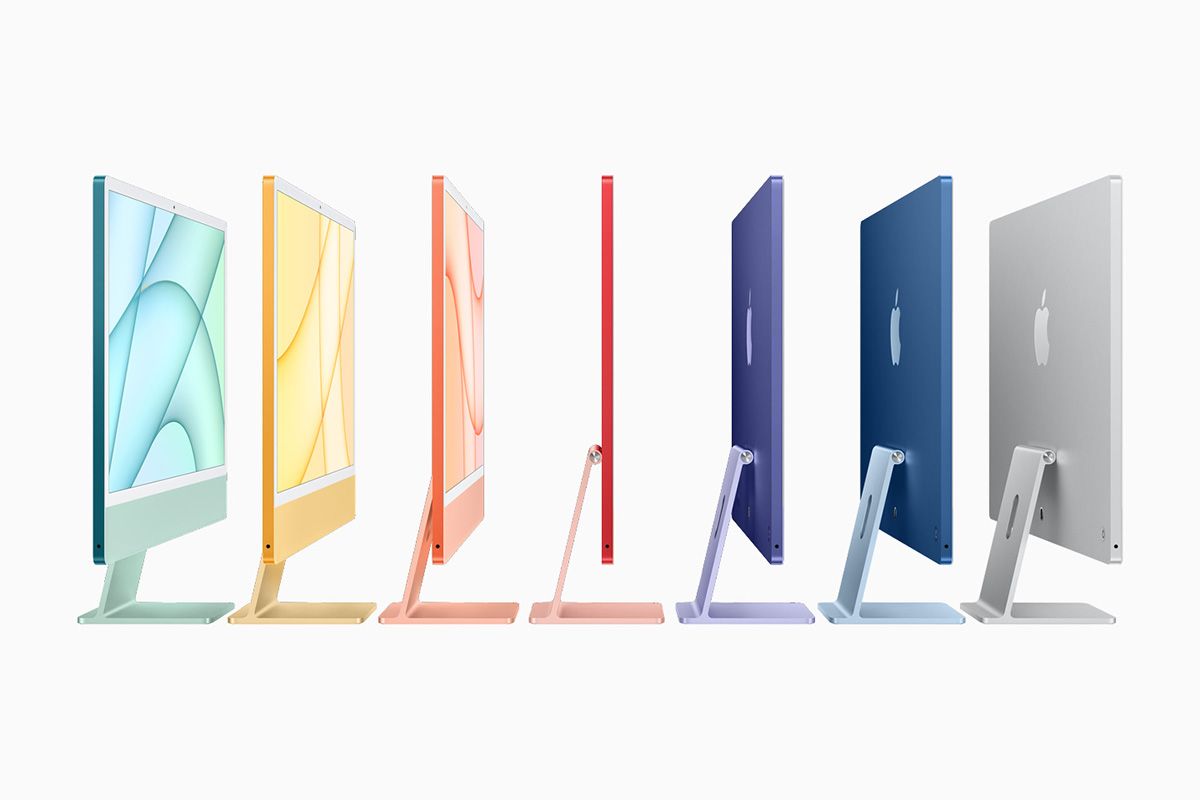
It’s the first Mac that’s actually designed with Apple Silicon in mind. Others like the MacBook Air, 13-inch MacBook Pro, and Mac mini all used the chassis of their Intel-powered predecessors. The iMac looks impossibly thin and incredibly beautiful, also coming in six stunning colors, and silver. Starting at $1,299, it also comes with a stunning 24-inch 4.5K Retina display.
It’s got the same M1 processor as the MacBook Air. Indeed, we live in a world where the 11-inch iPad Pro and the 24-inch iMac use the same processor, and the iMac is still desirable. The Apple M1 is that good.
While the Apple M1 is included in the 11-inch iPad Pro, the Mac mini is actually the least expensive way to get your hands on the company’s custom silicon at $699. This is another one of those situations where the value is just incredible if you want to be sticking within the Apple ecosystem. You’re not going to get this level of performance with an Intel PC for $1,699.
On a side note, the Mac mini is the only Apple Silicon Mac that supports dual monitors. You can connect one to the USB Type-C port and one to the HDMI port. What’s cool is that it doesn’t take up a lot of space either. You can easily customize your setup, something that’s not as easy to do with an all-in-one.
Apple's Mac mini is only small in size, not performance. It doesn't take up a lot of space, and it's the least expensive way to get an Apple Silicon Mac.
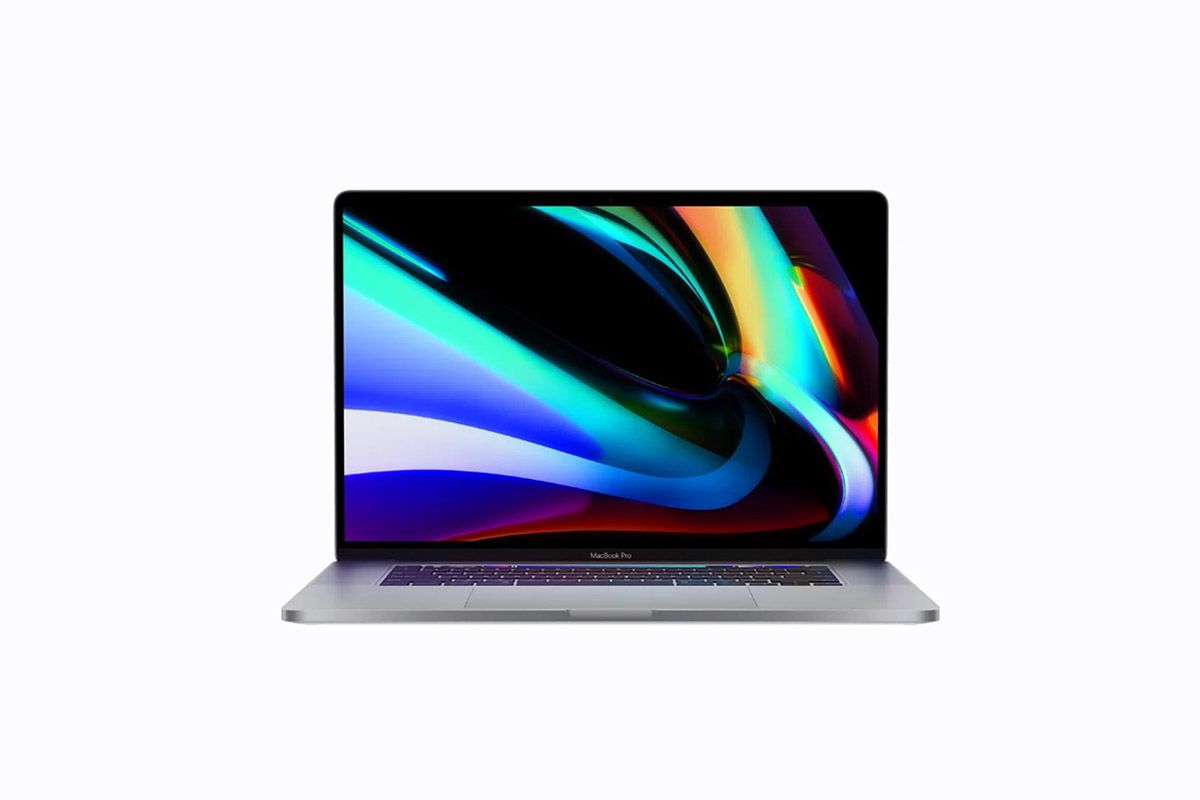
The 16-inch MacBook Pro is still the best Mac for creators, despite not yet having been refreshed with Apple Silicon. But since it still has a 45W Intel CPU, it can do some things that the M1 can’t. A single Thunderbolt port is capable of powering dual 4K displays, and the laptop itself can handle up to four 4K displays. Or it can handle two 6K displays. Another thing you can do here that you can’t do with the M1 is you can connect an external GPU, adding more power.
Along with up to an Intel Core i9, you can get it with an AMD Radeon Pro 5500M with 8GB GDDR6 memory or a Radeon Pro 5600M with 8GB HBM2 memory. It also comes with up to 64GB 2,666MHz DDR4 memory and up to an 8TB SSD. It starts at $2,399.
Apple's 16-inch MacBook Pro is still the powerhouse laptop, and you can pack it out with 64GB RAM, 8TB of storage, an Intel Core i9, and Radeon Pro 5600M graphics with 8GB HBM2 memory
On the creator end, the 27-inch iMac is the way to go. If you’re doing things like video editing and photo editing, you’ll appreciate the bigger, 5K Retina screen than the one on the 24-inch iMac. It’s got 10th-generation 65W Intel processors, which are full desktop parts. You can configure it with up to 128GB 2,666MHz DDR4 memory and up to an 8TB SSD.
For graphics, you can get up to an AMD Radeon Pro 5700 XT with 16GB GDDR6 memory, so there’s lots of power here. External display support is one 6K display, or two 6K display if you get a Radeon Pro 5700 or 5700 XT, so you can do a lot with the 27-inch iMac. It starts at $1,799.
The 27-inch iMac has a bigger screen and more pixels than the smaller 24-inch one. It has 10th-gen Intel processors, up to Radeon Pro 5700 XT graphics with 16GB GDDR6, 8TB SSD, and 128GB of memory
My top pick is the MacBook Air. Out of the four products with the Apple M1 processor, that’s the one that works for most people. And at $999, you’re just getting things that you can’t get anywhere else. It has a beautiful display, tons of power, and more. If you’re looking for something that isn’t portable, that’s when you go for the 24-inch iMac. It comes in pretty colors, and it’s just a delight to use.
A couple of products were omitted here. For one thing, we didn’t include the 13-inch MacBook Pro with its M1 processor. Being a Pro-branded PC, there are a few trade-offs that need to be worked out in the next generation, such as support for multiple external monitors.
Then there’s the big bad Mac Pro. The Mac Pro has tons of power if you want it, but we’re going to wait for it to get its Apple Silicon refresh before we recommend it. A year ago, Apple said that it was transitioning its entire lineup to Apple Silicon over the next year. For something that starts at $5,999, you might want to wait for the new one, especially since we know it’s coming soon.
Lenovo’s ThinkPad X1 Nano is a phenomenal PC. I’ve already said as much when I compared it to the ThinkPad X1 Carbon. They’re both meant to be premium, thin and light laptops for businesses, but the ThinkPad X1 Nano is next-level thin and light. This is actually the second one that I’ve reviewed, as Lenovo was kind enough to send over the multi-touch model.
The ThinkPad X1 Nano weighs in at just 2.14 pounds. It’s the kind of thing that if you carry it in your backpack, you have to check and make sure that it’s in there. The best part is that doesn’t really make compromises to get that thin and light, as the Intel processors under the hood are really good.
It’s also the first 16:10 ThinkPad, something that was way more of a big deal in December when this was first announced. Then, CES came in January and 16:10 screens became more common for everyone.
13.0″ 2K (2160 x 1350) IPS, anti-reflective, anti-smudge, touchscreen with Dolby Vision, 450 nits, 100% sRGB
Memory
16GB LPDDR4x 4266MHz (Soldered)
Storage
512GB PCIe SSD
Battery
48WHr, up to 13 hours
Security
Discrete Trusted Platform Module (dTPM) 2.0
Human-presence detection with Windows Hello & IR camera
Match-on-chip fingerprint reader
Webcam privacy cover
Audio
Dolby Atmos Speaker System
4 x 360-degree mics
Camera
Hybrid infrared (IR) / 720p HD with webcam privacy cover
Connectivity
Optional: WWAN LTE 5G / LTE 4G CAT9
WLAN: WiFi 6 AX201 802.11AX (2 x 2)
Bluetooth 5.2
with vPro On vPro Processors
Ports
2 x USB4 Thunderbolt 4 (Power Delivery)
Headphone / mic combo
Keyboard
Spill-resistant
Backlit with white LED lighting
Call-control keys (F9-F11)
Material
Top: Carbon fiber
Bottom: Magnesium alloy
Color
Black with Carbon-Fiber Weave on the top cover
OS
Windows 10 Pro
Price
$1,315.85
The price I listed for the ThinkPad X1 Nano is based on the product page on Lenovo.com, but that price always fluctuates. Lenovo never actually charges what would be considered full-price on a ThinkPad, and the “instant savings” and eCoupons always vary.
Note that this model weighs in at 2.14 pounds. The non-touch model that I previously reviewed came in at 1.99 pounds, so it does make a difference between the touch and non-touch models. Adding cellular puts on a bit of weight as well.
Design: The ThinkPad X1 Nano weighs around two pounds, depending on your config
The ThinkPad X1 Nano comes in two colors: black, and another kind of black. Lenovo sent me the latter, which is actually a carbon fiber weave design. The carbon fiber weave is exclusive to the touchscreen model, so if you want the 1.99-pound non-touch version, you’ll have to get regular black.
There’s not a whole lot to talk about when it comes to the general design of a ThinkPad. It’s a pretty standard look and feel that stretches across most of the lineup. Indeed, almost all of them just come in black, and they all have those squared-off corners and a ThinkPad logo stamped in the corner. For premium models, there’s the glossy black ThinkPad logo that we see here.
I quite like the ThinkPad X1 Nano’s carbon fiber weave design, and obviously, I’ve seen it on a number of ThinkPads. It’s just something a little bit different. I’m a bit surprised that Lenovo reserved it for the touch model since I think the non-touch one is the more desirable configuration. That’s the one that actually comes in at under two pounds, a key feature of the ThinkPad X1 Nano.
This one is just over two pounds, which is still incredibly light. As I said, it’s the type of device where if you walk out of the house with the laptop in your backpack, you’ll have to check and make sure you remembered to put it in your bag. The ThinkPad X1 Nano is just that light that you won’t even be sure it’s in there.
The ThinkPad X1 Nano is the type of device where if you walk out of the house with it in your backpack, you'll have to check and make sure you remembered to actually put it in your bag.
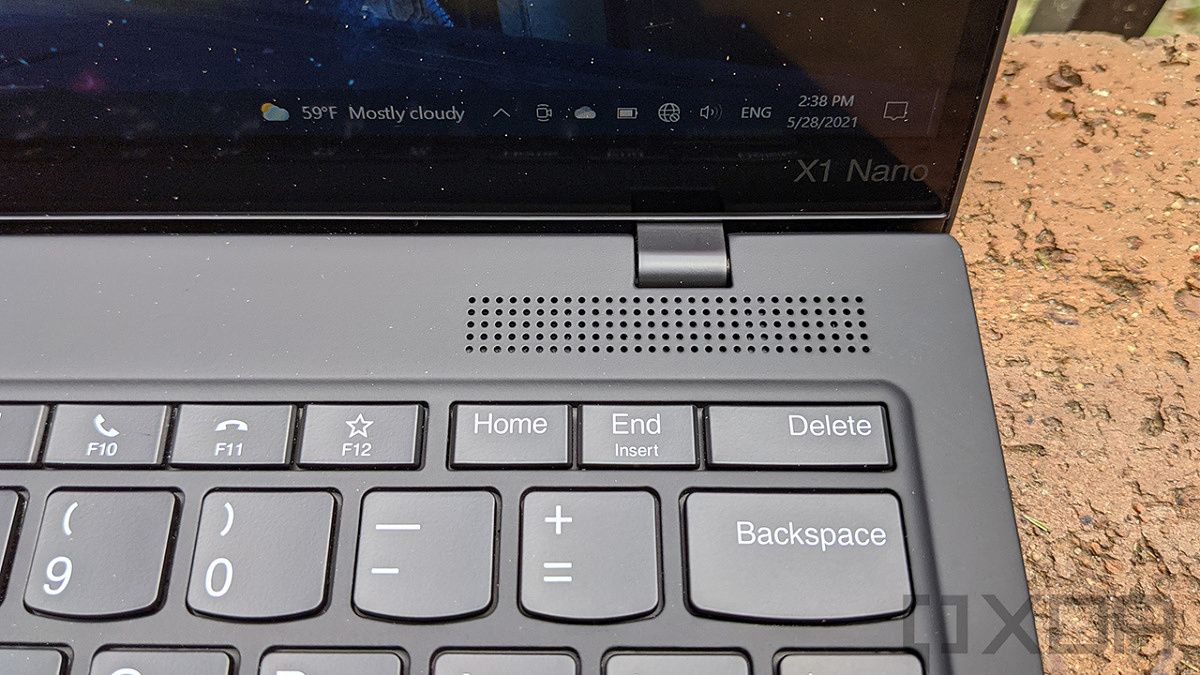
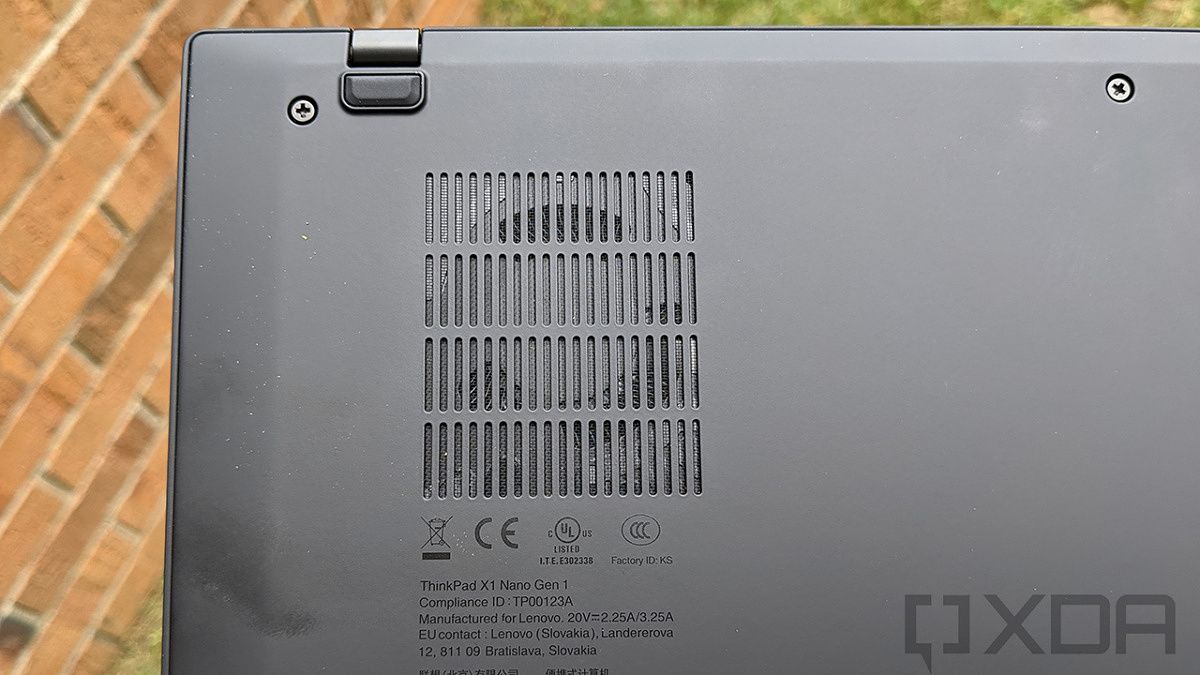
On the right side, there’s just a power button. This is only interesting if you’re into ThinkPad design as Lenovo used to put a circular power button on the keyboard deck for clamshells like this. A couple of years ago, Lenovo moved the button to the side to make it consistent with its convertibles. This year for the ThinkPad X1 series, the company moved the button back to the deck, making it double as a fingerprint sensor. But being that this laptop was announced in December rather than alongside the rest of the lineup, the ThinkPad X1 Nano missed out on that memo. Expect to see that on Gen 2.
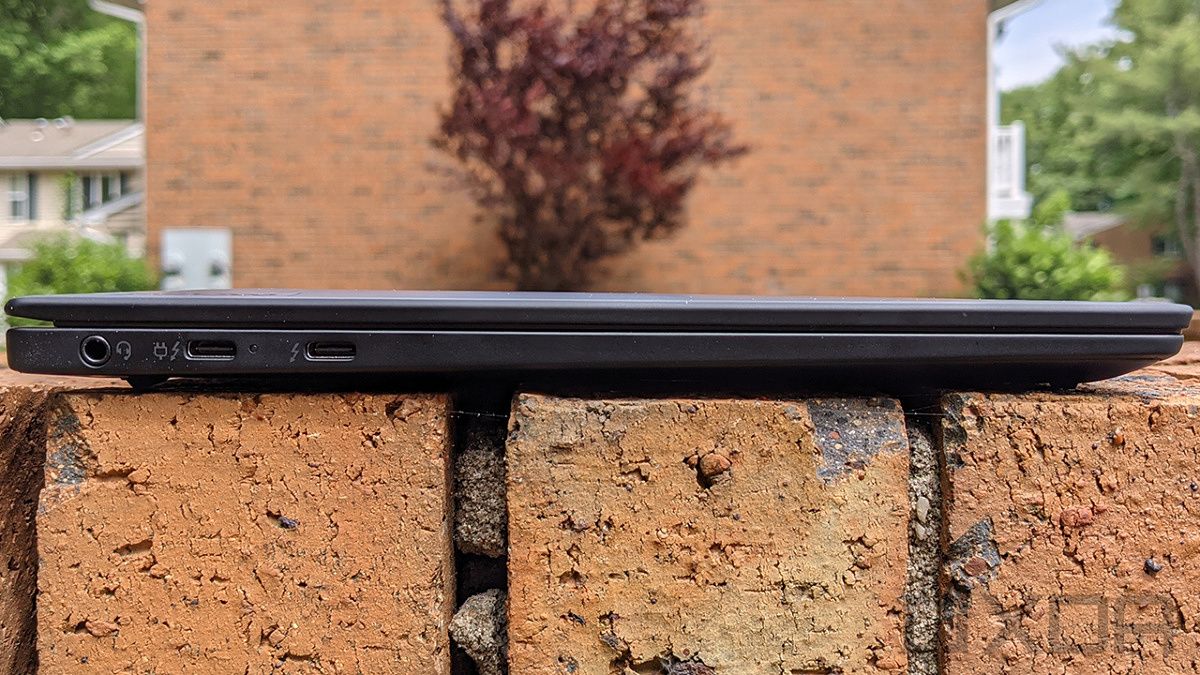
On the left side, there are two Thunderbolt 4 ports and a 3.5mm audio jack. If you need more ports than that, I suggest checking out the ThinkPad X1 Carbon. The two laptops fall under the umbrella of premium ThinkPads that are designed to be thin and light, but the Carbon maintains a lot of legacy support.
With Thunderbolt 4 support on the ThinkPad X1 Nano, you can connect dual 4K displays on a single port, or you can connect an external GPU. Here’s a better plan. You can connect an external GPU to one of the Thunderbolt ports, connect dual 4K displays to the external GPU, and then use the other Thunderbolt 4 port to connect a dock and add some ports. That’s what I actually did at one point, and I sat and played Forza Horizon 4 on Ultra graphics settings on a 2.14-pound laptop.
Display and Audio: It has a 2K screen and Dolby Atmos
The Lenovo ThinkPad X1 Nano doesn’t have a lot of display options like some more mature ThinkPads. You’ve pretty much got touch and non-touch. They both have 13-inch 2160 x 1350 450-nit panels that support Dolby Vision HDR. Aside from touch support, one key difference is that the non-touch model has an anti-glare screen while the multi-touch one has a glossy one.
The display has a 16:10 aspect ratio, and as I said earlier, the ThinkPad X1 Nano is the first modern ThinkPad to use the taller aspect ratio. Back in the old days, they had 4:3 aspect ratios, but then the industry moved to 16:9 when HD got popular. It’s always been generally accepted that taller screens are better for productivity, and we’re finally seeing the industry moving back in that direction.
The ThinkPad X1 Nano definitely has a pretty screen, and I really appreciate that it’s 2160 x 1350 in resolution instead of 1920 x 1200. Those extra pixels definitely make a difference. In my testing, it supports 99% sRGB, 72% NTSC, 77% Adobe RGB, and 77% DCI-P3.
I really appreciate that the ThinkPad X1 Nano has a 2160 x 1350 resolution screen. Those extra pixels definitely make a difference.
Sadly, the webcam is a bust. It’s only 720p in resolution, a real shame in the era of working from home. It does have a built-in privacy guard, so you don’t have to worry about putting tape over it or anything. I just wish Lenovo had packed a 1080p webcam. Fortunately, Lenovo did add an IR camera on the ThinkPad X1 Nano for Windows Hello support, so you do get built-in facial recognition.
Finally, we’ve got Dolby Atmos audio on the ThinkPad X1 Nano, with two speakers above the keyboard and two underneath the device. It has the clarity that Dolby Atmos is known for, but the volume isn’t terrifically loud. It’s fine for music at your desk, but it won’t fill the room. It’s also great for calls, of course, especially with its four 360-degree microphones.
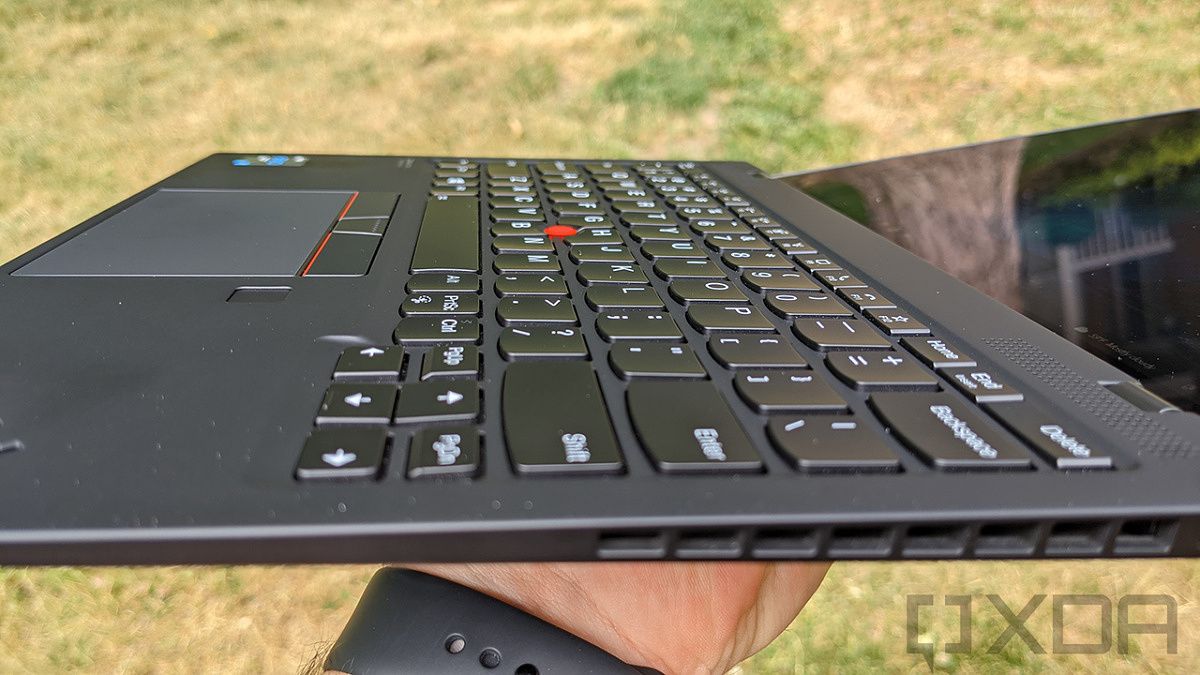
Keyboard: The ThinkPad X1 Nano has new 1.35mm keys
Lenovo’s ThinkPads are renowned for having some of the best keyboards, but what if I told you that this keyboard was different from the rest of the pack? Well, it is, and personally, I think it’s way better.
I think the X1 Nano's keyboard is way better than other ThinkPad keyboards.
The ThinkPad X1 Nano has 1.35mm keys, rather than the 1.5mm keys that you’ll find on most ThinkPads. While Lenovo ThinkPads always had amazing keyboards in terms of comfort and accuracy, the key throw always felt a bit long, even though competing laptops have shallower keyboards.
It’s actually the same keyboard, but even shallower. There’s a lot of engineering that went into everything about this PC. Making the keyboard shallower without changing the feel was a big part of that.
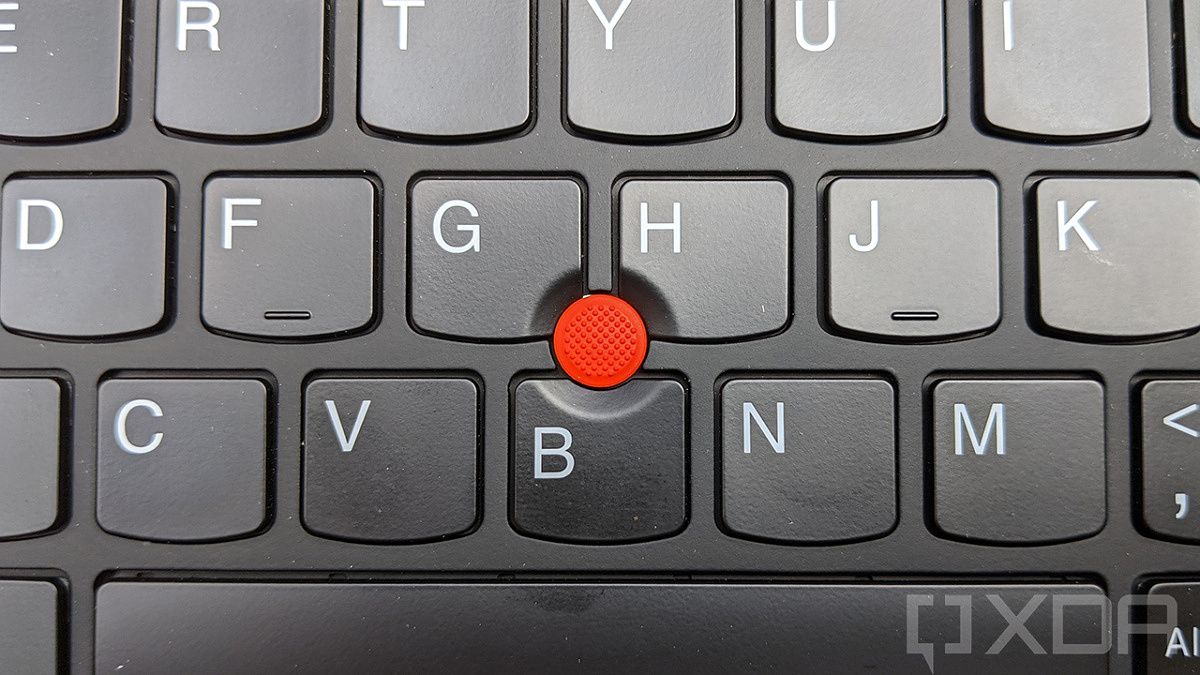
Obviously, the ThinkPad X1 Nano still has the iconic ThinkPad TrackPoint, ie. the little red nub that lets you control the pointer. It’s a relic from the age when Windows touchpads were terrible, but on ThinkPads, it’s just not going anywhere. If you love it, you can use it; if you hate it, just ignore it.
Note that there’s a fingerprint sensor next to the touchpad. That’s something that’s going away at least on some ThinkPads but is still there on the ThinkPad X1 Nano. As I mentioned above, the power button is moving to the keyboard deck with newer ThinkPads where it doubles as a fingerprint sensor. It’s just fascinating to me that this laptop is a brand-new ThinkPad X1 from the ground up, but it’s still missing some of the features that shipped just a month or two later.
Finally, there’s the Microsoft Precision touchpad, which has physical buttons above it. I like the physical buttons — it makes dragging and dropping easier. Still, they’re designed for use with the TrackPoint, and since the TrackPoint isn’t going anywhere, neither are those buttons.
Performance: Y-series? Y not?
The ThinkPad X1 Nano that Lenovo sent me has an Intel Core i7-1160G7 and 16GB RAM, the exact same specs as the first unit the company sent me. The processor is from the Tiger Lake UP4 family.
UP4 is the successor to the Y-series, and even before that, it was known as Core M. I know; I’m throwing around a lot of bad words here. But just because I’m saying things like “Y-series” and “Core M”, don’t run away just yet. These Intel CPUs are actually good.
Compared to the eighth-generation ‘Amber Lake’ (10th-gen ‘Ice Lake’ barely even shipped), there are some major differences. The TDP has been boosted, there are four cores instead of two, and the graphics are much, much better. Now, we’ve got Iris Xe graphics, which are clocked at 1.1GHz and have 96 execution units. Honestly, the integrated graphics on the eighth-gen Y-series were a joke.
Y-series was designed for fan-less PCs, and yes, the Lenovo ThinkPad X1 Nano does have a fan. But the fact that Tiger Lake UP4 is so good is why this PC can exist. In fact, the same goes for the ThinkPad X1 Titanium Yoga. If this laptop came out two years ago, I wouldn’t recommend it in a million years. In case you missed the badge in the beginning, though, I think the ThinkPad X1 Nano is a top pick.
With Tiger Lake UP4, it seems like there are no meaningful compromises left.
The Intel Core i7-1160G7 is great for productivity, but it can do more than that too. You won’t have any issues with editing images in Photoshop, and you can even do some light video editing on here. As far as performance goes, if you didn’t know that it was a Y-series successor, you wouldn’t even guess that it’s not a regular 15W U-series chip.
Battery life is fantastic too, like weirdly fantastic. I was able to get a solid 10 hours of usage out of this thing. That’s with the power slider one notch above battery saver and screen brightness at 25%. It’s so weird because the battery is only 48WHr, so it’s not particularly large. It’s just really good.
Battery life is fantastic too, like weirdly fantastic.
For benchmarks, I used PCMark 8, PCMark 10, Geekbench 5, and Cinebench.
Conclusion: Should you buy the Lenovo ThinkPad X1 Nano?
The point that I keep coming back to, and the reason that I love the ThinkPad X1 Nano so much, is because just a year ago, this combination simply wasn’t possible. Up until this year, if you wanted a laptop this thin and light, you had two choices: You had to settle for an Intel Y-series processor or a Qualcomm Snapdragon processor. Both have compromises. With Tiger Lake UP4, it seems like there are no meaningful compromises left.
Sure, I would bet that for a business PC, many will say that the lack of USB Type-A and HDMI ports is a compromise. Honestly, though, that’s why the ThinkPad X1 Carbon exists. The Carbon weighs in at under 2.5 pounds, so it’s still really light. With the ThinkPad X1 Nano, though, Lenovo just took things as far as it could go.
There’s one big con though, which is the 720p webcam. Over the last year, many people have moved to work from home, and that’s also caused a boost in PC sales. But if you’re buying a PC because you switched to working from home, you probably want an FHD webcam.
I’d still say that the Lenovo ThinkPad X1 Nano is good for working on the go, though. If you’re looking for something to park at a desk, get a desktop or a beefier laptop. This is something you’ll bring with you, and then when you get home, you can use a single-cable solution to plug it into a Thunderbolt dock.
The ThinkPad X1 Nano is definitely one of my favorite laptops on the market right now, although frankly, all of Lenovo’s ThinkPad X1 laptops are killing it this year.
Like many other retail stores, Walmart sells various tech products and accessories (most of which are ODM designs) under its own “Onn.” brand, alongside products from more well-known brands like Apple, Google, Roku, and so on. The company sells Onn-branded cables, accessories, and even Android tablets, but now Walmart is gearing up to release its own Android TV streaming stick — and it’s really cheap.
Walmart, everyone’s favorite anti-competitive and low-wage retail store, recently created a product listing for the “onn. FHD Streaming Stick” (via Android TV Guide). You can’t buy it yet, but the stick has a retail price of $24.88. If the price doesn’t change before release, it would make the Onn stick one of the least expensive Android TV streaming boxes to date. The Chromecast with Google TV and TiVo Stream 4K are both priced at $50 (though often go on sale for $40), and the Xiaomi Mi TV Stick is currently $40 in the US. Outside of the Android ecosystem, the Roku Express typically goes for around $25.
Onn Stick product listing on Walmart’s website
The product listing doesn’t have a lot of specific details, but it does confirm a maximum resolution of 1080p, Dolby Audio support, 1GB RAM, 2.4GHz and 5GHz Wi-Fi support, and a microUSB port for power. The remote has a Google Assistant button and a microphone for voice commands, as well as dedicated buttons for YouTube, Netflix, Disney+, and HBO Max. There’s also a wall power adapter and HDMI extension cable in the box, in case the HDMI or USB ports on your TV are difficult to access.
It remains to be seen if the stick will work with Amazon Prime Video, which is known to be blocked on many Android TV devices. Netflix also blocks content playback on TV devices that the company hasn’t certified, but the dedicated button for the service on the remote indicates Netflix should be available. Walmart is also preparing to launch a 4K Android TV box, which will cost around $30.
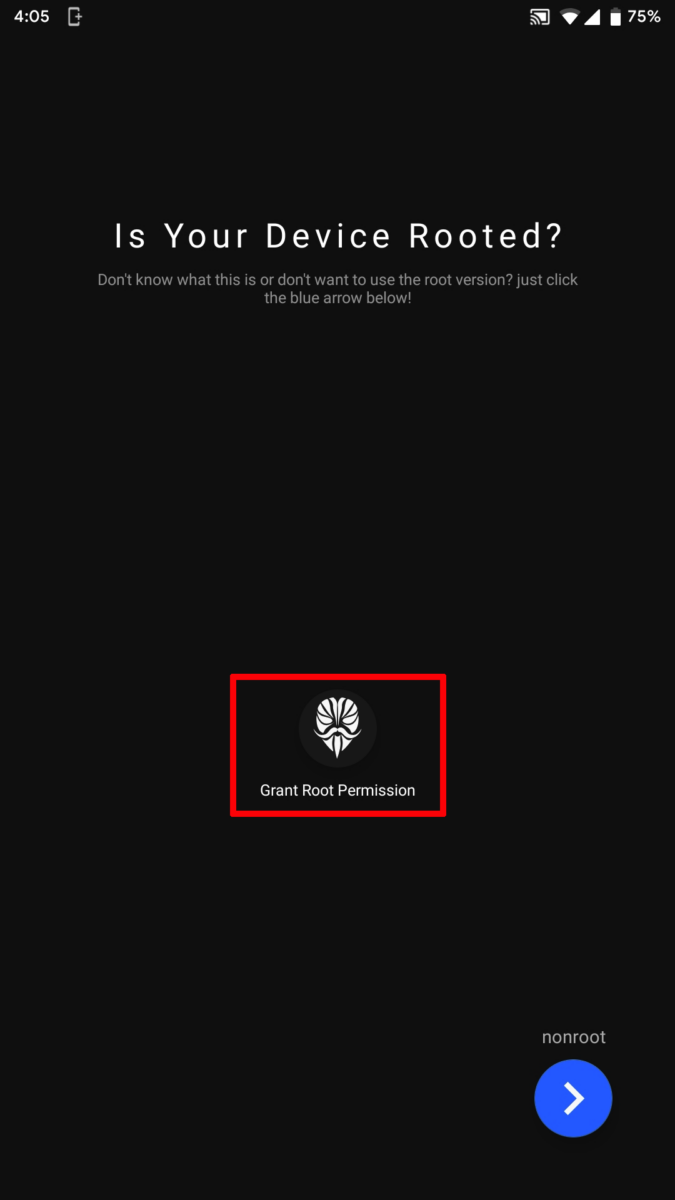
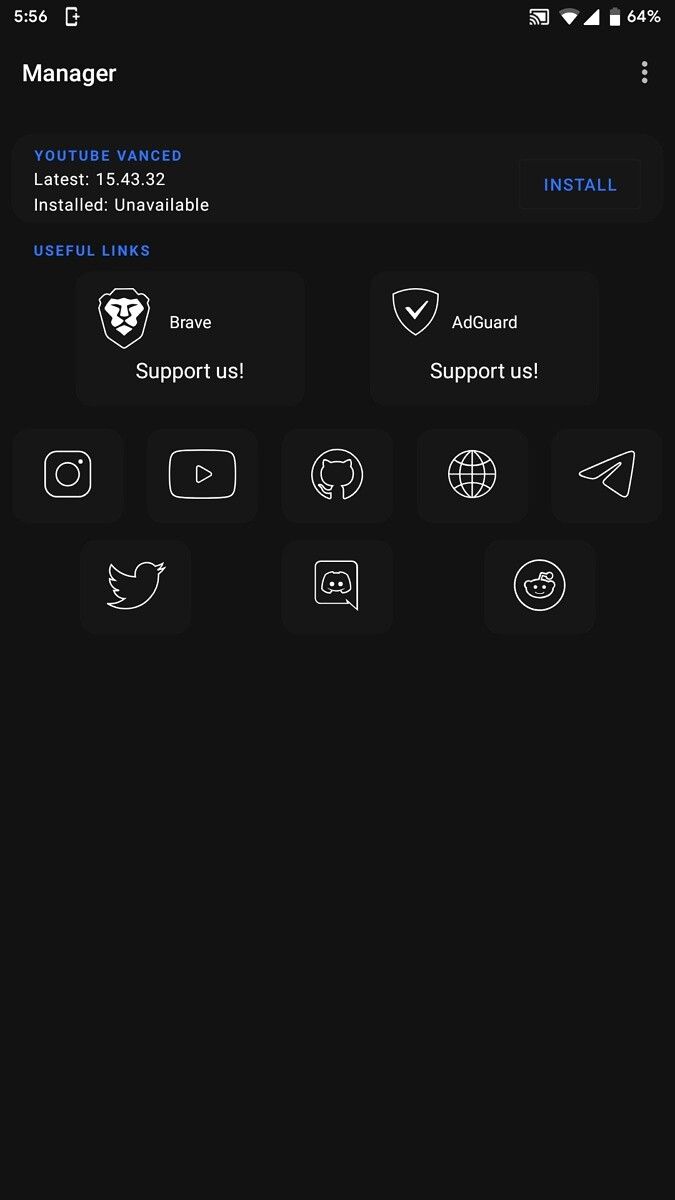
YouTube Vanced is a popular modded version of YouTube. It adds a number of features to the official YouTube app, including built-in adblocking, background playback, black/dark themes, and much more. This page has installation instructions and download links for rooted devices. Non-root downloads can be found here.
In terms of user experience, there is virtually no difference between the root and the non-root builds.
Root variant: The root variant of Vanced seamlessly replaces the official YouTube app. As a result, you can directly open YouTube links or call them using Google assistant through the modded app.
Non-root variant: However, if you have a device that is difficult to root or you don’t want to root your daily driver on the first hand, you should opt for the non-root variant. It can be installed on a rooted device as well. Since the package name of the non-root variant is different from the stock YouTube app, they can co-exist. Note that you need to install an additional companion app (MicroG) to be able to log in with your YouTube/Google account. Moreover, you have to manually set Vanced as the default app for opening YouTube links. However, the non-root variant is simply easier to live with, so our recommendation is to stick with the non-root variant unless you really need to replace the stock YouTube app on your phone.
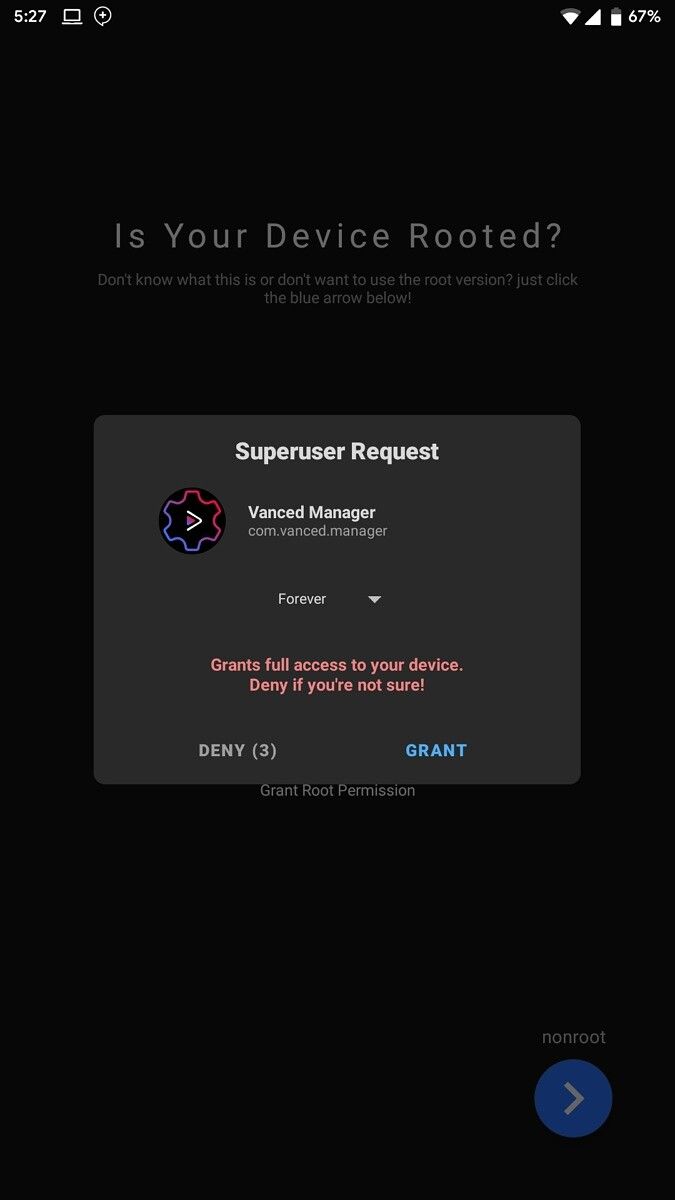
How to install YouTube Vanced Root variant with Vanced Manager
The YouTube Vanced team has created a new, easier method for getting Vanced up and running. Users can now simply install the Vanced Manager app and it will facilitate the process of installing YouTube Vanced. Support for Vanced Music, i.e., a similarly modded version of YouTube Music is also there since version 1.3.0. The app makes it easy to choose which theme you want and to install future updates.
Steps:
Download the latest Vanced Manager from here on your Android device.
Install the app and open it.
Make sure to grant the app superuser access during the initial configuration wizard.
You will have to disable signature verification in the framework to allow Vanced to install over the official YouTube APK.
At this point, you can tap the “Guide” button to open an external site and follow the guide mentioned therein, to disable signature verification.
You can also use a Magisk Module like Smali Patcher to systemlessly modify the Android framework. Note that you may need to re-create and re-apply the module after installing an official system software update.
Disabling signature verification is highly insecure and not recommended to do. Please exercise your own discretion.
After you’re done with disabling signature verification, simply tap the “Install” buttons and select your theme and language.
While Vanced Manager is always the recommended method for installing and managing the modded YouTube instance, power users may like to have more control over the installation process. In case you want to install this app without using Vanced Manager, you need to follow the steps mentioned below:
How To Install without Vanced Manager
Disable signature verification in the Android framework as mentioned above.
Find the suitable YouTube Vanced APK components for the target device and download them.
AMD announced its Cezanne chips earlier this year, stating that the new APUs under the series will arrive later this year. Today, at its Computex 2021 press conference, AMD CEO Lisa Su announced that the Ryzen 7 5700G and the Ryzen 5 5600G APUs are coming to market for consumers starting August 5, 2021.
The AMD Ryzen 5000G series was first announced in April with a total of three CPU models, out of which AMD is bringing the Ryzen 7 5700G and the Ryzen 5 5600G to retail. This means that the Ryzen 3 5300G will continue to be an OEM-exclusive model. The company had also announced the Ryzen 5000GE series, but it seems that there are no plans of bringing those models to retail at the moment.
Based on the 7nm process, the Ryzen 5000G series is built on the Zen 3 architecture with support for 24 lanes of PCIe 3.0 and DDR4-3200 memory. The Ryzen 7 5700G is an octa-core processor with 16-threads and clock speeds of 3.8GHz with peak turbo speeds of 4.6GHz and a 65W TDP. It also features Radeon Vega graphics with eight compute units running at a clock speed of 2.0GHz. The Ryzen 7 5700G is priced at $350, bridging the gap between the Ryzen 7 5800X and Ryzen 5 5600X.
The Ryzen 5 5600G comes with a six-core configuration with 12-threads, 3.9GHz clock speed, and turbo speeds of 4.4GHz. This one also has a TDP of 65W and Radeon Vega graphics with seven compute units operating at 1.9GHz. Priced at $259, the 5600G is now the most affordable Ryzen 5000 series desktop CPU available for retail. It is worth noting that the 5600G will be an important chip for AMD as it will directly compete with Intel’s Core i5-11600K, which, up until now, didn’t have any solid competition. Customers planning to buy either of the chips will be happy to hear that AMD will be shipping them bundled with the ‘Wraith Stealth’ cooling fan.