Mozilla rolled out Firefox 85 for PC and Android last week. While the update has an extensive changelog available for PC, the only change we knew about in Firefox 85 for Android was to make it easier to install extensions from addons.mozilla.org. But, as it turns out, Firefox 85 for Android includes another noteworthy change that enables DRM stream support on platforms like Netflix and Amazon Prime Video.
As a recent report from GHacks points out, Mozilla has re-enabled the ability to play DRM-protected content on Firefox for Android with the latest update. The browser now features software compatibility with Google’s Widevine DRM, allowing you to stream up to 720p resolution HD content on platforms like Netflix and Amazon Prime Video.
Following the update, you will see a new prompt when you try to play DRM protected content on the aforementioned websites, asking you if you want to allow the website to play DRM-controlled content. You can tap on the ‘Allow’ button in the prompt to start playing DRM content in the browser. In case you want to change the setting at a later stage, you’ll have to navigate to Menu > Settings > Site permissions and set your preference. You can either block DRM-controlled content by default, allow it to play without any future interaction, or select the “Ask to allow” option to have the browser bring up the aforementioned prompt every time you try to play DEM-protected media on the website.
Along with DRM stream support, Firefox 85 for Android brings a few usability improvements, including memory optimizations and improvements to Top sites selection. Additionally, websites opened using a Collection link will no longer load content from the cache. This will ensure that you see updated content every time you open a website from a Collection link. Download the latest Firefox release for Android by following the Play Store link below.
POCO disrupted the budget segment last year with the launch of the POCO M2, offering a quad-camera array, 6GB RAM on the base model, and a 5,000 mAh battery at just ₹10,999 (~$149). POCO is now following it up with the POCO M3 in India today (launched earlier in Europe), which is even more impressive, bringing not only a quirky design but also a powerful punch of Snapdragon 662, a 48MP primary camera, and an even bigger battery.
On the front, the POCO M3 is your usual run-of-the-mill smartphone, flaunting a 6.53-inch FHD+ panel with a waterdrop notch. But turn it around, and you’ll see a design that seems to be borrowed straight from the OnePlus 8T Cyberpunk Edition, with a giant camera island taking up one-fourth of the back panel and housing all three sensors along with a bold POCO branding.
The processing package also sees a notable upgrade, with the Qualcomm Snapdragon 662 taking up the reins from the MediaTek Helio G80, paired with 6GB LPDDR4X RAM and a faster UFS 2.1/2.2 flash storage. Similarly, the camera numbers also drop from four to three, but the switch to a 48MP f/1,79 sensor should bring a much-needed boost to the low-light performance.
The 5,000 mAh battery has been swapped for a 6,000 mAh cell, which now charges via a 18W fast charger with reverse wired charging support. Finally, the POCO M3 comes running Android 10 with MIUI 12 for POCO, features a side-mounted fingerprint scanner, dual speakers, Bluetooth 5.0, an IR blaster, and retains a 3.5mm jack and microSD card expansion slot.
POCO M3 Pricing & Availability in India
The POCO M3 is priced at ₹10,999 (~$150) for the base 6GB/64GB model and ₹11,999 (~$164) for the top 6GB/128GB model. The device will go on sale exclusively on Flipkart from Feb 9 at 12MP IST. You’ll have three color options to choose from: Cool Blue, POCO Yellow, and Power Black.
The Sony PlayStation 5offers a next-gen gaming experience and if you have managed to get one for yourself, you would know that it is not just about the new hardware and stunning 4K visuals. The PlayStation 5 also brings the new DualSense Wireless controller which is unlike any other controller on the market. Marketed as an upgrade to the DualShock 4, the new DualSense features an advanced haptic feedback system, adaptive triggers, and a built-in microphone and speaker combo that raises the bar to a whole new level.
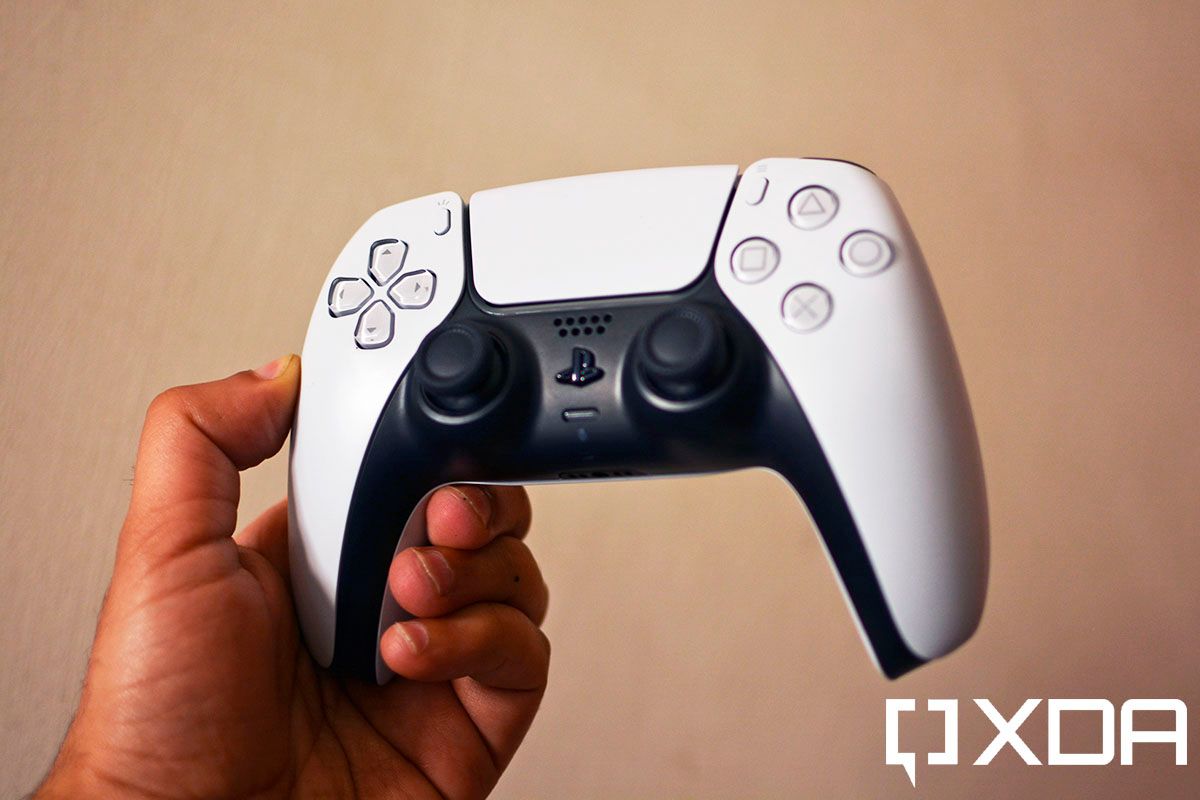
First, let’s talk about the new design. The DualSense controller is larger than the DualShock 4 and has a somewhat similar design approach as the Xbox Wireless controller. Like the PlayStation 5 itself, the DualSense features a dual-tone finish with larger shoulder buttons, while the main D-Pad and face buttons have a transparent finish to them. The analog sticks feel right at home and with the rubberized texture, they offer a better grip for your thumbs. The controller also includes the PlayStation button that can be used to quickly jump out of a game while the Share button is now renamed to the ‘Create’ button that lets you easily take screenshots or record games. You continue to get a large touchpad that itself can be used as a button, while the lightbar now surrounds the touchpad giving a very futuristic look. The controller also features a USB Type-C port for charging, a headphone jack to plug in a headset. I know most of you already know this, but the grips on the controller come with a textured finish at the bottom which, if you look really close, are just the PlayStation face icons. Overall, it is larger but you do get a nice grip on it.
The DualSense controller is best experienced in real-life and words can’t entirely explain the impressive haptics Sony has managed to incorporate. As soon as I booted up my PlayStation 5 unit, I saw Astro’s Playroom preinstalled which is a free title made specifically to show-off the capabilities of the controller. The arcade game is actually a lot of fun and with every single movement, you can feel the controller throwing tiny jolts to your hands. The developers have done an excellent job in distinguishing every single material and how it would feel in real life. For instance, when you start the game, Astro is standing on a metal platform with a fan blowing underneath. The subtle vibrations and hum of the fan coming directly from the controller’s speaker give a very immersive experience.
The game also makes full use of the new adaptive triggers which now offer increased or decreased resistance, depending on the game you are playing and the situational context you are in. This is best demonstrated when you enter a level on Astro’s Playroom where you need to get into a jumpsuit and springboard around the map. This gets tricky as you need to be accurate with the actuation before releasing the trigger. You can almost feel the tension of the spring which makes it all the more interesting.
Another game that makes use of the amazing tech inside the new DualSense controller is Spider-Man: Miles Morales. The vibrations can be distinctly felt right when the game loads with Miles roaming around the streets of New York and entering a subway train. A lot of the cutscenes also make the controller rumble or just nudge you a little depending on what the scene is.
The DualSense controller also features a built-in microphone, and while it can be used for voice chats in certain games, Sony has taken a step ahead and allowed developers to integrate it for gameplay. For instance, on a certain level in Astro’s Playroom, you need to blow on the controller to move a platform of ice, which is pretty cool. The built-in microphone on the controller allows you to chat with friends in case you don’t have a headset with you. It isn’t the best way to have in-game voice chat, but I get what Sony is trying to do here. It works decent, but only if you have a quiet room as it can pick up sounds from all around.
The experience of the amazing haptics and adaptive triggers is going to be limited to only select titles, as game developers do need to make a conscious effort in bringing out the best experience that the tech can offer. However, Sony has put in a solid effort in the hardware to introduce a whole new level of immersion. The DualSense could very well be the most advanced controller and right now it is only the tip of the iceberg as new games in the future could offer a new experience to gamers and alike.
The Sony PlayStation 5 is the latest and greatest in the line of successful game consoles from Sony. With the all-new DualSense controller, the Sony PlayStation can deliver up to 4K 120fps gaming to bring to you an impeccable gaming experience.
The new DualSense controller from Sony is one of the highlights of the PlayStation 5. It features improved haptics and adaptive triggers, providing an additional layer of immersion on optimized titles.
If you’re looking to pick up a Sony PlayStation 5 and perhaps an extra DualSense controller, keep in mind that you can use the DualSense controller with Android, PC, and the NVIDIA Shield TV as well. While you do miss out on the immersion that the new tech within the controller brings along, it still is a very nice controller to play games on.
Sony’s latest and greatest gaming console of all-time is finally here. Featuring a new CPU and GPU combination made by AMD along with a speedy internal SSD, the new Sony PlayStation 5 brings a revamped DualSense controller with improved haptics, along with a slew of exclusive gaming titles. Just like the new Xbox Series X, Sony claims that you can expect a smooth 4K gaming experience on the PS5 with faster load-times, enhanced textures alongside ray tracing, and of course, HDR support.
Having said that, the demand for gaming hardware, especially for new consoles, is at an all-time high with stocks vanishing in an instant. The PlayStation 5 currently retails at $499 for the standard variant or at $399 for the digital version that does not include an optical drive. The console has been selling in very limited numbers ever since its official launch in November last year. So, consider yourself lucky if you managed to grab one, and in case you haven’t, refer to our restock guide.
Notably, due to low stocks globally, the Indian launch of the PlayStation 5 was delayed by months until today. Customers in India can finally purchase the PlayStation 5 via the official Sony PlayStation India website as well as various other online and physical retail stores, although it is speculated that only a few thousand units will be available. Sony India is going to start selling the regular PlayStation 5 with the optical drive priced at ₹49,990 while the digital version —which costs ₹39,990 — will be available later this month alongside new accessories.
Luckily, Sony India sent us a unit for a few days to check out. A few (lucky) members of our U.S. team have also had the console for a few weeks now as personal purchases, and their thoughts are mentioned in a separate section below. Here’s a quick look at the hottest and most wanted gaming console.
Sony PlayStation 5: Specifications
Features
Sony PlayStation 5
CPU
AMD Ryzen Zen 2 octa-core at 3.5GHz
GPU
AMD Radeon RDNA 2
Variable frequencies up to 2.23 GHz
10.3 TFLOPS
Memory
16GB GDDR6
Internal storage
825GB SSD
667GB user-accessible
Storage expansion
M.2 NVMe SSD Slot
External storage
USB 3.0 external HDD/SSD support
Optical drive
Ultra HD Blu-ray
Resolution support
4K at 120Hz refresh rate
Up to 8K at 60Hz refresh rate
Connectivity
USB Type-A (5Gbps)
2x USB Type-A (10Gbps)
USB Type-C (10Gbps)
Ethernet
HDMI port
Wi-Fi 6
Audio
3D Audio
Dimensions
391.16 x 259.08 x 104.14mm
Weight
4.49kg
Price
$399 (Digital version)
$499 (Optical drive version)
About this preview: Sony India loaned me the PlayStation 5 for a brief review. The majority of this article was written after about 5 days of regular use. The section written by Mishaal was based on his several week-long use of the console he purchased in mid-November. Regardless, Sony had no input into the contents of this article.
Sony PlayStation 5: Box contents
Sony PlayStation 5 box contents
The retail version of the PlayStation 5 comes in a massive box with the console itself along with the instruction manuals and warranty information, the new DualSense controller, a round stand, an HDMI 2.1 cable, a USB Type-A to Type-C cable, and the power cord. The first lot of customers in India also get a certificate as a token of appreciation for being one of the first to get their hands on the new console.
Sony PlayStation 5: Design
The PlayStation 5 is definitely a large console
The PlayStation 5 is definitely a large console, and I was surprised by its sheer size when I took it out of the box. As opposed to my experience with the tiny Xbox Series S, the PS5 takes up quite a bit of space on the desk. Even placing it in a vertical position doesn’t really help all that much as it is a tall and chunky device. The takeaway from this is that you need to make sure you have a good amount of space around or under your TV/monitor if you are planning to buy the PlayStation 5.
Sony PlayStation 5 vs Xbox Series S
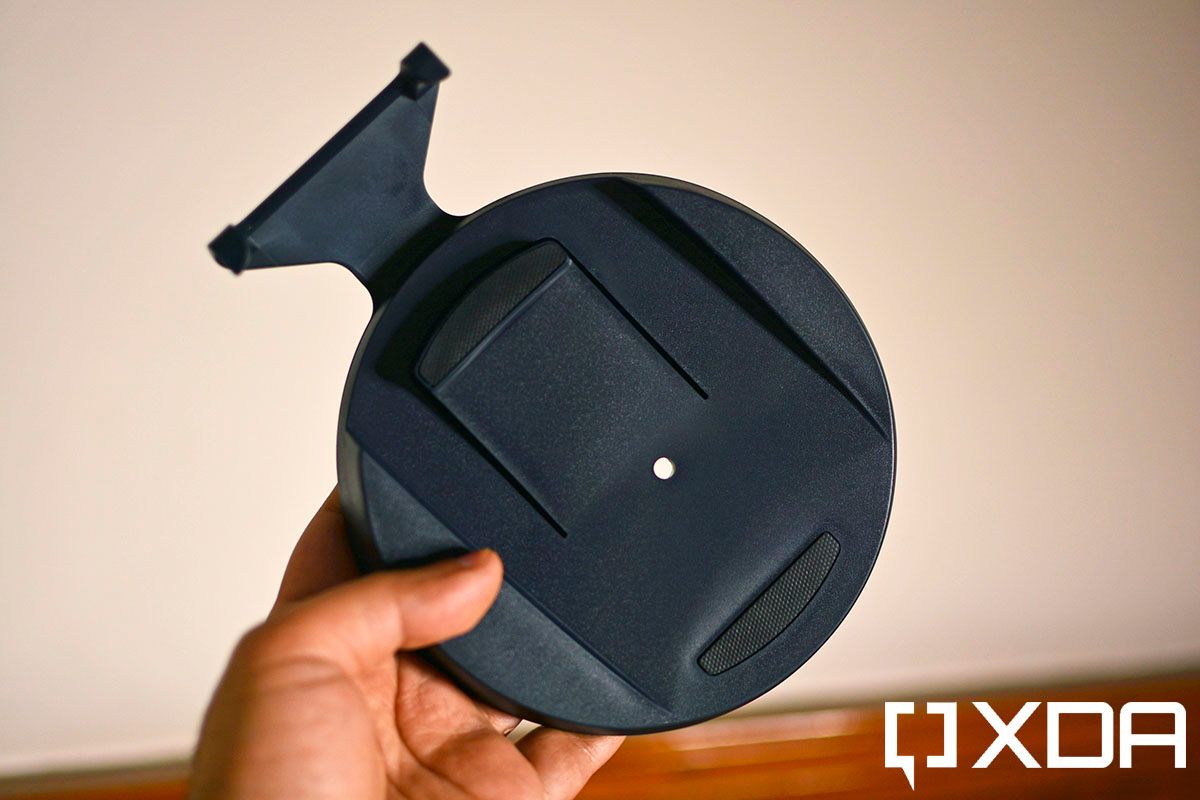
The stand for the PlayStation 5 has a round base at the bottom. This lets you place the console in either a vertical or horizontal orientation. It also helps in keeping the console slightly raised from the surface it is being kept on, thus ensuring that it doesn’t get scratched on the bottom. There is a small screw hidden inside the bottom of the stand that can be used to secure it when placing the console in a vertical position. You don’t get any tools to screw it in, though.
On the other hand, if you want to place the PlayStation 5 horizontally, you need to rotate the clamp in the correct position, place the console on the base, and secure it using the two hooks at the back by aligning them with the PlayStation button icons pattern. You do need to be careful when placing the PlayStation 5 in a horizontal position as the hooks are not as secure as you want them to be. On a couple of occasions, the console just slid off the stand when I was unplugging the cables at the back, which did raise some concerns.
Once you get over its massiveness, you start appreciating what Sony has done here. The PlayStation 5 looks very futuristic with subtle curves all around. Sony’s blend of black and white is a nice touch that extends to the new DualSense controller as well. The molded white plastic panels on the outside have a matte finish protecting the internal dark glossy body from dust and other potential damage.
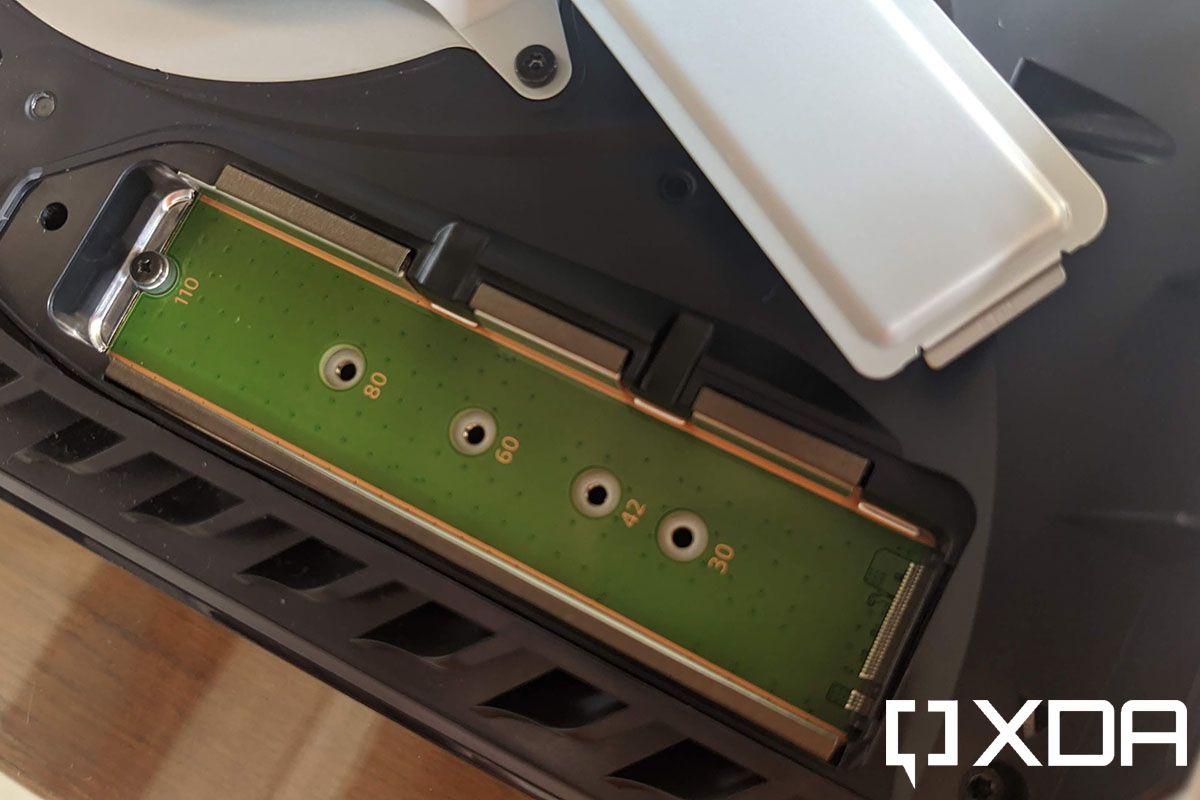
These panels can actually come off rather easily by applying a bit of force on the corners. By doing so, you get access to the cooling exhaust fan and a tiny slot to install an additional M.2 based SSD protected with a metal shield and a screw. As of now, the PlayStation 5 does not support any additional internal SSDs, but Sony says they will enable support through a software update. There are also some LEDs placed around the fan intake vents on the top (when in vertical position), and these light up blue when you boot up the console, white when the console is on, and yellow when it is in standby mode. The exhaust vents at the back are pretty massive. All in all, it doesn’t really matter how you position the PS5, as Sony has ensured that both of these placements provide identical functionality.
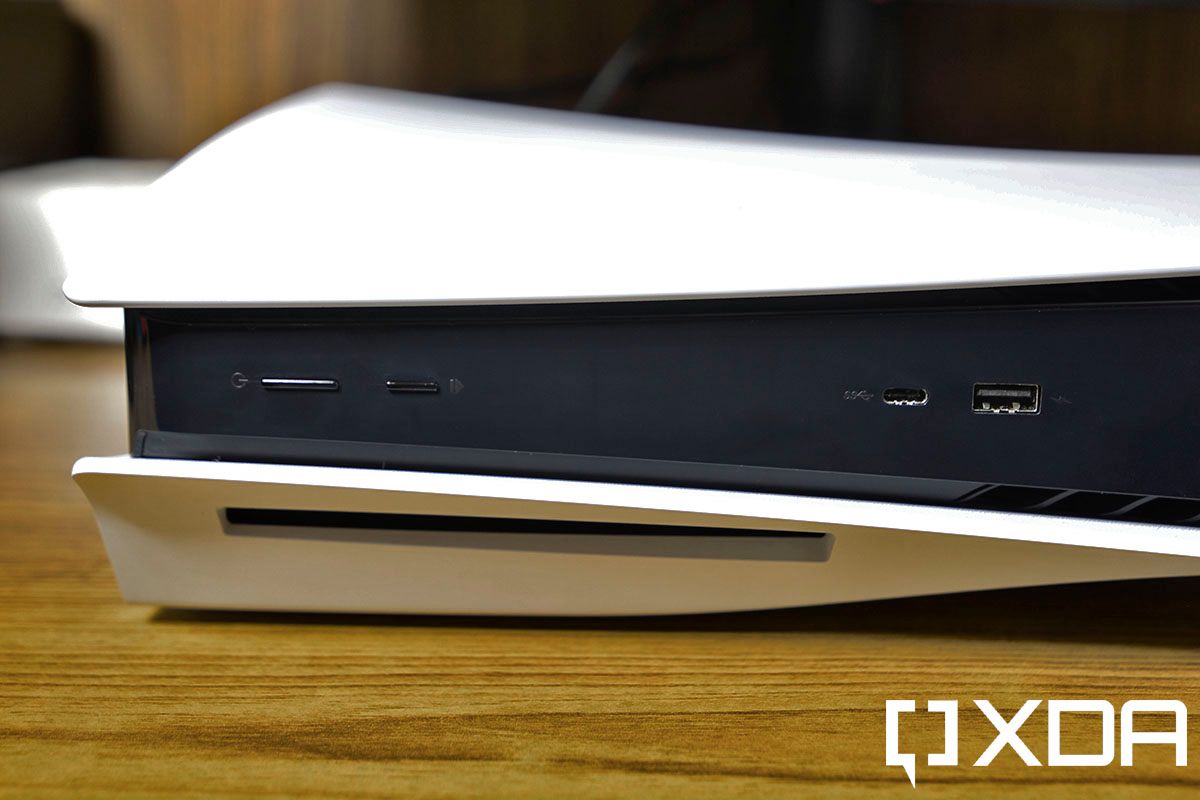
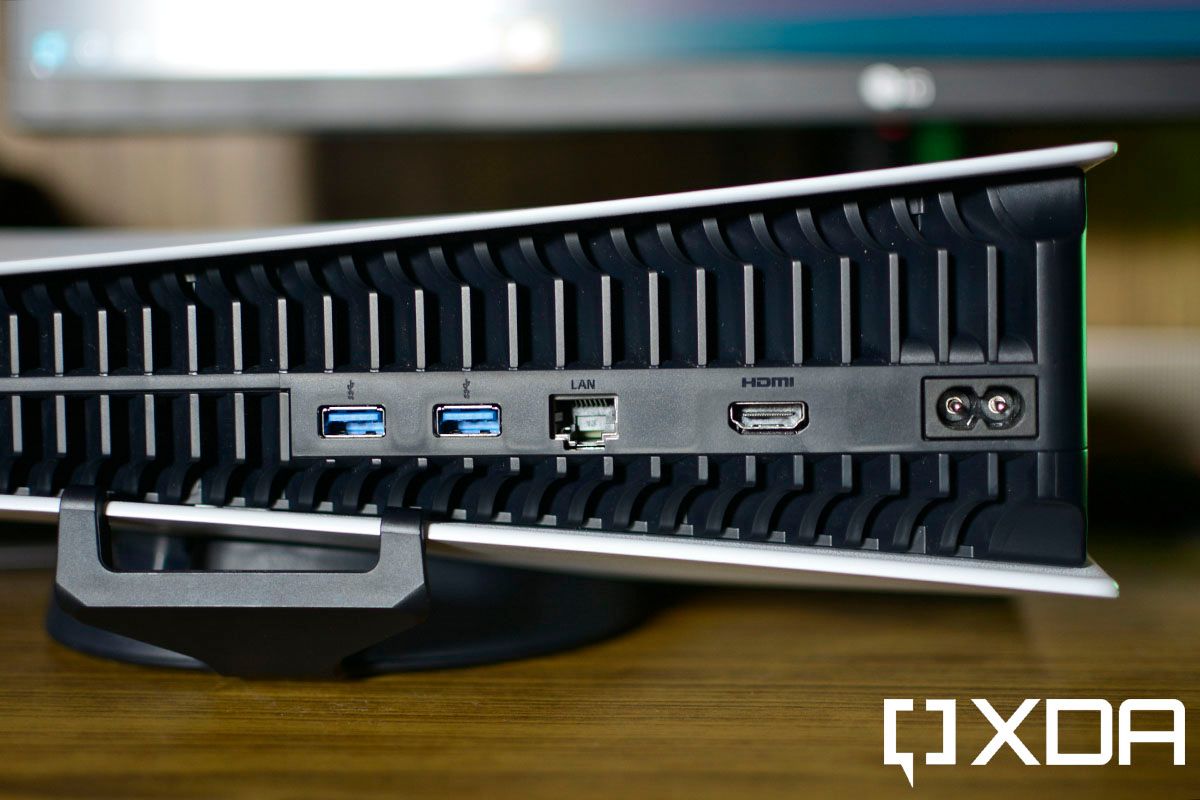
As for ports and buttons on the PS5, the front includes the power and disc eject buttons, a standard USB Type-A port, and a USB Type-C port. On the back, there is a two-pin power port, two USB Type-A ports, an HDMI 2.1 port, and an ethernet port. Just like the new Xbox consoles, the PlayStation 5 itself doesn’t have any dedicated audio ports so you are left with either Bluetooth audio or audio output via the HDMI port. Fortunately, the DualSense controller has a 3.5mm audio jack on the bottom, so you can plug any wired headphone into the controller.
Sony PlayStation 5: Experience and Performance
Setting up the PlayStation 5 was fairly easy and snappy. The setup process takes about 4-5 minutes before you get to the main home screen. The user interface is clean and uncluttered and doesn’t really feel out of place, especially if you’re coming from the PS4. You get a row of horizontal tiles that include all of your recent games, an Explore tab for all your news and updates, a Games Library tab, and access to the PS Store and PS Plus services. Selecting any of the games immediately changes the background and sound corresponding to the game, which is a nice touch. The UI is very responsive and I did not experience any sort of lag or slowdown.
Sony PlayStation 5 home screen. Photo: Kunal Khullar
The PlayStation 5 comes preloaded with Astro’s Playroom, a fun arcade game that seems to be tailor-made to show off the potential of the console. You get absolutely amazing feedback with the new DualSense controllers, a very snappy gaming and visual experience, great audio, and a trip down memory lane with various Sony PlayStation collectible items.
Astro’s Playroom. Photo: Kunal Khullar
Of course, when it comes to more serious gaming, I grabbed the 14-day free trial of the PlayStation Plus gaming service which starts at $9.99 for a month going up to $59.99 annually in the US. In India, the service costs ₹499 for one month, ₹1,199 for 6 months, and ₹2,999 for a year. I believe that is a good price to pay since Sony has some really good exclusive titles along with solid backward compatibility with PS4, PS3, and PS2 titles. Using the PS Plus membership, I got my hands on God of War, Ratchet and Clank, and Mortal Kombat X, while Sony was kind enough to offer me codes for Marvel’s Spider-Man and the new Spider-Man: Miles Morales games.
The built-in SSD paired with the octa-core AMD CPU brings a well-needed boost to reduce load times, and it clearly shows. The console itself takes about 20 seconds for a cold boot-up, which is about 10 seconds faster than the original PlayStation 4 from 2013. God of War takes about 21-22 seconds to start and load into the game, while Spider-Man: Miles Morales took only 11 seconds to load from the PlayStation 5 home screen right into the streets of New York.
Marvel’s Spider-Man: Miles Morales. Photo: Kunal Khullar
Visuals on the PlayStation 5 are quite impressive
Visuals on the PlayStation 5 are quite impressive, and in the few days of my testing, I was surprised by how smooth the textures look. Some of the games optimized for the PlayStation 5 offer a Performance mode under the Visual settings which basically disables certain texture features including ray tracing and makes use of upscaled 4K resolution to offer more stable frames at 60 frames per second. This also means that you won’t be able to play games at 120 frames per second with ray tracing on. Despite ray tracing being off, I was pretty satisfied with the visuals, even when I used the console on my 55-inch 4K TV.
If you do care about realistic lighting, then you can turn on ray tracing by selecting the Fidelity mode which locks the game at 30 frames per second and offers native 4K resolution. The PlayStation 5 also lacks the ability to jump between multiple games and resume without having to load them from the start, something that is available on the new Xbox Series X|S. It didn’t really bother me all that much since the games don’t take an eternity to load, but I hope Sony brings this feature via a future update.
Sony has done an A+ job on the fan noise and thermals
As for fan noise and thermals, Sony has done an A+ job here. You don’t hear the cooling fan at all nor does the console spew out hot air even after a 30-40 minute gaming session. This doesn’t come as a surprise since the PlayStation 5 is a massive console, allowing the company to have enough space to incorporate a large cooling fan and big exhaust vents. I am primarily a PC gamer, but trust me when I say that the PlayStation 5 has the potential to deliver games that are as good as on a high-end gaming PC while being a fraction of the cost.
Looking for games to play? Catch up on your PS4 backlog!
Section written by Mishaal Rahman
When I purchased my PlayStation 5 in mid-November, I knew that I was jumping in a bit early. The games I’m most excited about are coming out later this year, like Resident Evil: Village, Horizon Forbidden West, and God of War 2: Ragnarok. I wasn’t really interested in paying full price for Spider Man: Miles Morales (I heard it’s quite short and I picked up its prequel quite late at a discount), so I instead opted for the Demon’s Souls remake and Assassin’s Creed: Valhalla. The former was exactly as I had remembered it (only in glorious 4K) while the latter was as rote as I expected it to be. So, while I enjoyed my short time with Demon’s Souls, I really didn’t have many actual PS5 games to play.
The PlayStation 5 is the definitive way to catch up on your PS4 backlog
Fortunately, I had a massive backlog of PS4 games. I’m glad I waited as I feel the PlayStation 5 is the definitive way to catch up on your PlayStation 4 backlog. The PlayStation 4’s late 2013 hardware just struggles with certain titles, especially ones released late into the console’s lifecycle. Whether it’s massive frame drops, slow loading, dynamic resolution rarely hitting 4K, poor draw distance, or lack of HDR, you may have to deal with some of these issues when playing certain games on the base PlayStation 4 or PS4 Pro.
Thanks to the much better CPU, GPU, and storage performance, the PlayStation 5 plays PS4 games the way the developers intended them to be played. Here’s a summary of the PlayStation 4 games I played on the PlayStation 5 and what benefits I got by playing them on the new hardware. For reference, I played each of these on a 75″ Sony X900H:
Days Gone: This open-world survival game plays at a consistent 60fps with dynamic 4K resolution and HDR. There are no slowdowns when traversing the world on Deacon’s motorcycle or when fighting a massive horde. Loading times when fast-traveling are low and there’s no issue with texture pop-in thanks to the PlayStation 5’s SSD.
Ghost of Tsushima: This stealth action game plays at a consistent 4K 60fps with HDR enabled, and it’s jaw-dropping gorgeous. GoT won Best Art Direction at the 2020 The Game Awards, and that was based on how it played on PlayStation 4! I can’t stress enough how beautiful this game’s visuals are, and when playing on PlayStation 5, you don’t have to compromise on resolution or frame rate.
13 Sentinels: Aegis Rim: This….half-visual novel, half real-time strategy game was criminally underrated when it released late last year. While it’s seemingly a simplistic-looking game, the real-time strategy portion can tax the PlayStation 4’s hardware when it comes to the last few missions. There are no such issues on PlayStation 5, however.
Didn’t have a chance to play God of War? A free update will enable dynamic 4K resolution at 60fps on the PlayStation 5! Photo: Kunal Khullar
I also played Yakuza: Like a Dragon because I just couldn’t wait for the official PlayStation 5 launch for the title, but honestly, I would just wait a month for the PS5 version at this point. The PS4 version of the game runs at 1080p30 on the PS5, and the only benefit you get from playing it now is minimal loading times.
I would have played more had I not had to send in my PS5 for repair which cost me 2 weeks without the console, but even that setback doesn’t make me regret my purchase of the PlayStation 5 this early in its release cycle. I also purchased the PS2, PS3, and PS4 at launch, and so far, the PS5 is the console that has given me the most entertainment despite how few games have actually been released for it. With how much use I expect further into the months, I have no regrets.
Concluding Thoughts
Photo: Kunal Khullar
The more I use the PlayStation 5, the more I fall in love with this beast. It is silky smooth when it comes to the software experience, games look visually appealing, and overall, it is a big step forward for the PlayStation brand. I absolutely love the new DualSense controller with its insanely intuitive haptics and responsiveness along with the super-fast SSD that helps to cut down on load times. The only concern that I and probably a lot of users are going to have is its huge size. It is the largest gaming console I have seen to date, and if you don’t have the right amount of space, it can get tricky to stow the PS5. Of course, the biggest issue with the PlayStation 5 is the limited supply and from what I have heard, the massive demand is only going to be fulfilled after the first half of 2021.
The Sony PlayStation 5 is the latest and greatest in the line of successful game consoles from Sony. With the all-new DualSense controller, the Sony PlayStation can deliver up to 4K 120fps gaming to bring to you an impeccable gaming experience.
Lately here at XDA we have been writing a number of tutorials to show you how to access certain features of the Android platform that simply are not visible to the user. These have generally been done with the help of some command line Android Debug Bridge (ADB) commands, a tool that Google offers for developers to debug various parts of their applications or the system, but which we can use for all kinds of neat and hidden tricks. Using the command line isn’t something that everyone is comfortable with, though, so in an attempt to teach everyone how to do these tweaks (no matter what skill level you’re at), we have been including some basic steps about how to install ADB in each of our tutorials where necessary.
Well, the number of our tutorials has ballooned in quantity lately, so we have decided to exclude those steps from future tutorials to avoid redundancy. However, we still want all future tutorials we write to be easy to understand for as many people as possible, so that will be the point of today’s guide. Having a dedicated step by step tutorial on how to install and setup ADB on your computer (no matter what operating system you use) will be great for those who may not have it set up already.
This will also let us include a link to this guide in the future tutorials we write that require you to have ADB setup and installed on your computer. So when one of our new tutorials comes out that requires ADB, you can click through the link to learn how to install ADB or you can simply ignore it and move onto the next step. Since ADB can be used on a variety of operating systems, we’ll be covering some basic instructions for Windows, macOS and Linux.
How to Setup the Android Debug Bridge (ADB)
Note: Setting up ADB on the computer is just half the equation since you’ll also need to do some things on the smartphone or tablet to accept the ADB commands.
Phone Setup
Launch the Settings application on your phone.
Tap the About Phone option generally near the bottom of the list.
Then tap the Build Number option 7 times to enable Developer Mode. You will see a toast message when it is done.
Now go back to the main Settings screen and you should see a new Developer Options menu you can access.
Go in there and enable the USB Debugging mode option.
You are partially done with the phone setup process. Next up, you will need to scroll below and follow the rest of the instructions for your particular operating system.
Follow along for the operating system on your computer.
Extract the contents of this ZIP file into an easily accessible folder (such as C:\platform-tools)
Open Windows explorer and browse to where you extracted the contents of this ZIP file
Then open up a Command Prompt from the same directory as this ADB binary. This can be done by holding Shift and Right-clicking within the folder then click the “Open command window here” option. (Some Windows 10 users may see “PowerShell” instead of “command window”.)
Connect your smartphone or tablet to your computer with a USB cable. Change the USB mode to “file transfer (MTP)” mode. Some OEMs may or may not require this, but it’s best to just leave it in this mode for general compatibility.
In the Command Prompt window, enter the following command to launch the ADB daemon: adb devices
On your phone’s screen, you should see a prompt to allow or deny USB Debugging access. Naturally, you will want to grant USB Debugging access when prompted (and tap the always allow check box if you never want to see that prompt again).
Finally, re-enter the command from step #6. If everything was successful, you should now see your device’s serial number in the command prompt. Yay! You can now run any ADB command on your device! Now go forth and start modding your phone by following our extensive list of tutorials!
Extract the ZIP to an easily-accessible location (like the Desktop for example).
Open Terminal.
To browse to the folder you extracted ADB into, enter the following command: cd /path/to/extracted/folder/
For example, on my Mac it was this: cd /Users/Doug/Desktop/platform-tools/
Connect your device to your Mac with a compatible USB cable. Change the USB connection mode to “file transfer (MTP)” mode. This is not always required for every device, but it’s best to just leave it in this mode so you don’t run into any issues.
Once the Terminal is in the same folder your ADB tools are in, you can execute the following command to launch the ADB daemon: adb devices
On your device, you’ll see an “Allow USB debugging” prompt. Allow the connection.
Finally, re-enter the command from step #7. If everything was successful, you should now see your device’s serial number in macOS’s Terminal window. Congratulations! You can now run any ADB command on your device! Now go forth and start modding your phone by following our extensive list of tutorials!
Extract the ZIP to an easily-accessible location (like the Desktop for example).
Open a Terminal window.
Enter the following command: cd /path/to/extracted/folder/
This will change the directory to where you extracted the ADB files.
So for example: cd /Users/Doug/Desktop/platform-tools/
Connect your device to your Linux machine with your USB cable. Change the connection mode to “file transfer (MTP)” mode. This is not always necessary for every device, but it’s recommended so you don’t run into any issues.
Once the Terminal is in the same folder your ADB tools are in, you can execute the following command to launch the ADB daemon: adb devices
Back on your smartphone or tablet device, you’ll see a prompt asking you to allow USB debugging. Go ahead and grant it.
Finally, re-enter the command from step #8. If everything was successful, you should now see your device’s serial number in the Terminal window output. Congrats! You can now run any ADB command on your device! Now go forth and start modding your phone by following our extensive list of tutorials!
Some Linux users should be aware that there can be an easier way to install ADB on their computer. The guide above will certainly work for you, but those own a Debian or Fedora/SUSE-based distro of Linux can skip steps 1 and 2 of the guide above and use one of the following commands:
Debian-based Linux users can type the following command to install ADB: sudo apt-get install adb
Fedora/SUSE-based Linux users can type the following command to install ADB: sudo yum install android-tools
However, it is always better to opt for the latest binary from the Android SDK Platform Tools release, since the distro-specific packages often contain outdated builds.
Just to cover all of our bases here, Linux users may need to put a ./ in front of the ADB commands we list in future tutorials. This is something that is likely known by any Linux user already, but again, we want as many people as possible to understand how to do these tweaks for Android no matter how much of your operating system you know.
Bonus: For those who want to take this a step further, you can follow this new tutorial we put together that will walk you through how to setup ADB so that you can use the command from any directory on a Windows or Linux desktop.
Mobvoi on Monday introduced a new firmware update for the TicWatch Pro 3, which includes a number of new features and improvements. The new firmware version is PYDA.200427.080.MRB.210114.001.
Mobvoi said some of the new features for the TicWatch Pro 3 include support for adjusting the essential screen’s date format (DD-MM/MM-DD) through the Essential Mode app and support for turning off the essential screen’s auto-backlight. The update also includes improvements to the tilt-to-wake screen and the smoothness of sliding.
Here’s the full changelog for today’s TicWatch Pro 3 update.
Features:
1. Support adjusting the essential screen’s date format(DD-MM/MM-DD) through the Essential Mode app.
2. Support turning on the backlight through the power button in the essential mode.
3. Support turning off the essential screen’s auto-backlight in the Essential Mode app.
4. Enable the notification sound (Can be adjusted in Settings –> Sound –> Ring volume).
Improvements:
1. Improved the speed of the Tilt-to-wake screen by about 1/4 second.
2. Solved the issue where sometimes the steps in the essential mode might be partially lost after restarting.
3. Improved the smoothness of sliding.
4. Optimized the responsive area at the edge of the screen.
5. Reduced the backlight brightness of the essential screen.
6. Improved pairing speed when pairing with Android phones.
Bug Fixes:
1. Solved the issue that the essential screen’s backlight could not be lit up by Tilt-to wake under certain circumstances.
2. Fixed the issue that double-clicking the function key sometimes opens other apps instead of Google pay(if Google pay is available in your area).
Mobvoi said that the rollout will take place in stages, with some users receiving the update today. By Thursday the company said that 100% of all TicWatch Pro 3 owners should receive the update available on their device.
The TicWatch Pro 3 was launched last year and features Qualcomm’s Snapdragon 4100 chip and Wear OS. Mobvoi recently launched an LTE version of the wearable in Europe.
In a world of smartphones that look increasingly alike, OPPO aims to make a device that stands out, with a glow-in-the-dark design. The OPPO Reno5 Pro is the company’s first big launch of 2021. Along with the new phone comes an updated OS in the form of ColorOS 11.1 This latest update features several new functions that we were able to show off in our video review below.
OPPO Reno5 Pro
Specs
Chipset
Mediatek MT6889Z Dimensity 1000+
RAM
8/12GB
Storage
128/256GB
Display
1080x2400p, Super AMOLED, 90Hz, HDR10+
Main Camera
64+8+2+2MP
Selfie Camera
32MP
Battery
4350mAh
OS
ColorOS 11.1
While the phone is packed with some impressive specs, one of the most noticeable features is the fact that this phone glows once the lights go out. The glass around the back of the camera, as well as the bottom edge of the phone, will glow in dark environments. Our review video of this device shows this feature in action.
This phone is a strong start to 2021 for OPPO. It’s a nice balance of performance and design, with ColorOS 11.1 having a large focus on personalization. These are some of the best features you’ll find in ColorOS 11.1:
Customizable Always-on Display
Create your own design to show on the display of your phone. Choose what kind of clock, text, and images you want to be shown. Then package it all together for the perfect always-on-display setup.
FlexDrop
Shrink the app you’re using into a floating or mini window, so you can monitor it while using other apps
Gamer Mode
Gamer Mode lets you temporarily stop incoming notifications and other interruptions, so you can focus on winning your game.
There are many for features to explore in ColorOS 11.1 on the OPPO Reno5 Pro. So check out our full review video for more.
We thank OPPO for sponsoring this post. Our sponsors help us pay for the many costs associated with running XDA, including server costs, full time developers, news writers, and much more. While you might see sponsored content (which will always be labeled as such) alongside Portal content, the Portal team is in no way responsible for these posts. Sponsored content, advertising and XDA Depot are managed by a separate team entirely. XDA will never compromise its journalistic integrity by accepting money to write favorably about a company, or alter our opinions or views in any way. Our opinion cannot be bought.