NVIDIA on Wednesday announced a milestone update for its range of SHIELD TV devices, which remain some of the more feature-rich and powerful Android TV-powered set-top boxes on the market. For owners of the original NVIDIA SHIELD TV that launched in 2015, this will be the 25th update, which is pretty remarkable support.
NVIDIA launched its first SHIELD TV set-top box back in 2015 and later refreshed it in 2017. Late last year, the company launched the more portable SHIELD TV streaming stick and the SHIELD TV Pro, bringing a slight upgrade to the Tegra X1 chip, Dolby Vision support, AI upscaling, and a new remote. The new SHIELD Software Experience Upgrade 8.2 that’s rolling out today improves upon the AI upscaler feature for the 2019 SHIELD TVs and also expands the customizability of the new SHIELD remote’s menu button.
The AI upscaler feature takes low-resolution input video and runs the frames through a neural network upscaler, producing higher resolution video. In today’s update, NVIDIA is adding more UHD 4K upscaling support from 360p to 1440p content. 2019 SHIELD TV Pros are also getting support for upscaling 60fps content. NVIDIA even plans to add support for 4K 60fps upscaling to GeForce Now on the SHIELD TV in September.
One of the other big changes in today’s update is the ability to further customize the SHIELD remote’s menu button. Users can now configure a custom action for a double press and long press. There are over 25 actions to choose from, including new ones like switch input (IR only), start Daydream, and more. NVIDIA says the new menu button customization options will work with all SHIELD TVs and requires the SHIELD TV app for iOS and Android.
Finally, the SHIELD Experience 8.2 update is adding improved IR and CEC volume control support, allowing users to change the input source on TVs, AVRs and soundbars. If you own a 2015 or 2017 SHIELD TV model, you’ll now have the option to match the frame rate of displayed content. Here are the other enhancements added to the update:
Other Enhancements:
Includes Android security patch level June 2020
Adds SMBv3 support for a faster, more secure connection to SHIELD over a local network
Restores surround sound audio while casting
Allows users to grant write access to NAS from installed apps
Adds ability to convert local HDR video content to SDR displays
Adds option to disable volume lowering when “OK Google” is detected on a Google Home device
Restores Bluetooth LDAC support for supported headphones
The update is rolling out to all NVIDIA Shield TV models now.
Apart from smartphones and tablets, Android is an operating system you can find inside your smart TV, smartwatch, car, and several other devices of all shapes and sizes. When it comes to the world of x86 PCs, however, Google is trying hard to push Chrome OS instead. Thankfully, Android’s open-source nature and versatility allow developers to unleash the full potential of the OS and port it to x86(-64) devices as well. The Android-x86 project is a pioneer in this field, which also serves as the foundation for a number of forks, such as Remix OS (not supported anymore) and Bliss OS. The developer team behind the Bliss OS/BlissRoms project has now come up with an interesting toolkit that should revolutionize the porting process of any custom ROM to the PC platform.
Dubbed as “Android-Generic Project”, the whole idea is very much similar to the concept of Project Treble and the associated modularization of Android. Bliss OS developers are now revising their build scripts so that someone can easily integrate the codebase of a typical custom ROM on top of their x86 PC-specific trees (formerly known as “Android-PC project”). Those familiar with AOSP Generic System Images (GSIs) should easily notice the similarity, due to the fact that the Android Generic project is heavily inspired by XDA Recognized Developer phhusson‘s custom GSI generation scripts under the hood.
Here is a short video posted by BlissRoms team member Jon West, AKA XDA Recognized Contributor electrikjesus, showing a build of Dirty Unicorns compiled using the Android Generic toolkit:
Android-x86 is still being used as the underlying base, but a smart pre-patch phase has been introduced to eliminate the redundant patches from different custom ROMs. Once all the patch conflicts have been resolved, the resultant build manifest should be enough to generate one vendor repo that just needs to be cloned into the AOSP or custom ROM source before the final build process. In a nutshell, booting custom ROMs like CarbonROM on your PC doesn’t require pulling your hair out from now on.
It is worth mentioning that the Bliss OS builds are now compiled using the Android Generic build scripts, which is a pretty good indicator of the stability of this project at its current stage. Besides Dirty Unicorns and CarbonROM, you can find work-in-progress builds of vanilla AOSP, Tesla OS, and Pixel Experience for PC in the thread linked below. In case you’re interested in porting a particular custom ROM to PC, you can find the required tools, files, and documentation in this GitLab repo.
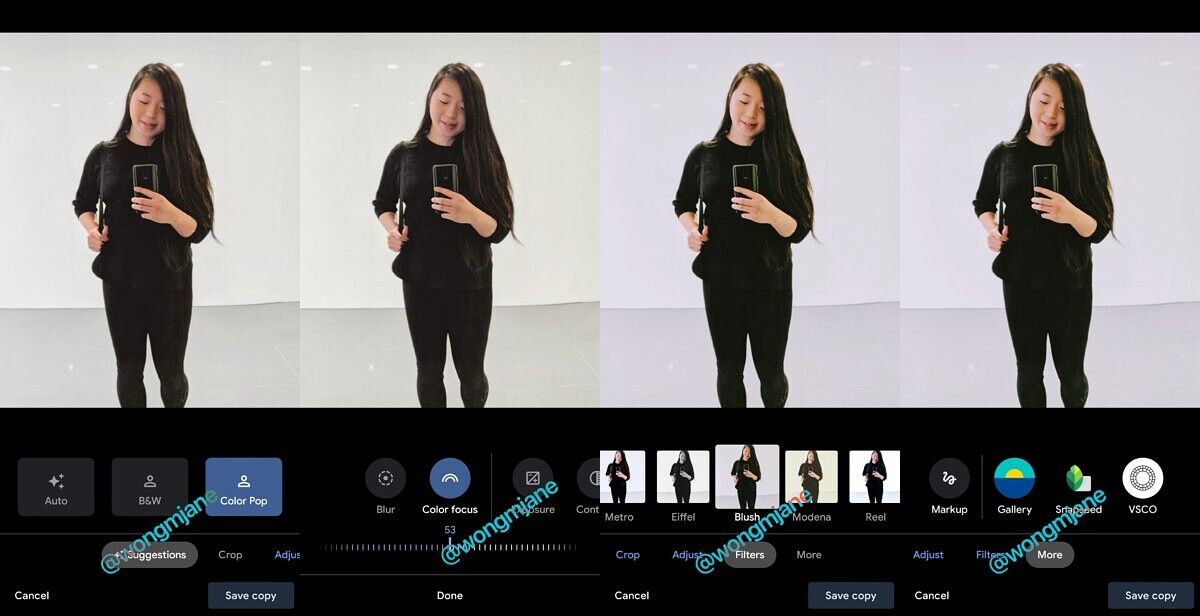
Google Photos appears to be testing a new editor UI, with larger buttons that will make it easier for users to edit their photos. The service previously received a big redesign over the summer that didn’t overhaul the editor UI. The changes were discovered by Jane Manchun Wong, who has a reputation for reverse-engineerings apps and uncovering features that are in development.
Right now, the editor UI in Google Photos looks like what you’d find in Snapseed or Adobe Lightroom, with sliders for settings like exposure, contrast, etc.
Old Editor UI
The redesigned UI features large buttons with a slider below, which can be used to make fine-tuned adjustments. It looks a lot like what you’d find in Apple’s stock Photos app on iOS. The controls are much easier to understand and are more user-friendly. Ultimately, offering tools that are easier to use will encourage Google Photos to edit their photos right inside the app. Users can save a copy of the photo they’re editing so the original stays intact. Of course, if you do want to use another app, the revamped editor UI appears to feature quick access to other photo apps, including Snapseed and VSCO Cam.
New Editor UI
It’s unclear when the new editor UI will become widely available in Google Photos, but it looks like a welcome change, offering a cleaner, easier to understand layout.
When it comes to developing an app, there are a lot of ways to go about it. You can choose which platform(s) to develop for, which programming language(s) you want to use, and so much more.
Back in the fall of 2019, Google introduced a new framework for building UIs in Android, using Kotlin. Until now, it’s been in a developmental state, with frequent breaking changes and tons of missing features. But today, Google has pushed Jetpack Compose to the alpha release state, meaning it’s one step closer to being used in production-quality projects.
What is Jetpack Compose?
When building an Android app, there are usually two main components you have to deal with: the code, for logic-based things; and the XML, for layouts. By default, Android uses Java for code and its own set of XML tags for layouts.
For many, Java and XML are just fine, especially for simpler apps. But both systems have their limitations and annoyances. With the introduction of Kotlin as an official (and recommended) language for Android development, the coding side of making an Android app arguably got a lot easier. With Kotlin’s handy features like built-in null protection and extension functions, code looks cleaner and is easier to read.
But Kotlin didn’t change anything with Android’s layouts. To make a complex layout, you still needed to create an XML file and design it there. This has some notable disadvantages, including the inherent separation between the code and XML. If you have a constant string in your code, for example, you can’t just reference that from XML, so if that string changes in code, you have to remember to update it in XML as well.
Enter Jetpack Compose. This is Google’s answer to the increasingly-clunky XML layout design process in Android. Instead of designing your app’s UI in XML, you can do it right from your code. While code-based layouts are possible to create, they’re usually less maintainable than XML and involve easily-broken libraries. Compose, on the other hand, is designed to work straight inside Kotlin: no more XML.
Jetpack Compose is also a pretty radical departure from the standard imperative design of XML layouts. Instead, it’s more similar to React or Flutter, with declarative layouts that update themselves when data changes, instead of relying on the developer to implement that logic.
What’s Supported
So Jetpack Compose is in alpha now. What does that mean? Well, a lot of things.
Interoperability with Views
Just like Kotlin is fully interoperable with Java, Jetpack Compose is fully interoperable with Android’s standard Views. This means quite a few things.
For one, it’ll be a lot easier to migrate to Jetpack Compose if you want to. Instead of having to convert all your custom Views and layouts to Composables, you’ll be able to just make your new layouts and components in Compose. Have a library that uses “legacy” Views, but your app is designed with Compose? No problem. You can add the View straight into your Composable function. Haven’t made the jump to Compose yet, but you want to use a library that relies on Composables? Again, no problem. Just put the Composable right into your layout.
As for theming, it’s not quite as plug-and-play as layout interoperability. However, Google has made a library to adapt your standard XML themes into Compose-compatible themes, helping to keep things centralized and avoid duplication.
Animations
There’s not really too much to say here, except that Jetpack Compose supports animations, just like Android’s View framework. You can move, resize, and rotate to your heart’s content.
Lazy Lists
A lazy list is essentially Compose’s version of a RecyclerView. It only lays out items as needed, saving on RAM and increasing performance. Of course, this being Compose, lists are significantly simpler to implement.
ConstraintLayout
One of the more powerful Views in Android is the ConstraintLayout. This lets you position, size, and weight child Views relative to each other, while also making certain animations easier. If you were worried about losing this functionality in Compose, you shouldn’t be, because it’s here, too.
Material UI Components
Another set of powerful Views is Google’s Material Components library. Most of what’s in here are standard Views and layouts you can find in the native View framework. But they’re tweaked or wrapped to provide extra functionality and make theming easier, and they’ve made their way to Compose, as well.
Testing
An important part of developing an app is testing it. For a simple app, you could do this manually by installing and using it. However, more complex projects can benefit greatly from automated testing frameworks that do most of the hard work for you. Jetpack Compose supports automated testing so you can make your app as stable as possible.
Accessibility Features
Accessibility is an important part of our society. Without accessibility features in our technology, a lot of people would simply be shut out from the benefits our phones, televisions, and whatever else, provide. Jetpack Compose is still in alpha, so accessibility support isn’t complete, but Google is keeping it in mind during development, and rudimentary support is already present.
Android Studio
Not all the features of Jetpack Compose are in Jetpack Compose itself, though. Android Studio and Kotlin also have plugins and expansions for easier Composing.
Kotlin Compiler Plugin
As with Kotlin JVM, there’s a compiler plugin in Android Studio to properly convert your Compose functions to code that Android can actually understand and follow.
Interactive Previews
Just like with your standard XML layouts, Android Studio comes with a layout preview for Jetpack Compose. While it’s not currently quite as convenient as the XML previews in some aspects—you have to build your project for the preview to update, and make a dedicated preview function—it does come with one notable advantage: interactive previews.
An interactive preview is just a normal preview, but interactive. Crazy, I know. What this means, though, is that you can actually type text into text boxes, click buttons, and, well, interact with your Composables, without even having to deploy them.
Single Composable Deployment
If you do want to actually deploy (i.e install) your layout to see how it works on a real device, this feature might help you. With normal XML layouts, in order to see how a layout works in the real world, you have to build and install the entire app. If the layout you want to test isn’t on the primary screen, you might be doing a lot of tapping to get to it.
And that’s where the ability to deploy only a single Composable comes into play. Instead of having to build and install your app, and then navigate to the layout you’re testing, you can just deploy the layout. Android Studio will generate and open a wrapper Activity that just displays the Composable you deployed. This can make testing and design a lot quicker, and can even help isolate issues related to element interaction.
Code Completion
If your IDE doesn’t have code completion, is it even an IDE? No. No, it’s not. So, of course, Android Studio supports full code completion for Jetpack Compose.
While this isn’t everything that Jetpack Compose brings to the table, the features and behavior above showcase just how powerful Google wants this framework to be. And, while it’s still in alpha, that’s a step ahead of its previous “development” status. If you were holding off on really using Jetpack Compose (like I was), now might be the time to give it another try.
Android tablets suck, well, a lot of them do. Ask any regular person to describe a tablet, and they’ll often call it an iPad. While Samsung and others do a great job of not allowing the iPhone to become synonymous with the mobile category, it’s in tablets where Android manufacturers haven’t figured it out.
That’s not to say they haven’t tried, and Samsung has released several Galaxy Tabs that try to compete with the steady cadence of slabs coming out of Cupertino. None have appealed to me, mainly as I don’t think Android was designed with tablet sizes in mind. The Galaxy Tab S7 Plus, however, is the first Android tablet that would make me consider switching from my trusty iPad Pro.
There’s a whole lot of reasons why, and while the experience is mostly positive, there’s a couple of pitfalls that Samsung has also fallen into. I’ve been using the Galaxy Tab S7 Plus 5G for about 72 hours now, and here are our hands-on first impressions.
The Galaxy Tab S7+ is the best Android tablet I've ever used. Not many come close to the iPad Pro, but after just two days, I'm very tempted to switch. Powerful specs, a premium feel and excellent features make up a flagship tablet that will cost you a flagship price tag.
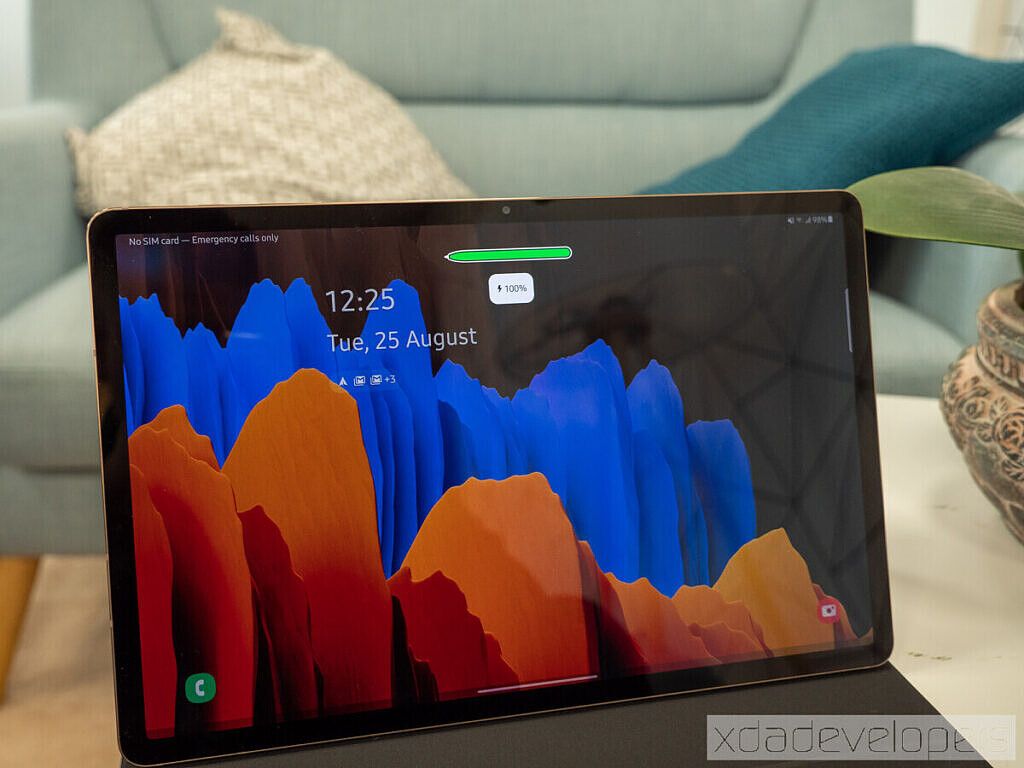
There’s no other way to put it – the Galaxy Tab S7 Plus is stunning, and the display is visually breathtaking. Apple likes to tout marketing terms like Retina Display, but the 12.4-inch Super AMOLED display on the Galaxy Tab S7 Plus is in a league of its own. At 1752 x 2800 pixels and a 16:10 aspect ratio, the display “only” offers 266 pixels per inch density, but much like megapixels aren’t the only deciding factor in cameras, the quality of the Galaxy Tab S7 Plus display is second to none.
The Galaxy Tab S7 Plus is stunning, and the display is visually breathtaking.
The rest of the tablet is standard fare: a fairly uniform and large bezel around the screen, which results in an 84.6% screen to body ratio. An array of color choices, with the Mystic Bronze featuring a brushed rear finish and the best choice of color by far. Even though the black bezels seem unsightly, the sleek 5.7mm thickness means its part of the design aesthetic, and you don’t think about them.
At 575g, however, you feel the heft and at 285mm tall by 185mm wide, it’s not the most comfortable thing to use without a case. Unfortunately, right now, you can’t buy the keyboard cover, which means you’re limited to the on-screen keyboard (as there are no good third-party keyboard cases right now), and it’s too wide to be comfortable trying to hold at the bottom and type in portrait mode. Samsung has made some tweaks to the software so the keyboard can be split or turned into a floating keyboard, but you’ll want a keyboard cover: it’s just too uncomfortable otherwise.
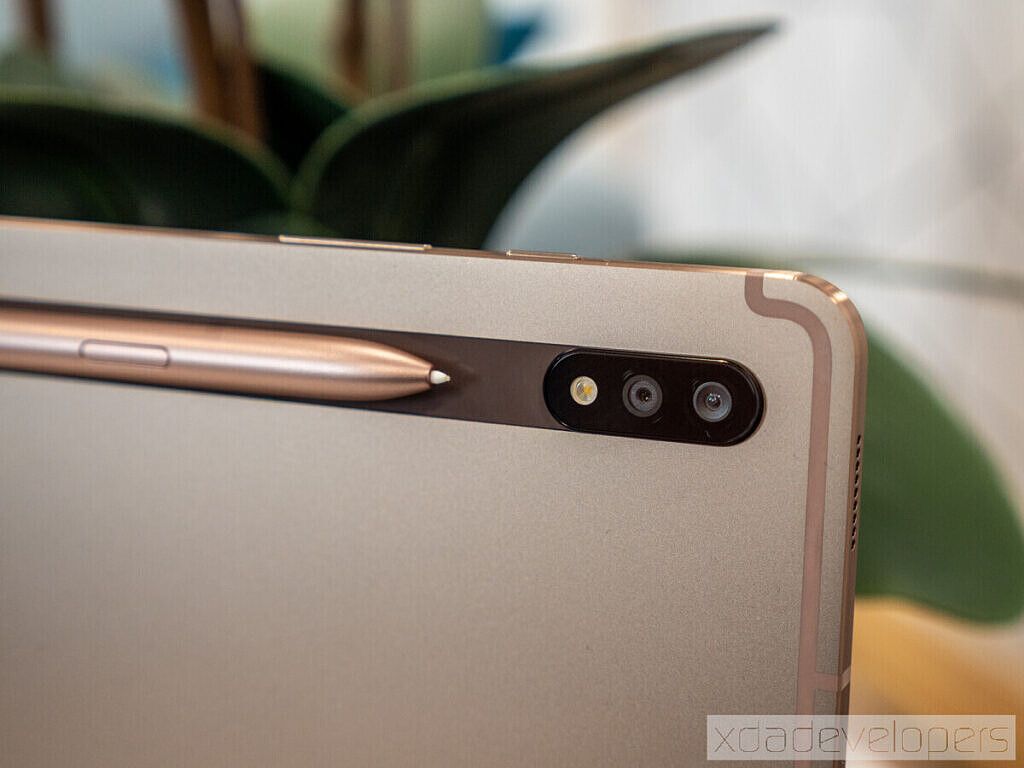
While most of the Galaxy Tab S7 Plus is stylish and sleek, the position of the S Pen on the rear is problematic and honestly, quite unsightly. Using relatively strong magnets, the S Pen automatically attaches to the back. Connecting to an extended magnetized area that blends into the camera housing, this is probably the best that Samsung could do, but it’s not the most stylish thing.
Further, in the space of 48 hours, I’ve already lost the S Pen a couple of times. Once, it came loose and rolled under my car. The other, it fell to the bottom of my bag. Unlike the iPad Pro, where the Apple Pencil connects to the top of the iPad, the S Pen connects to the back, which also means it doesn’t lay flat when you put it on a table. It’s not a deal-breaker, but I’d love to see Samsung fix this flawed design in a future version.
Powerful performance and impressive hardware
Take the main specs from a flagship like the Galaxy Note 20 Ultra (aside from the camera), put it in tablet format, and what do you get? The Galaxy Tab S7 Plus.
The package includes the Qualcomm Snapdragon 865 Plus processor – the latest from Qualcomm, and a modest upgrade over the Snapdragon 865 found in most flagship phones – and 6GB or 8GB of RAM. If you go for the 6GB version, it comes with 128GB of storage, while the 8GB variant comes with either 256GB or 512GB of storage. There’s also support for microSD expansion. I’m using the entry-level 6GB model and thought I had a higher spec: there’s been no initial lag or stutter, and it’s been lightning-fast with an experience that’s akin to the Galaxy Note 20 Ultra. Of course, it’s too soon to tell and I’ll reserve final judgment for the full review.
Great speakers and a gorgeous display make the Tab S7+ great for watching movies.
The rest of the hardware is equally impressive. The display supports HDR 10+ and offers a 120HZ refresh rate like the new Galaxy Note 20 series. The dual camera combines a primary 13MP wide-angle sensor with f/2.0 aperture, with a 5MP ultra-wide sensor with f/2.2 aperture.
The camera is ok at first glance, but no one should buy a tablet for its camera, please don’t be that person. The front camera is arguably more important, especially for things like video calls, and the 8MP f/2.0 sensor will likely be ok, although it is limited to Full HD at 30 frames per second. If you really must be the person using a giant tablet to take photos or videos, you’ll be happy to know the rear camera supports 4K video, also at 30 frames per second.
The rest of the hardware package includes a 10,090 mAh battery, and thankfully, 45W charging that should mean relatively rapid charging times. The Galaxy Tab S7 Plus is also one of the first devices to support the latest Wi-Fi 6 standard. Like the rest of Samsung’s recent flagship devices, there’s also wireless DeX so you can use your tablet to turn any display into a PC.
You might be wondering where the fingerprint sensor is. The answer is, Samsung went for an in-display fingerprint sensor, but Samsung might as well have not bothered. Anyone who’s used the Galaxy S20 range will understand what I mean: that series (and the Note 20 range) both had fairly bad in-display fingerprint readers, but somehow, Samsung has made it even worse on the Galaxy Tab S7 Plus. Whether you keep your fingerprint static when registering, or rotate it so you can unlock at any angle, it doesn’t matter. The fingerprint reader is almost useless, and in two days, I’ve had more failures to unlock than with any other device I’ve ever used. Unfortunately, there’s no other secure method for things like banking apps, etc., so it’s either struggle through the fingerprint issues or constantly have to log in to those apps.
Where I’ve been truly impressed so far is in the audio experience: the quad speakers tuned by AKG are loud, clear, and immensely enjoyable. The speakers have the added benefit of louder notifications, although you’ll want to turn this down as at its loudest, the notification sound can be heard upstairs in my house. If you’re buying the Galaxy Tab S7 Plus for its visual and auditory experiences, you won’t be disappointed.
Samsung is the software king
I’ve been using the Galaxy Fold for the past few months and love Samsung’s multitasking features. The best thing about the Galaxy Tab S7 Plus is your ability to multitask. You can have three windows side-by-side and can open more in a pop-up view that lets you also minimize the app into a little chat head. The iPad and even other Android tablets can’t compare, and Samsung’s decade of experience refining the multitasking experience shows.
Unfortunately, they’ve still not addressed my big concern about tablets as a whole: they’re treated less like independent experiences, and more like big smartphones. This is flawed, and it’s most apparent on the home screen. The Galaxy Tab S7 Plus offers a 5×6 maximum grid layout, which is also the same on the Galaxy Note 20 Ultra, despite the former having almost twice the screen real estate. Yes, there are third-party launchers, etc., but just like my complaints with the Galaxy Fold, it doesn’t feel like Samsung is maximizing the larger screen real estate. Is it that difficult to give us the ability to use smaller icons, and a larger overall grid to fit more on the screen?
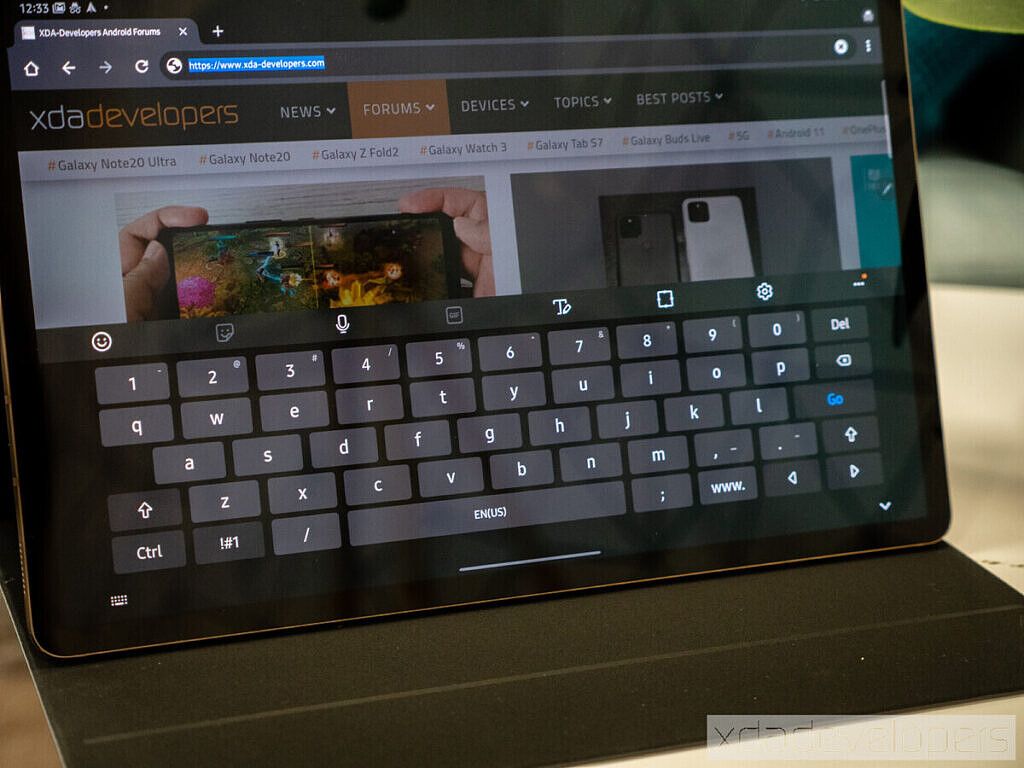
That said, Samsung has made some optimizations, mainly to the keyboard experience. Knowing that many people will rely on the on-screen keyboard, there’s the ability to resize the keyboard, turn it into a split keyboard or undock it and let it float on top of whatever app you are using.
The keyboard also contains Ctrl, Shift and arrow keys, allowing you to use common PC commands like Ctrl + C / V to copy and paste. While necessary for DeX, this also has the by-product of finally offering the ability to quickly undo what you last did using the Ctrl + Z / Y key combos. It’s long been a gripe of mine that Android doesn’t have an easy way to undo or redo your last action, and while these keyboard shortcuts can’t be used outside of text input fields, it’s still a handy feature to have.
Specifications
Here’s the full specs list for the Galaxy Tab S7+, as well as its younger sibling, the Tab S7.
Specification
Samsung Galaxy Tab S7
Samsung Galaxy Tab S7+
Dimensions & Weight
253.8 (W) x 165.3 (H) x 6.3mm (D)
498g (Wi-Fi), 500g (LTE), 502g (5G)
285.0 (W) x 185.0 (H) x 5.7mm (D)
575g (Wi-Fi, LTE, 5G)
Display
11-inches
2560×1600 (WQXGA)
LPTS TFT
120Hz
12.4-inches
2800×1752 (WQXGA+)
Super AMOLED
120Hz
CPU & GPU
Qualcomm Snapdragon 865 Plus:
1 x Kryo 585 (ARM Cortex-A77-based) Prime core @ 3.1GHz
3 x Kryo 585 (ARM Cortex-A77-based) Performance core @ 2.4GHz
4 x Kryo 385 (ARM Cortex A55-based) Efficiency cores @ 1.8GHz
Adreno 650 GPU
Fabricated on TSMC’s 7nm (N7P) process
RAM & Storage
6GB LPDDR5 RAM + 128GB UFS 3.0 storage
8GB LPDDR5 RAM + 256GB UFS 3.0 storage
Expandable storage (up to 1TB microSD)
Sound
Quad Speakers
Tuned by AKG, Dolby Atmos
Battery & Charging
8,000 mAh
45W Super Fast charging
10,090 mAh
45W Super Fast Charging
Security
Capacitive side-mounted fingerprint by Goodix
Optical under-display fingerprint scanner by Goodix
Rear Camera
13MP f/2.0 main + 5MP f/2.2 ultra-wide
LED flash
Front Camera
8MP f/2.0
Ports
USB Type-C, 3.2 Gen 1, DP Out
Connectivity
5G, LTE, Wi-Fi 6 (802.11 a/b/g/n/ac/ax), Wi-Fi Direct, Bluetooth 5.0
Sensors
Accelerometer, compass, gyroscope, light sensor, hall sensor
Software
Android 10 with One UI 2.5
Galaxy Tab S7 Plus: I’m tempted to switch from the iPad Pro
This is the most surprising part of my first impressions: the Galaxy Tab S7 Plus is so impressive in the right areas that I am considering switching from my iPad Pro. There are some inexcusable things like the fingerprint sensor and that awful design of the S Pen location on the back, but these are nitpicking from a positive experience.
A great alternative to the iPad Pro
That said, the real proof will be in the coming days and weeks as I put it through its paces. It may not live up to its early hype, but the Galaxy Tab S7 Plus has left enough of a good impression that I can’t wait to see how it performs.
Stay tuned for the full review, but in the meantime, I’m off to try and hunt down the keyboard cover or an alternative. I wrote this entire post in word using the on-screen keyboard on the Tab S7+, and my hand is suffering from cramp, so I don’t recommend relying solely on the on-screen keyboard. If you have any ideas, let me know in the comments!
The Galaxy Tab S7+ is the best Android tablet I've ever used. Not many come close to the iPad Pro, but after just two days, I'm very tempted to switch. Powerful specs, a premium feel and excellent features make up a flagship tablet that will cost you a flagship price tag.
At the IFA trade show in September last year, Sony unveiled the Xperia 5 — a compact version of its flagship Xperia 1 with the Snapdragon 855 SoC, triple cameras, and a 21:9 display. Similarly, the company is expected to launch a compact version of this year’s flagship Xperia 1 II and the device will, most likely, be called the Sony Xperia 5 II (Sony Xperia 5 Mark 2). While Sony is yet to reveal any information about the device, noted leaker Evan Blass (@evleaks) has now shared a render of the Xperia 5 II that showcases a familiar design.
As you can see in the attached image, the upcoming Xperia 5 II will look almost identical to the Xperia 5 from last year, featuring a 21:9 tall display with bezels on the top and bottom. The device will feature a triple camera setup on the back with minimal design changes to the camera module, a side-mounted capacitive fingerprint scanner, and a dedicated camera shutter button on the right edge. Unlike the original Xperia 5, however, the Xperia 5 II’s fingerprint scanner doesn’t look to be recessed and this could possibly be Sony’s solution to the fingerprint scanner issues that plagued the Xperia 1 and Xperia 5.
Although the render reveals no information about the Xperia 5 II’s hardware specifications, we believe that it will be a minor upgrade over its predecessor since the Xperia 1 II was also a minor upgrade over the original Xperia 1. We expect Sony to include Qualcomm’s flagship Snapdragon 865 SoC on the Xperia 5 II, coupled with an FHD+ OLED display, up to 8GB of RAM and up to 256GB of storage.
Due to the smaller form factor, the battery on the device will also be smaller than the one found on the Xperia 1 II and it should be between 3,200mAh and 3,600mAh. The device will, most likely, feature the same camera setup as the Xperia 1 II, with a 12MP f/1.7 primary camera, a 12MP f/2.2 ultra-wide camera, and a 12MP f/2.4 telephoto camera. Over on the front, the device is expected to feature a single 8MP selfie shooter. As mentioned earlier, Sony is yet to release any official information about the Xperia 5 II. We’ll update this post as and when the company releases any information about the device.
It’s been a few weeks since Google unveiled the long-anticipated Google Pixel 4a and the company has already released a beta build of Android 11 for the smartphone. The factory images and the kernel sources for the Pixel 4a have been published as well, which are just the right ingredients required by the modding enthusiasts to start playing with the device. If you specifically bought this phone for tinkering, then you would be glad to know that XDA Recognized Developer Zackptg5 has managed to achieve root on the Google Pixel 4a. The developer has also put together a nice elaborate guide that utilizes XDA Senior Recognized Developer topjohnwu’s Magisk to root the device after unlocking the bootloader.
Before we get into how to root the Pixel 4a, remember to take an off-device backup. That’s because the rooting process requires wiping all the data on your phone, including the files on the internal storage. Your banking apps as well as popular games like Pokémon Go will also likely to stop working after rooting due to SafetyNet attestation failure, but we do have a temporary workaround for this issue.
How to root the Google Pixel 4a
Step 1 – Unlock the bootloader
It is important to note the steps described below are intended for the carrier unlocked variant of the Pixel 4a. Most of the U.S. carriers like to disallow bootloader unlocking, making it impossible to root your phone.
Go to System settings -> About phone -> tap on ‘Build number’ several times until Developer options is enabled
Back out into settings and go to System -> Advanced -> Developer Options -> Enabled ‘OEM Unlocking’
Unplug your phone if it’s plugged into anything and power it off
Boot into the Fastboot interface by holding Power + Vol Down
Plug the phone into your PC and open Terminal/Shell/Command Prompt/PowerShell (depends on the OS)
Type fastboot flashing unlock on the terminal and follow the prompt on your device to unlock the bootloader (Note that this step will factory reset the device)
The bootloader is now unlocked!
Step 2 – Patch the stock boot image using Magisk Manager
While you can find a pre-patched boot image for the Pixel 4a on our forums, make sure to verify its origin. Any pre-patched boot image you download should match the installed software build version, otherwise you may face serious anomalies. We always recommend you to patch the boot image yourself.
Download the factory firmware corresponding to the installed version of the stock ROM and extract the boot image from the archive
Open a Terminal app on your phone and type ‘su -c props’
Select ‘Force BASIC key attestation’
This will make your device appear to be a different one in some instances and by default, this is Nexus 5. Zacharee1 prefers it to look like a newer device that doesn’t have hardware attestation (like the Google Pixel 3a). So choose: ‘Pick from fingerprints list’ -> ‘Google’ -> ‘Google Pixel 3a’
Reboot and verify you should hopefully pass SafetyNet!
If you are looking for more details on the process, check out the following thread in our forums:
Amazon launched pre-orders early, so the phone has already been back-ordered for weeks. You can still try your luck and see if you can buy one and have it delivered to you in the distant future. Amazon also has three bundled case options available as well.


 Unfortunately, they’ve still not addressed my big concern about tablets as a whole: they’re treated less like independent experiences, and more like big smartphones. This is flawed, and it’s most apparent on the home screen. The Galaxy Tab S7 Plus offers a 5×6 maximum grid layout, which is also the same on the Galaxy Note 20 Ultra, despite the former having almost twice the screen real estate. Yes, there are third-party launchers, etc., but just like my complaints with the Galaxy Fold, it doesn’t feel like Samsung is maximizing the larger screen real estate. Is it that difficult to give us the ability to use smaller icons, and a larger overall grid to fit more on the screen?