LightBlog

lundi 17 août 2020

Android App Basics: How to install Android Studio on Windows, macOS, Linux, and Chrome OS

If you’re just getting started in Android app development, you may or may not know of Android Studio. It’s Google’s official IDE (integrated development environment) made specifically for developing native Android apps. For Java or Kotlin Android apps, there’s no better option in terms of ease of development.

Of course, Android Studio is a development tool, so it’s not exactly a plug-and-play installation for your preferred development platform. There’s a little manual setup required, and that’s where this article comes in. Today, we’re going to go through installing and setting up Android Studio on Windows, macOS, Linux, and Chrome OS. Let’s get started!


Download Android Studio

This may be the most obvious step, but I’m including it here anyway for easy access. Before you can actually use Android Studio, you’ll need to download the appropriate version for your system. Follow the link below and download the appropriate file for your device.

Android Studio Downloads


Install Android Studio

Now comes the fun part. Follow the section below for your operating system to get Android Studio installed.

Windows

Windows actually has a couple of ways to install it.

Method 1

If you just want an easy installation, you can download and run the installer EXE. You’ll be guided through installing Android Studio, and then you’re done!

Just download the EXE and run it.

Method 2

This method is a bit more involved, but if you don’t have administrator access on your computer, this is the better choice. Let’s start.

  1. The first thing to do is to download Android Studio. Grab the ZIP version for Windows.

    Download the ZIP for Windows.

  2. While that’s downloading, make a folder for where you want to store Android Studio. For instance, my installation is located at E:\AndroidStudioDevWin\.
  3. Next, open up the ZIP you downloaded. Inside, you should see a folder called android-studio. Go into that folder and you should see a whole bunch of folders and files, including binjre, and uninstall.exe. These are the files you’re going to extract.

    You should see something similar to this.

  4. Open a new File Explorer window and navigate inside of the folder you created in step 2. In my case, that’s E:\AndroidStudioDevWin\.
  5. Back in the ZIP window, select all the folders and files and drag them to the window you opened in step 4.
    Android Studio on Windows

    Extract the files into the folder you created for Android Studio.

  6. Once the extraction is complete, you can delete the ZIP if you want.
  7. Now, go into the bin directory and find the studio64.exe file. Right-click and choose the Pin to taskbar option. Right-click again and choose the Pin to start option.
    Android Studio on Windows Android Studio on Windows

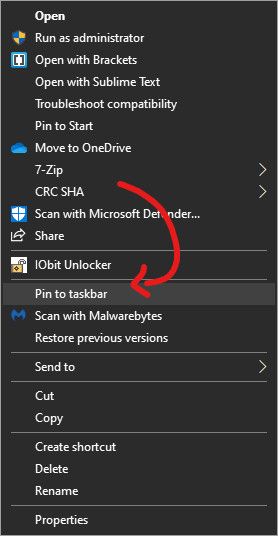
And that’s it! You should be able to search for “studio” in the Start Menu or simply click on the Android Studio icon in the taskbar to run it.

macOS

Follow these steps to install Android Studio on macOS:

  1. Download the Android Studio DMG for Mac.

    Download the DMG for Mac.

  2. Open the downloaded DMG. A window with the Android Studio icon and a shortcut to the Applications folder should open. If you’ve installed third-party apps on macOS before, this should look pretty familiar.

    You should see something like this when you open the DMG.

  3. Drag the icon to the Applications folder shortcut and let it copy.

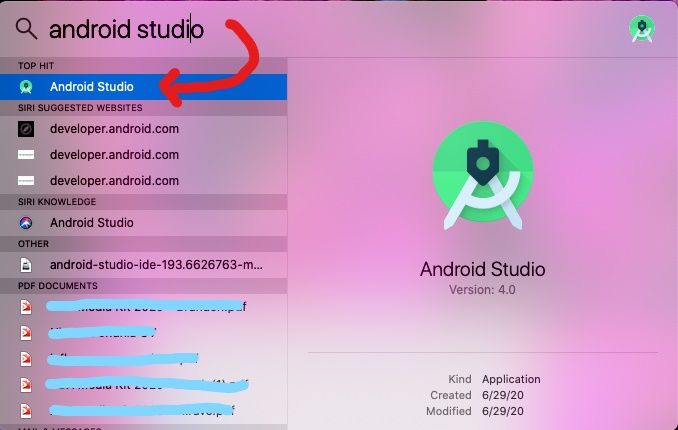
Once the copying has finished, you can open Android Studio by searching for it in Spotlight (CMD+Space) or Launchpad (Fn+F4).

Android Studio on macOS Android Studio on macOS

Linux

There are quite a few Linux distributions out there, and these instructions can’t cover them all. We’re going to be talking specifically about Debian-based and Fedora-based distributions here, but the general instructions should apply to all distributions.

  1. First up, you’ll need to download the Android Studio TAR.GZ for Linux.

    Download the TAR.GZ for Linux.

  2. The second thing you’ll need to do is create a directory where it should be installed. For instance, it could be at /home/zachary/Desktop/AndroidStudio/.
  3. Next, open up the TAR.GZ archive you downloaded. You should see a folder called android-studio. Go into that folder and you should see a whole bunch of folders and files, including binjre, and product-info.json.

    You should see a bunch of files in the ZIP, like this.

  4. Open a new Files window and navigate into the folder you created in step 2. In my case, it’s /home/zachary/Desktop/AndroidStudio/.
  5. Back in the Archive Manager window, select all the folders and files and drag them into the window you opened in step 4. Once the extraction is complete, you can delete the TAR.GZ if you want.
  6. While the files are copying, open a terminal (Ctrl+Alt+T). We need to make sure some libraries are installed so Android Studio can run.
    1. On Debian-based distributions, run:
      sudo apt-get install libc6:i386 libncurses5:i386 libstdc++6:i386 lib32z1 libbz2-1.0:i386
    2. On Fedora-based distributions, run:
      sudo yum install zlib.i686 ncurses-libs.i686 bzip2-libs.i686
    3. On other distributions, you’ll need to find and install these libraries using the appropriate package manager.
  7. Once the extraction is finished, go into the bin directory in your installation directory. Inside, you should see a file named studio.sh.
  8. Right-click on an empty space in the window and choose the Open in Terminal option.

    Choose “Open in Terminal”

  9. Once the terminal window opens, run the following command:
    ./studio.sh

    This will open Android Studio.

Now you’ve got Android Studio installed! If you want to make it easier to open, you can try making a desktop entry. Follow the instructions below to do so.

  1. Right-click on your desktop and choose Open in Terminal.

    Choose “Open in Terminal”

  2. In the terminal window, run:
    touch AndroidStudio.desktop

    Close the terminal.

  3. Open the AndroidStudio.desktop file in a text editor, like Gedit, and paste the following:
    [Desktop Entry]
    Name=Android Studio
    Exec=/home/zachary/Desktop/AndroidStudio/bin/studio.sh
    Icon=/home/zachary/Desktop/AndroidStudio/bin/studio.sh
    Type=Application
    Terminal=False
    Categories=Utility;
  4. You’ll need to change the paths after Exec= and Icon= to match your paths.

    Your desktop entry should look something like this.

  5. Save, and then right-click AndroidStudio.desktop. Choose the Allow Launching option. This may not be necessary for all distributions.
    Install Android Studio on Linux

    Select the “Allow Launching” option.

  6. Finally, double-click the file to launch Android Studio.

Chrome OS

If you’re on Chrome OS or some variant of Chromium OS, you’re in luck, because Google has made Android Studio available through the Linux framework. Read on to find out how to get Android Studio up and running on Chrome OS.

Installing Linux

Before you can install Android Studio on Chrome OS, you’ll need to install Linux. This isn’t a dual-boot situation, though, so don’t worry. Google has added a feature to Chrome OS to run Linux apps without having to install Ubuntu/Arch/etc. and reboot. If you already have Linux on Chrome OS enabled, you can skip this section.

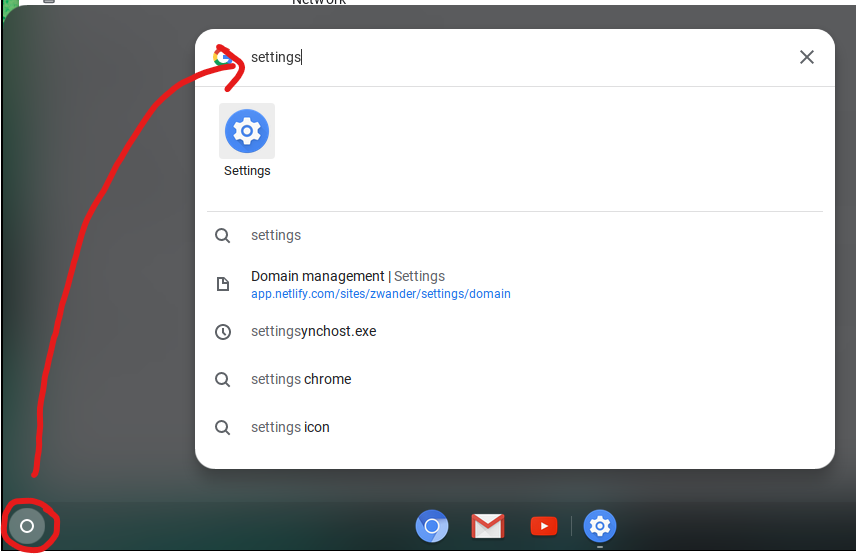
  1. Open Settings. You can do this by clicking the time in the bottom right of the screen and then clicking the gear icon, or by opening search (the circle in the bottom-left) and searching for Settings.
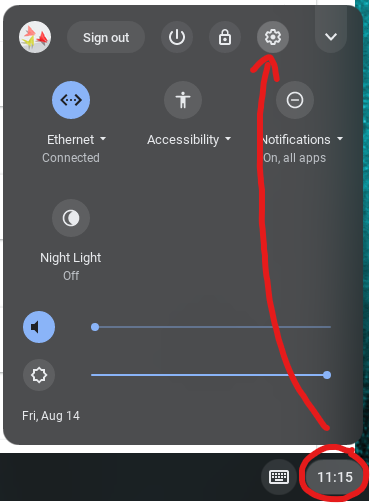
  2. In the left sidebar, click Linux (Beta) or scroll down to the bottom of the Settings window.
  3. Click the Turn on button in the Linux card.

    Click “Turn on” to enable Linux.

  4. At this point, a window should pop up telling you how much space Linux will take up. Click Next.

    Click “Next”.

  5. On the next screen, specify a username for the Linux installation, and then click Install.

    Click “Install”.

  6. Wait a few minutes for the installation to finish. A terminal window will appear. Close it.

If everything went well, you should now have Linux enabled on Chrome OS!

If you don’t see the Linux option in your settings, it likely means your Chromebook doesn’t support it. Most Chromebooks launched in 2019 or later support it, while some launched before 2019 support it. You can find a full list of such devices here.

Installing Android Studio

Now that you have Linux enabled, it’s time to install Android Studio.

  1. Download the Android Studio DEB for Chrome OS.

    Download the DEB for Chrome OS.

  2. Open Files and navigate to the Downloads folder.
  3. Right-click the downloaded DEB and select Install with Linux (Beta).

    Click “Install with Linux”.

  4. In the window that pops up, wait for the details to load, and then click Install.
    Install Android Studio on Chrome OS

    Click “Install”.

  5. You’ll get a notification telling you the progress of the installation. This might take a bit.
  6. Once the installation is finished, you’ll be able to find Android Studio right in the launcher in the Linux apps folder.

    Android Studio will be in your apps launcher inside the “Linux apps” folder.

That’s it! Setting up Android Studio on Chrome OS isn’t exactly simple, but it’s at least fairly straightforward.


Hopefully, this guide helped you get Android Studio set up on whichever operating system you may be using.

The post Android App Basics: How to install Android Studio on Windows, macOS, Linux, and Chrome OS appeared first on xda-developers.


from xda-developers https://ift.tt/323DhJx
via IFTTT

OxygenOS 11’s new OnePlus Sans font now available to sideload via Magisk Module

Last week, OnePlus gave us a sneak peek of OxygenOS 11 as they released the third (and final) Developer Preview build of Android 11 for the OnePlus 8 series. The latest iteration of the Chinese OEM’s custom skin comes with a plethora of design language changes, including a brand new font named OnePlus Sans.

oneplus_sans_sample_text

OnePlus Sans is the spiritual successor to the iconic OnePlus Slate font that was introduced back in 2017. Matter of fact, the transition from the “Slate” typeface is quite in line with OnePlus’ recent visual identity refresh. OxygenOS has yet to support downloadable font packages, which means currently there is no official way to get the new OnePlus Sans font on OnePlus phones other than the OnePlus 8 and the OnePlus 8 Pro (yes, not even the OnePlus Nord) until the arrival of public beta builds of OxygenOS 11.

Well, XDA’s developer community has once again come to the rescue. In collaboration with XDA Junior Member NeFeroN, XDA Member Venky has compiled a Magisk Module that can systemless-ly install the OnePlus Sans font on any Android device, not just OnePlus phones. After sideloading the module using Magisk Manager, you have to reboot at least once to let the new font take effect.

oneplus_sans_homescreen oneplus_sans_settings

Apart from supporting vanilla (or close-to-stock) Android skins, the module is smart enough to detect Xiaomi’s custom font implementation in MIUI, which means you can flash it on Mi, Redmi, and POCO-branded devices as well. On OnePlus devices running OxygenOS, it replaces the OnePlus Slate font, thus you can even switch between the built-in Noto Sans and OnePlus Sans fonts after installing the module.

Magisk Module to install OnePlus Sans font – XDA Thread

The module has already been tested by multiple users, but it is recommended to backup your data anyway before proceeding. You can revert back to the default font anytime by uninstalling the module using Magisk Manager.

The post OxygenOS 11’s new OnePlus Sans font now available to sideload via Magisk Module appeared first on xda-developers.


from xda-developers https://ift.tt/2E0Gt0r
via IFTTT

True Private Browsing: 10 of the Best Deals on VPNs This Week

From Amazon’s trackers to cybercriminals trying to steal your data, there are many good reasons to protect yourself online. Using a VPN is a smart move, and there are some great subscription deals available this week at the XDA Developers Depot. Here are some of the best — now with over 90% off.

Goose VPN: 2-Year Subscription

Providing protection on unlimited devices at the same time, Goose VPN is perfect for families. It also offers strong encryption and zero logging; CNET said, “We think Goose VPN is something to honk about.” Worth $349, two-year subscriptions are now only $19.99.

MaxiVPN Premium Plan: 6-Month Subscription

This speedy provider offers secure encryption on all your devices, with no bandwidth limits or activity logging. With access to over 300 high-speed servers in 49 countries and counting, MaxiVPN is also a great choice for streaming. You can currently pick up a six-month subscription for just $12 (normally $71).

KeepSolid VPN Unlimited: Lifetime Subscription

Winner of PC Mag’s Top VPN award, this service gives you access to a network of 400 speedy servers in 80 countries. You can use VPN Unlimited to unlock Netflix and other major streaming sites, while military-grade encryption and a kill switch keep your browsing private. Usually $199, lifetime subscriptions are currently just $39.

VPN by VeePN: Lifetime Subscription (5 Devices)

With a focus on security, VeePN is great for securing your connection on public networks. You get bank-level encryption, multiple VPN protocols to choose from, and a built-in kill switch — plus 2,500 servers to choose from. Normally $440, lifetime service covering five devices is now $24.99.

Hola VPN Plus: Lifetime Subscription

Used by over 200 million people, Hola VPN is one of the most popular VPNs in the world. This Plus subscription gives you unlimited bandwidth on five devices, and access to masking servers in 190 countries — perfect for streaming. Worth $717, lifetime service is currently just $34.99.

BulletVPN: Lifetime Subscription

As the name suggests, BulletVPN is fast. This makes the service perfect for unlocking streaming sites, including Netflix, iPlayer, Hulu, Amazon Prime, DAZN, and more. It also offers strong encryption and unlimited bandwidth. Order now for just $38.99 to get a lifetime subscription, worth $540.

Seed4.Me VPN: Lifetime Subscription (Unlimited Devices)

As featured by Wired, this lightweight VPN provides simple yet effective privacy protection. You can cover all your devices with one account, and you can connect to servers in more than 30 countries. Normally $432, lifetime subscriptions are now just $39.99.

personalVPN™ Pro: 3-Year Subscription

Built by security experts with 15 years of experience, this highly secure VPN protects your connection with 4096-bit encryption. You can start personalVPN with a click, and Stealth Mode disguises the fact you are using a VPN at all. Three-year Pro subscriptions are currently 50% off at $79.99.

SurfShark VPN: 2-Year Subscription

Rated by The VPN Lab at 8/10 stars, SurfShark VPN offers unlimited bandwidth on unlimited devices. You have access to 1,200+ servers in 61 countries, with AES-256-GCM encryption to keep your data under wraps and a strict no-logging policy. Worth $290, two years of service is now only $69.

SlickVPN: Lifetime Subscription

Honed for streaming, SlickVPN is fast enough for HD viewing on any device. You still get the security of AES-256 encryption and zero logs, while the service gives you access to 125 gateways around the world. Normally valued at $1,200, lifetime subscriptions are currently $19.99.

Prices subject to change  

The post True Private Browsing: 10 of the Best Deals on VPNs This Week appeared first on xda-developers.


from xda-developers https://ift.tt/2Y98UQx
via IFTTT

USA further tightens restrictions on Huawei, will not extend the temporary general license

The Trump administration in the USA has kept Huawei in its talons ever since it placed it on the Commerce Department’s “Entity List”. The move blocked Google from licensing GMS for new Huawei devices, which single-handedly humbled the competitiveness of the Chinese giant’s flagships. The U.S. Government did grant Huawei a temporary general license (TGL) that was renewed several times over the year, allowing Huawei to do limited business with U.S. companies. The last TGL extension just expired a few days ago, and as it turns, it will not be renewed. The U.S. Government is also further tightening the restrictions on Huawei.

According to the U.S. Department of State and U.S. Department of Commerce, the U.S. Department of Commerce will expand the restrictions that were imposed in May 2020, that blocked chip makers from supplying HiSilicon Kirin SoCs to Huawei without a special license.

“The Department of State strongly supports the Commerce Department’s expansion today of its Foreign Direct Product Rule, which will prevent Huawei from circumventing U.S. law through alternative chip production and provision of off-the-shelf (OTS) chips produced with tools acquired from the United States. This measure follows the more limited expansion of the Foreign Direct Product Rule in May, which Huawei has continuously tried to evade.

The Commerce Department also added 38 Huawei affiliates to its Entity List, which identifies foreign parties prohibited from receiving certain sensitive technologies and allowed Huawei’s Temporary General License (TGL) to expire. The United States has provided ample time for affected companies and persons – primarily Huawei customers – to identify and shift to other sources of equipment, software, and technology and wind-down their operations. Now that time is up.”

According to a report from Reuters, a new separate rule will stipulate that all companies on the economic blacklist will require a license when a company on the list acts as a purchaser, intermediate consignee, ultimate consignee, or end-user. Even further, the department is also adding addresses for four Huawei assembly locations on to the Entity List.

And to top it all off, the temporary general license that expired on Friday will not be extended. Parties will now need to submit license applications for transactions previously authorized under the TGL.

These new restrictions sound deeply impactful. Their complete impact will need to be assessed. We will keep you informed of further development on this matter.

The post USA further tightens restrictions on Huawei, will not extend the temporary general license appeared first on xda-developers.


from xda-developers https://ift.tt/3h4q8WJ
via IFTTT

Samsung planning to shift export-centric smartphone production to India under the PLI scheme

The Indian government recently dropped a few onerous clauses from the Production-Linked Incentive (PLI) scheme, alongside planning an incentive program worth $6.6 billion. The idea was to invite companies to manufacture their goods in India with a view to not only supply into the country, but also export from it. The changes appear to be coming to fruition, as Samsung is now said to be considering shifting a major part of its smartphone production from Vietnam and other countries into India.

According to a report from Economic Times, Samsung is “likely to diversify its production lines for making smartphones to India under the PLI (Production Linked Incentive) scheme”. This will have an impact on its existing capabilities across various countries like Vietnam. Vietnam is the second-largest smartphone exporter in the world, coming in after China, so a move away by Samsung gains further prominence. Samsung makes about 50% of its current phones in Vietnam, while its largest mobile phone manufacturing unit in the world is located in Noida, India.

Samsung is said to have submitted estimates of making smartphones worth over $40 billion over the next five years. Of these, phones with a factory price of over $200 could account for over $25 billion, and most of the phones in this category will be exported. At present, $200+ factory price phones account for just 2% of Samsung’s exports from India.

If and when Samsung’s move fructifies, the company will join the ranks of Apple, which is also in the process of shifting a key part of its production for smartphones to India. All three of Apple’s three contract manufacturers (Foxconn, Wistron, Pegatron) have applied to take benefits of the PLI scheme, and are moving manufacturing from places like China to India. Most of the production under the scheme is intended for export out of India. So while this does not directly and immediately bring down prices for Indian consumers, it is in the consumer’s longer-term interests as it would affect prices over a longer duration.


Source: Economic Times

The post Samsung planning to shift export-centric smartphone production to India under the PLI scheme appeared first on xda-developers.


from xda-developers https://ift.tt/2Y8OQy1
via IFTTT

The Mobvoi Earbuds Gesture are new TWS earbuds with head gestures

Following the recent launch of the affordable TicPods ANC, Mobvoi is back with a new pair of TWS earphones that feature innovative head gestures. The new Mobvoi Earbuds Gesture feature a design similar to the popular TicPods Free, with a small charging case, larger battery, and silicone tips for better passive noise isolation. The TWS earbuds include support for TicMotion head gestures, which we first saw on the TicPods 2 Pro. The head gestures allow users to easily accept or reject incoming calls by nodding or shaking their head twice.

TicPods ANC XDA Review || TicPods 2 Pro XDA Review

Mobvoi Earbuds Gesture: Specifications

Specification Mobvoi Earbuds Gesture
Dimensions & Weight
  • Charging case
    • 81mm x 36.8mm x 31mm
    • 130g
Speaker & Mics
  • 6mm drivers
  • Dual-mic array
Battery & Charging
  • Earbuds: 90mAh each
  • Charging case: 600mAh
    • USB Type-C port for charging
Connectivity
  • Bluetooth 5.0 low latency
  • Independent connection support
  • Mobvoi app support
Gesture controls
  • TicMotion head gestures for incoming calls
  • Touch gestures for playback controls, incoming calls, and voice assistant
Color Matte Black
Water/Dust Resistance IPX5
Box Contents
  • Earbuds
  • Charging case
  • Extra silicone tips
  • USB Type-C to Type-A charging cable
  • Quick start guide
  • User manual

Along with the unique head gestures, the Mobvoi Earbuds Gesture offer touch-sensitive playback controls that will let you accept/reject phone calls, play/pause music, switch to the next or previous track and wake the voice assistant of your choice. The earbuds also support independent connections, which means that you’ll be able to use a single earbud without any issues.

Mobvoi Earbuds Gesture

Each earbud packs in a 90mAh battery, which rated for up to 10 hours of continuous playback on a single charge. The charging case, on the other hand, packs in a 600mAh battery, which can provide an additional 50 hours of playback time. The earbuds also come with IPX5 water and dust resistance rating, which will ensure that they’re able to withstand your intense workout sessions.

Pricing & Availability

The Mobvoi Earbuds Gesture have successfully completed a crowdfunding campaign on Indiegogo and will start shipping to campaign backers in October this year. The TWS earbuds will be available in Matte Black at an introductory price of $67 for campaign backers.

Mobvoi Earbuds Gesture

Once the campaign ends, the earbuds will be priced at $130. In case you haven’t backed the crowdfunding campaign yet, you can head over to the Indiegogo page linked below and back the product for the introductory price before the campaign ends.

Get the Mobvoi Earbuds Gesture on Indiegogo

The post The Mobvoi Earbuds Gesture are new TWS earbuds with head gestures appeared first on xda-developers.


from xda-developers https://ift.tt/3h2X3uQ
via IFTTT

Here’s how to unbrick your OnePlus Nord with MSMDownloadTool

OnePlus phones are known for their hackability and the newly released OnePlus Nord is certainly not an exception. The classy mid-ranger has already received a somewhat working build of TWRP as well as an unofficial build of Pixel Experience ROM, thus we are pretty much confident that there’s more to come. However, sometimes you may end up with a “brick” while tinkering with your shiny new OnePlus Nord, a state where you can’t even access the Fastboot interface to restore the stock firmware. While you can contact OnePlus support in such scenarios to let them remotely perform a low-level flash on your device, our veteran OnePlus tipster Some_Random_Username has managed to grab the appropriate unbrick package for this device so that you can revive your bricked OnePlus Nord all by yourself.

OnePlus Nord XDA Forums

OnePlus Nord Review: Great Performance at a Great Price

Dubbed as ‘MsmDownloadTool’, the tool utilizes Qualcomm’s Emergency Download Mode (EDL) for the flashing task. You need a PC running Microsoft Windows 7 or newer in order to use this flasher, as it isn’t compatible with Linux and macOS. You also need a compatible Qualcomm driver, which can be downloaded straight from Microsoft’s update server.

If your OnePlus Nord is already bricked, connecting the device to a USB port on your computer should expose it as “QDLOADER 9008” (or “QHUSB_BULK”, if the driver isn’t properly installed) under Device Manager. End users can also manually trigger the EDL mode on the OnePlus Nord, which is particularly useful if you want to downgrade the installed version of OxygenOS in it. All you need to do is turn off the Nord, then hold down both volume up and volume down buttons and plug the phone into your PC.

Unbrick your OnePlus Nord with MSMDownloadTool

Keep in mind that there are 3 different regional variants of the OnePlus Nord: Indian (AC01DA), Global (AC01AA), and European (AC01BA). You need to pick the correct EDL flasher for your model, although cross-flashing is very much possible. Do create a backup of the ‘persist’ partition before attempting such cross-flashing to avoid fingerprint enrollment issues.

MsmDownloadTool for the OnePlus Nord — XDA Thread

Note that the currently discovered EDL flashers for the OnePlus Nord are based on OxygenOS 10.5.2, not the latest OxygenOS 10.5.4. Once you have the correct flasher corresponding to the variant you have, follow the steps below to unbrick:

  • Launch MsmDownloadTool V4.0.exe.
  • On the login prompt select “Other” in the dropdown menu and click on Next.
    oneplus_msmdownloadtool_user_type
  • Wait a few seconds until main window shows up.
  • Click on Target button and select O2 while using global tool or India while using indian tool or EU when using european tool.
  • Press Start button (this is done so that device will be “captured” automatically by tool instead of going back to normal boot after 10 seconds)
  • While the phone is in Qualcomm EDL mode, plug it to your computer using stock OnePlus cable.
  • Wait ~300 seconds.

And that’s it! The phone will automatically reboot into the stock OxygenOS that you just restored.

The post Here’s how to unbrick your OnePlus Nord with MSMDownloadTool appeared first on xda-developers.


from xda-developers https://ift.tt/31WzVrO
via IFTTT