LightBlog

dimanche 3 juillet 2022

Xiaomi Smart Band 7 Review: This $60 fitness tracker continues to uphold Xiaomi’s value proposition

Xiaomi’s line of fitness trackers has gone through several minor name changes over the years, from Mi Smart Band to Mi Band, to now, Smart Band, but the appeal remains the same — it’s a very affordable fitness tracker that can provide accurate fitness and health tracking, with data immediately viewable on a screen that, in recent years, has gotten larger and more vibrant. We now have the Xiaomi Smart Band 7, and it promises to do more of the same.

XDA Best Award
Considering that these bands can do almost the same fitness tracking as an Apple Watch or Galaxy Watch at a fraction of the price, it’s no wonder that these have been selling very well. This newest model sees a slight price hike — it’s $60 now — but it’s still a far cheaper option than say a Fitbit Charge 5. While it may not be as flashy or attention-grabbing as a smartwatch or a large-display fitness tracker, the Xiaomi Smart Band 7 is proof that a practical product will still find itself a market when it is priced right. It does what it says on the box, and most people buying this will be happy with that.
    Xiaomi Smart Band 7
      The Xiaomi Smart Band 7 is an affordable fitness tracker that does a good job of keeping track of steps, heart rate and sleep, with a large and vibrant screen too.

        Pros:

        Cons:

    Xiaomi smart Band 7 worn on wrist with a white watchface

    Xiaomi Smart Band 7: Pricing and Availability

    The Xiaomi Smart Band 7 is available now worldwide — including the elusive North American market — via Amazon and other online retailers. It will also be sold in Xiaomi’s physical stores for those who live near one. The official price is $62, but on Amazon, the price varies between $58 to $66.


    Xiaomi Smart Band 7: Specifications

    Specs Xiaomi Smart Band 7
    Size and weight
    • 46.5 x 20.7 x 12.25mm
    • 13.5g
    Materials Polycarbonate
    Wristband Silicone
    Compatibility Android, iPhone
    Display 1.62-inch AMOLED (152 x 486)
    500 nits brightness
    Connectivity Bluetooth 5.2
    GPS No
    Sensors
    • PPG Heart rate sensor
    • 3-axis accelerometer
    • 3-axis gyroscope
    • Barometer
    • Proximity sensor
    NFC payments No
    Battery 180 mAh
    Water resistance 5ATM or 50m up to 10 minutes

    About this review: Xiaomi sent me a Smart Band 7 for review. This article was written after nine days of wearing the device. Xiaomi did not have any input in this review.


    Xiaomi Smart Band 7: Hardware and Design

    Like its Mi Band 6 predecessor, the Xiaomi Smart Band 7 is in fact a tiny oval-shaped device that is entirely detachable from its rubbery band. The little pod-shaped core measures just a hair more than 12.2 mm thick (thinner than the Band 6’s 12.7mm) and weighs an inconsequential 13g. Even with the strap, the weight jumps to 16g only. It’s so dainty and petite that I’ve had the device (without the strap) in my pant pocket and forgot it was there for an entire day.

    Xiaomi Smart Band 7 detached from its band.

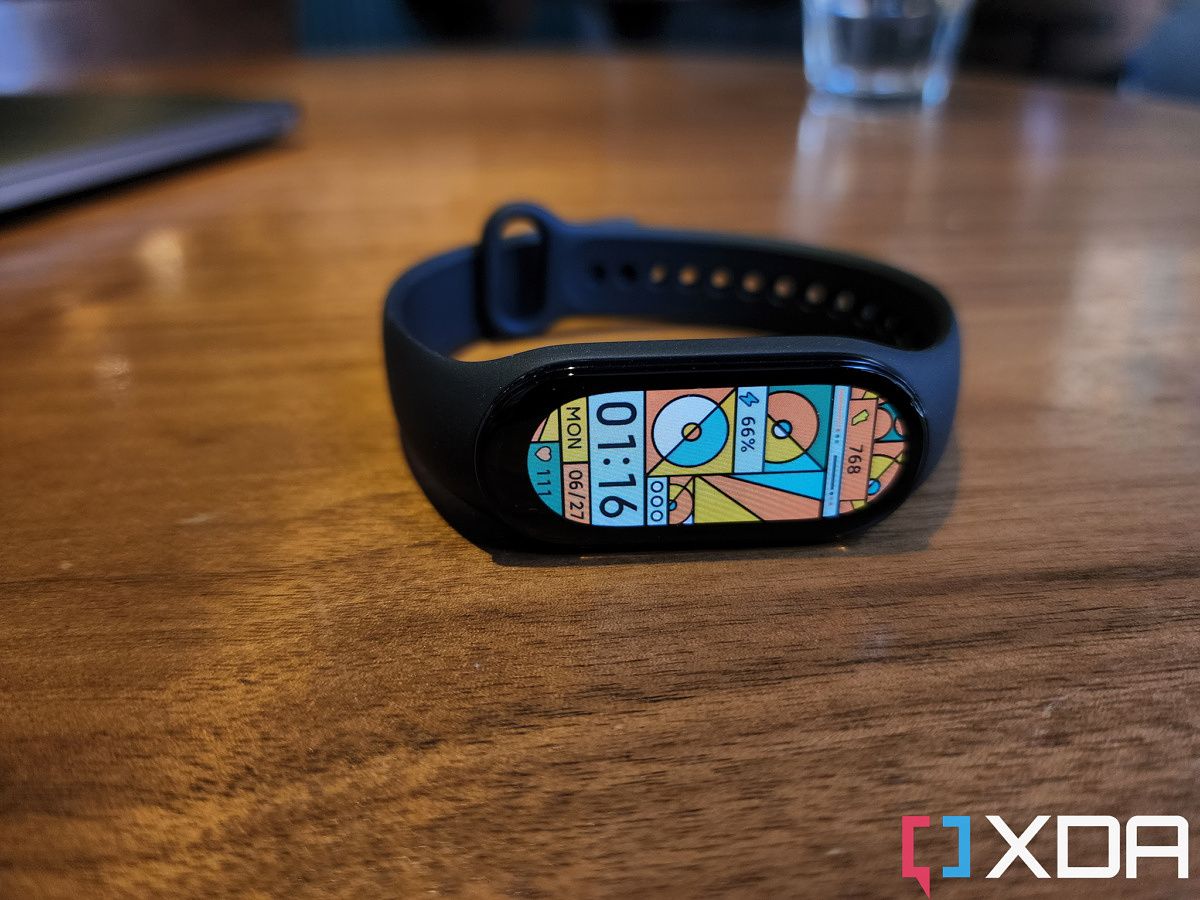
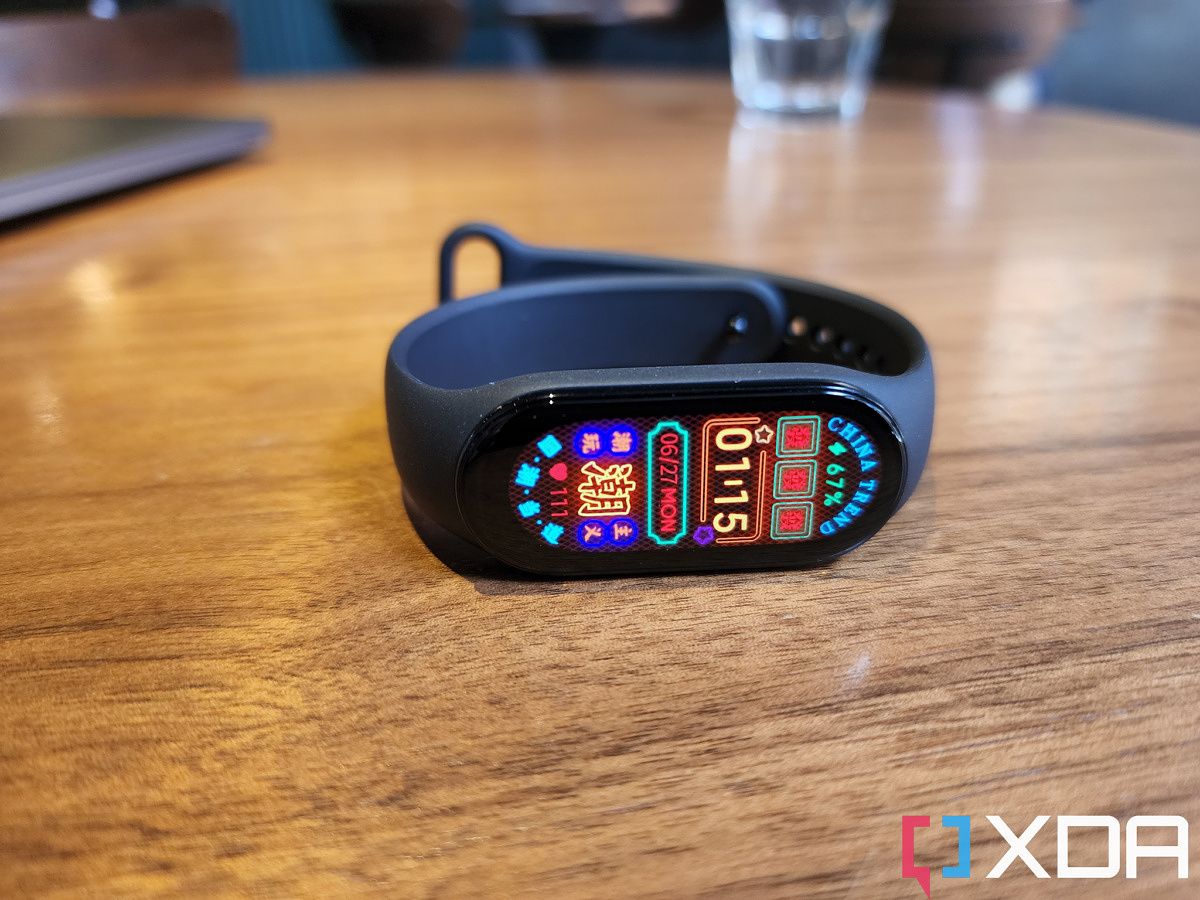
    The 1.62-inch OLED screen is the largest it's ever been

    The 1.62-inch OLED screen is the largest it’s ever been, a small bump from last year’s 1.56-inch and a huge jump from the 1.1-inch from the Xiaomi Band 5. The display size increase mostly stretches horizontally, which means the Smart Band 7 has a wider screen (instead of longer) than last year’s Band 6. Maximum screen brightness has been bumped up to 500 nits, still not quite enough to see easily in direct harsh sunlight, but the screen looks great everywhere else.

    Xiaomi Smart Band 7 side

    On the back of the device are sensors for heart rate and blood-oxygen levels, along with a magnetic pin space for the proprietary charger. I can confirm the Band 6’s charger still works with the Smart Band 7, though I am not sure the Band 5’s charger will (because I don’t have one to test).

    Xiaomi Smart Band 7

    This little pod slips into the rubber strap snugly. There are no switches or buttons to deal with, the rubber strap just wraps around it like a rubber band and the fit is secure.

    Xiaomi Band 7 with rubbers trap

    One of the selling points of Xiaomi’s band series is the replacement bands, which Xiaomi sells in vibrant colors such as “neon green,” “khacki green,” and orange. If you find these options lacking, third-party sellers will soon pop up, giving access to many more options in different styles and colors. There will be a bit of a dearth of “premium” bands, but considering what this fitness tracker lineup has been historically, you will be very content at the selection of bands.

    Personally, I am not a fan of rubber straps, they feel sticky and “slimy” when I sweat (I always buy a third-party leather strap if available). But considering its two-digit pricing, I have no issue with the rubber strap being the included band. This isn’t like Apple or Samsung giving us rubbery straps for wearables that cost over $300. At this price, this is great, and you can always plop down a few dollars and get something else if you need to.

    Xiaomi Smart band 7

    The strap fits comfortably around my wrist, with enough notches for incremental size adjustments. The wearable is rated 5ATM, which means it can be submerged in water up to 50 meters for up to 10 minutes. This number is a safe estimate — I’ve worn the Band 6 (also rated 5ATM) underwater for well over 20 minutes without issues.

    There’s a 180 mAh battery inside, which is enough to power the Smart Band 7 for up to two full weeks depending on settings. More on battery performance in the performance section. While the China version of this band features NFC, the global version (the one I’m reviewing) does not. There’s also no GPS so you need to have your phone with you to track runs. Again, these are acceptable compromises for the price in my opinion.


    Xiaomi Smart Band 7: Software and Features

    Navigating through the Xiaomi Band 7 is done entirely via swipes and taps, as there is no physical button. This is fine for the most part, but sometimes when the display screen is wet, or if my finger is wet, it may take more than one tap to get the desired action. It doesn’t happen often, but sometimes I’d try to wake the screen, and it takes two to three taps. Perhaps a physical button would be helpful. There is a raise-to-wake feature that works well, by the way. I’d say 98% of the time I have been able to navigate through the band’s UI fine.

    The UX is pretty standard for wearables: swipe down from the top to see notifications, swipe up from the bottom to access a set of features that you can customize in the companion app. Horizontal swipes cycle through all the various features like music player, exercise tracking, etc.

    There’s virtually no app ecosystem to speak of, meaning everything you can do with the band is already present out of the box, and you can’t go and download more things to do. While this sounds like a shortcoming compared to other Android smartwatches, the reality is all non-Apple Watch smartwatch platforms, whether it’s Google’s own WearOS, Samsung’s Tizen, Huawei’s HarmonyOS, or Fitbit’s OS, have anemic third-party app support anyway. If we compared the Smart Band 7 to an Apple Watch, sure, then the Apple Watch can do a lot more things, like access a digital assistant or control Spotify playlists or open up a digital boarding pass (for North American airlines, at least). But compared to, say, a Huawei Watch GT 3 or Fitbit Sense? The Xiaomi Smart Band 7 can do virtually everything those pricier smartwatches can do.

    Xiaomi Smart Band 7 with a Samsung Galaxy S22 Ultra

    The band pairs to your smartphone via Xiaomi’s Mi Fitness app which is available for Android and iOS. I paired my Smart Band 7 with a Xiaomi smartphone, and then with a Galaxy S22 Ultra, and everything worked fine. There are no features exclusive and limited to Xiaomi smartphones like there are with Huawei’s wearables, so you can use this very flexibly across Android without any OEM lock-in.

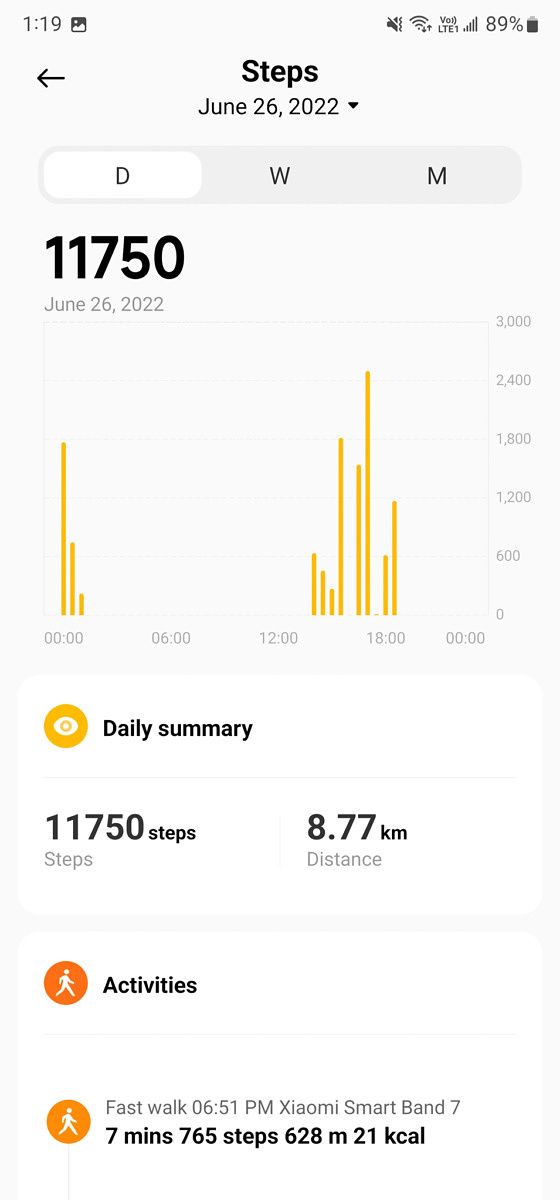
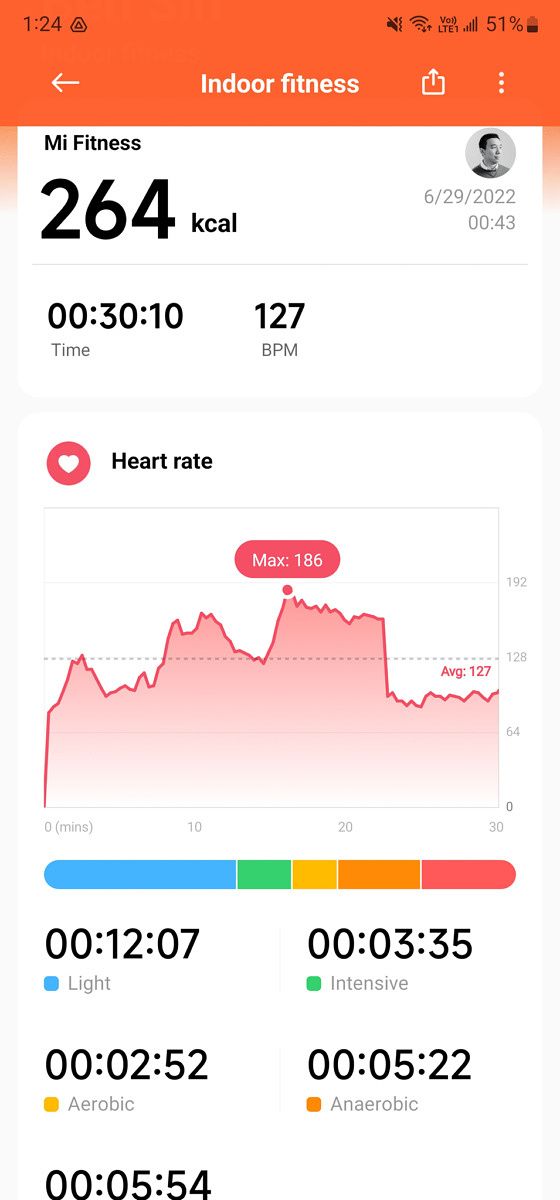
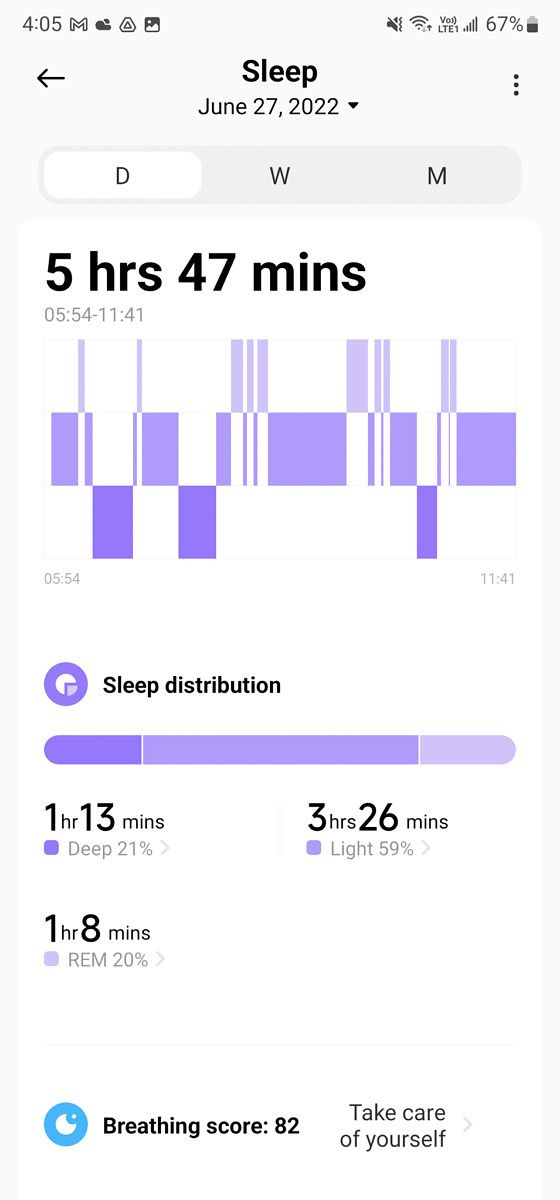
    You can check your current day’s health data — steps walked, heart rate, workouts completed, sleep time — directly on the wearable. But if you want to check older data you have to jump into the Mi Fitness app which offers a rather typical overview. By typical, I mean it’s fine, it isn’t any more or less insightful than what a Fitbit or Apple Watch shows me. For workouts, for example, I can see a detailed map of my heart rate during the entire session. For sleep, I can see when I was in deep sleep or REM.

    mi fitness app screenshot mi fitness app screenshot mi fitness app screenshot

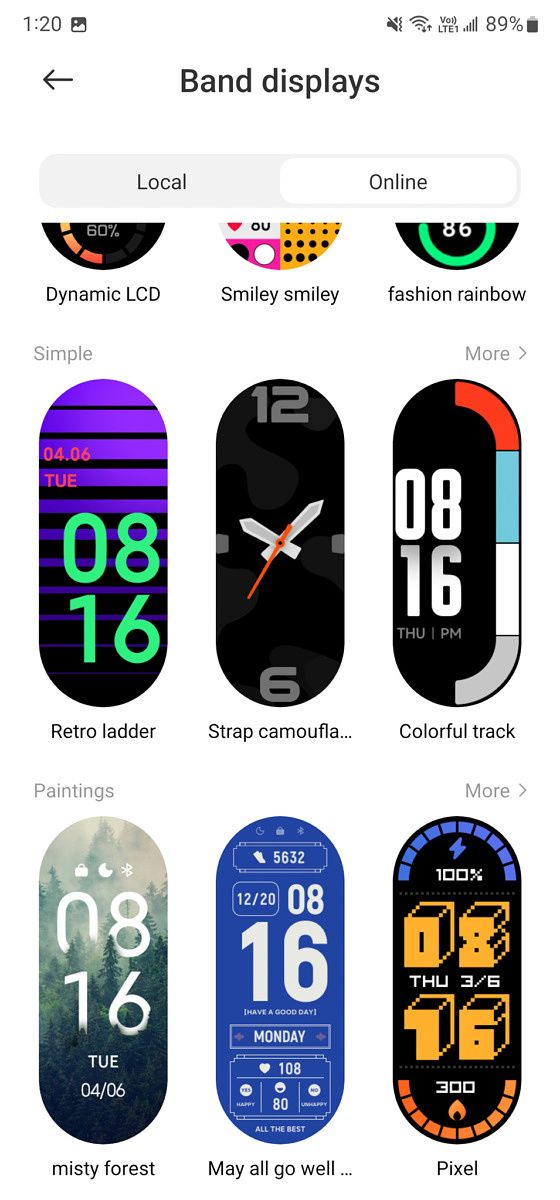
    The Mi Fitness app also has dozens of watch faces to choose from, and they’re quite aesthetically pleasing — much better than the options in Samsung’s or Huawei’s wearable store, in my opinion. The community has figured out ways to create custom watch faces too, so there’s plenty of room to explore here.

    Changing watch faces also takes just 10-30 seconds (you have to download the watch face first), unlike Fitbit, which almost always takes five to ten minutes (this is a bug of Fitbit’s app, one that hasn’t been fixed for years).

    Some of these watch faces even support complications, though it’s quite limited (you can assign a complication to show you heart rate or steps or weather, for example). This is nowhere close to the variety of useful complications you get on an Apple Watch watch face, but still much better than, again, any Fitbit or Huawei watch faces that support zero complications.

    Xiaomi Smart Band 7 in the hand over a brown table Xiaomi Smart Band 7 in the hand

    Have you noticed the trend in this review yet? Any shortcoming or nitpick I have with this $60 band is when I compare it against the Apple Watch which costs a minimum of $199. Otherwise, this band often keeps up or even surpasses the performance of other wearables from everyone else.


    Xiaomi Smart Band 7: Performance and Battery Life

    As a fitness tracker, the Smart Band 7 gets the job done. I wore the band alongside an Apple Watch 7 for a series of walks and workouts, and the numbers were comparable. Sleep tracking also seemed reasonably accurate, as the band was smart enough to not think of my constant tossing and turning was me “waking up.”

    xiaomi smart band 7 detached from the band in the hand showing a black screen

    In addition to tracking expected things like blood-oxygen level, and heart rate, the Xiaomi Smart Band 7 can also track menstruation cycles, and breathing, though the latter is in beta stage.

    I wore the band alongside an Apple Watch 7 and for a series of walks and workouts, and the numbers were comparable

    The Xiaomi Smart Band 7 doesn’t automatically detect workouts and begins tracking the way pricier fitness trackers do, so you will have to manually log the exercise. There are an overwhelming number of workout modes, ranging from the basics like cycling to yoga to the obscure like fishing and parkour. I always take these fitness modes with a grain of salt — I mean, can a wrist-worn device really accurately tell the difference between badminton and tennis? Fishing or tai chi? This isn’t a Xiaomi problem, I’m skeptical about whether the Apple Watch can tell too. My advice is to just pick a workout close enough to what you’re doing. When I’m at the gym, I can just pick “freestyle workout,” or “strength training,” I don’t need to differentiate between walking on an inclined treadmill or on the stair climber. It’s a waste of time in my opinion.

    working out with the Smart Band 7

    One gripe I have with the band is that the band can only mirror notifications from my smartphone in static form. I can’t interact with the notifications at all. But again, this problem exists on virtually 99% of fitness bands and most Android smartwatches too. So I’m not even sure if this is a reasonable complaint if $300 Android smartwatches also won’t let me respond to notifications.

    Battery life is very good. If you leave the always-on display off, you can get up to 14-day battery life. I haven’t used this band for 14 days yet, but after nine days of use at the time of this writing, my band still has 38% battery left so it seems like it will surpass the 14-day mark. If you leave the always-on display on, Xiaomi says battery life drops down to about a week. That’s still pretty good.


    Should you buy the Xiaomi Smart Band 7?

    Xiaomi Smart band 7

    You should buy the Xiaomi Smart Band 7 if:

    • You want an affordable fitness band to keep track of fitness data
    • You want a thin and lightweight wearable that won’t get in the way of long-sleeved shirts, sleeping, or other activities

    You should not buy the Xiaomi Smart Band 7 if:

    • You already own the Xiaomi Smart Band 6
    • You don’t mind paying much more for a more capable overall wearable like the Galaxy Watch 4 or Apple Watch

    Even with a slight price bump, the Xiaomi Smart Band 7 is an easy recommendation for those looking for a good value fitness tracker. At $60, the product more than lives up to what it claims to do, and offers a larger, more vibrant screen and better watch faces than other trackers at this price range. However, the Smart Band 7 just isn’t a big step up from the Band 6 (the only improvements are better battery life and a larger screen), so those who own last year’s wearable already need not upgrade.

      Xiaomi Smart Band 7
      The Xiaomi Smart Band 7 is a $60 tracker with a large, vibrant screen and accurate fitness tracking

    The post Xiaomi Smart Band 7 Review: This $60 fitness tracker continues to uphold Xiaomi’s value proposition appeared first on XDA.


    from XDA https://ift.tt/c2xSzQ5
    via IFTTT

    samedi 2 juillet 2022

    DockCase USB-C Visual Smart Hub 7-in-1 review: A dock with a screen

    Until recently, I didn’t really find myself in need of a docking station all that frequently, but even some of the best laptops today a very limited selection of ports, and even if you don’t have a ton of accessories, having a compact dock with some ports can be extremely helpful. That’s the market DockCase seems to be focused on with the USB-C Visual Smart Hub 7-in-1, and it does a good job at what it sets out to do.

    DockCase makes a few of these docks that have a screen and while there isn’t necessarily a ton of uses for that screen, it does make it easy to see more information about the peripherals connected to your PC. There are cheaper options out there, but the display is what helps this one stand out, plus it has really solid build quality. With a solid mix of ports and support for up to 100W of power delivery (technically maxing out at 95W), this is a great option if you need to connect some peripherals to your laptop, whether that’s at your office or during a trip.

    The DockCase Visual Smart Hub 7-in-1 comes in two versions, one with a detachable cable and one with an integrated cable. They’re functionally the same, so it’s up to your preference. The detachable model means you can try to get your own cable if you want a longer one, which is a plus. That’s the only version available on Amazon right now, and it’s much cheaper there. Buying directly from DockCase’s website is more expensive.

      DockCase USB-C Smart Visual Hub 7-in-1
      The DockCase SUB-C Smart Visual Hub gives you a handful of ports for peripherals, and it has a screen so you can keep tabs on it all.

        Features:

        Pros:

        Cons:

    Navigate this review:

    DockCase USB-C Visual Smart Hub 7-in-1: Pricing and availability

    • The DockCase USB-C Smart Visual Hub 7-in-1 costs $64.99 on Amazon, but only the version with a detachable cable is available
    • The model with an integrated cable is available directly from DockCase’s website

    The DockCase USB-C Visual Smart Hub is available to buy right now, but while it comes in two versions, only one is available on Amazon. That’s the model with a detachable cable, and if you buy from Amazon, it costs just $64.99.

    Both versions are available to buy on DockCase’s website, but they cost $99.99 there, at least officially. If you’re outside the US, though, this might be your best option, since Amazon won’t ship it everywhere.

    DockCase USB-C Visual Smart Hub 7-in-1: Specs

    Size (WxDxH) 121 x 39 x 15 mm (4.76 x 1.54 x 0.59 in) excluding cable
    Weight Detachable (excluding cable): 132 grams (0.29 lbs)
    Integrated: 140 grams (0.31 lbs)
    Speed and Power Speed (to host):
    • USB 3.2 Gen 2 (10 Gbps)

    Power delivery (host passthrough charging):

    • 100W (95W maximum effective charging)
    Ports Front
    • 1 x USB Type-A (5Gbps)
    • Full-size SD card reader
    • microSD card reader

    Rear

    • 2 x USB Type-A (5Gbps)
    • 1 x HDMI 2.0 (up to 4K @ 60Hz)
    • USB-C charging port (100W)

    Right (detachable model):

    • USB Type-C port (connection to host PC)
    Display 1.3-inch display, 261 PPI
    Material Zinc alloy (casing) and tempered glass (top)
    What’s in the box DockCase USB-C Visual Smart Hub 7-in-1
    USB-C to USB-C cable (detachable model)
    Price $64.99

    Design and ports: It has 7 ports, including HDMI

    • The DockCase USB-C Visual Smart Hub has three USB Type-A ports, HDMI, and both full-size and microSD card readers
    • It can also deliver up to 95W of power to your laptop to keep it charged

    There’s only so much you can say about a dock like this, and we’ll get right to what’s important – the ports. Regardless of whether you choose the version with a detachable or an integrated cable, the dock has three ports on the front and four on the back. Up front, we get one USB Type-A port, along with full-size SD and microSD card readers.

    Front view of the DockCase USB-C Visual Smart Hub 7-in-1 showing a USB Type-A port and a full-size and microSD card readers

    On the back, there are two more USB Type-A ports, one USB Type-C port for AC input, and an HDMI port, allowing you to connect to an external display. When you have only seven ports in total, there’s only so much you can do, but this is probably the most ideal setup for this size. Having an HDMI 2.0 port means you can connect a 4K display at 60Hz, which is pretty nice. My monitor is a Full HD 144Hz panel, and the hub can drive it just fine, too.

    Rear view of the DockCase USB-C Visual Smart Hub 7-in-1 showing two USB Type-A ports, an HDMI port, and a USB Type-C port

    One thing I like is that all the USB ports are USB 3.0, so you can get 5Gbps speeds out of any of them. Of course, the hub itself only supports 10Gbps, so you can’t use the full bandwidth of all three ports at the same time, but that’s going to be the case with any hub like this.

    If you get the version with a detachable cable, there is another USB Type-C port on the side, which is used to connect to the host computer. It supports 10Gbps of bandwidth and 100W of power, or at least that’s the advertising claim. In reality, the dock can only deliver up to 95W of power, and truth be told, that’s such a minute difference that it will work just as well. This is also the case for any other USB-C dock like this, so this doesn’t mean you need to look for another option. It’s worth noting that this isn’t a docking station, so it doesn’t have its own power adapter, it just supports passthrough charging.

    Both models of the DockCase USB-C Visual Smart Hub 7-in-1 seen from the front

    I feel the need to bring this up, though, because I have an Asus laptop (a 2021 ROG Flow X13), and it supports 100W charging. But there’s also a feature in Asus’ Armoury Crate software that lets you disable the discrete GPU when on battery power, and if the laptop is receiving less than 100W of power, that still disables the GPU. That’s relatively easy to work around, but it’s something to keep in mind.

    I’ve found the port selection overall to be nearly perfect for my usual needs. There have been times when the USB ports weren’t enough for all my peripherals, but I’d argue most people buying a small dock like this don’t need as many peripherals as I do. You also only get one HDMI port, which might not be enough for users with more complex setups, though I was fine with it since I only have one monitor anyway. Another thing that’s missing is a headphone jack, though to be fair, most laptops still have one of those.

    A desk setup with a laptop, a monitor, keyboard, mouse, and USB webcam all connected to a hub, which is also charging the laptop.

    One problem I’ve sometimes had is that the dock fails to detect the connected display, and you might either have to reconnect the display or the dock itself. Hopefully this is something that can be fixed with a firmware update, which the dock does support.

    Aside from that, the dock is built to feel solid. It has quite a bit of heft to it, and most of the unit is a solid piece of metal, with the exception of the top where the display is. There’s a small hole on the back (below one of the USB ports) that hides a button, and you need a SIM ejection tool to use it. We’ll get into that in a bit.

    Display: It can show some useful information

    • The display on the hub can show various information about connected peripherals
    • It can also be used to change certain settings for the dock, such as how much power is reserved for peripherals

    What really helps the DockCase USB-C Smart Visual Hub stand out is the display that’s built into the dock. This is a fairly basic display specs-wise, but t’s actually pretty sharp and it works perfectly for displaying the information you need to see on it. In its idle state, it’ll display general information about all your connected devices, including how much power is being delivered to your laptop, the resolution and refresh rate of your screen, and the supported USB speeds of your peripherals. The screen actually allowed me to learn that one of the laptops I have lying around can only receive 60W of power over USB-C, which was an interesting find. The screen also shows the internal temperature of the hub, so you can keep an eye on it.

    Main display of the DockCase USB-C Visual Smart Hub 7-in-1 showing information about various connected peripherals

    The dock also responds whenever you plug in a display or power adapter. When you plug in a power adapter, you’ll briefly see how much power the dock is receiving and how much is being delivered to the laptop. When you plug in a monitor, you can see all sorts of information including resolution, size, manufacturer, and refresh rate. It’s really neat. One problem I’ve noticed is that the dock won’t update the refresh rate information when you change it in Windows. You need to unplug the display and plug it back in to see the updated value.

    DockCase USB-C Visual Smart Hub 7-in-1 showing information about a recently-connected isplay, including size, model number, and resolution

    You can change the orientation of the display by inserting a SIM ejection tool into the small hole on back. Pressing the hidden button once will rotate the display 90 degrees, and you can choose whatever orientation is most convenient to you.

    But the most interesting thing is the ability to change certain dock settings directly on the dock thanks to that display. When you press and hold the hidden button, you start seeing various options appear, including the control panel, where you can see various settings for the dock. These let you change things like the minimum temperature at which the internal fan should start cooling the dock, ow how much power the dock itself can use.

    Control panel for the DockCase USB-C Visual Smart Hub 7-in-1

    That last one can be important if you’re using high-speed data transfers via USB, as you might need to reserve more power for the USB ports, but that comes at the cost of slower charging for your laptop. It’s great that you can choose what your priorities are, though. Other settings include the screen time-out threshold, and a handful of other options that aren’t meant for most users to mess with. Navigating this UI can be a little clunky, but you basically press once to move to the next option on the page, and press and hold to select. The screen shows an indicator of how long you need to press to confirm a choice, so you can get the hang of it fairly quickly.

    Who should buy the DockCase USB-C Smart Visual Hub?

    All things considered, the DockCase USB-C Smart Visual Hub offers a solid range of connectivity, and for the $65 price tag on Amazon, it’s actually very nice and versatile. The display can also be useful to learn more information about the peripherals and power adapter you’re using.

    You should buy the DockCase USB-C Smart Visual Hub if:

    • You have a laptop with very few ports, like a Dell XPS 13 or MacBook Air
    • You want to connect a few peripherals to your laptop
    • You find the display useful for monitoring your peripherals

    You shouldn’t buy the DockCase USB-C Smart Visual Hub if:

    • Your laptop requires more than 100W of power
    • You have a complex setup with multiple displays or lots of USB peripherals
    • You need a headphone jack

    I’d say the biggest thing to look out for with this dock is that issue where the connected display may not detect a signal when the host PC wakes up from sleep, but it doesn’t happen all the time and it’s relatively easy to fix. You should also know that this dock isn’t meant for very complex professional setups with multiple displays, so you might want to look at more high-end options if that’s what you need.

    The post DockCase USB-C Visual Smart Hub 7-in-1 review: A dock with a screen appeared first on XDA.


    from XDA https://ift.tt/a5NFLvg
    via IFTTT

    Why I spent $350 on an Amazon Kindle e-reader twice, and would do so a third time

    “I love the smell of a book.”

    “You just can’t beat the feel of a real book.”

    “I really enjoy digging through a physical bookstore and finding what I want to read.”

    “I guess I’m just old-fashioned.”

    These are all things that I’ve heard from people about why they prefer to read physical books instead of digital ones. They’re also people that have never tried the Amazon Kindle Oasis.

    And why should they have? It’s an e-reader that starts at $249.99. When I told my friends that I bought the first one for $359 (the 3G model – it started at $289), they asked me what else it does. Unless you really enjoy reading books, and those books tend to be electronic, it’s hard to justify buying an e-reader with an E Ink display for more money than a base model iPad.

    A lot of the people I talk to that still prefer physical books haven’t gone beyond the small screen on their phones to try digital books. Beyond that, some people have tried tablets. But very few of these book lovers have tried an e-reader, or more specifically, one of the Kindles that are popular on Amazon.

    When I first decided to get a Kindle, I decided to get a Paperwhite. It was one step up from the base model, but I didn’t think I needed the bells and whistles of the Kindle Voyage, which was the top-tier product at the time.

    I absolutely hated the Kindle Paperwhite. Unlike the first and only other Kindle that I had ever purchased – which was the Kindle 4 that was released in 2011 – the Paperwhite didn’t have physical buttons on the sides to turn pages. Remember, that old Kindle didn’t even have a touchscreen (or a frontlight), so buttons were necessary to turn the page. I found this to be a real pain point for the Paperwhite. Without those buttons and having to touch the screen to turn pages, it was nearly impossible to use the device one-handed.

    I returned the Kindle Paperwhite. It wasn’t doing anything for me that I really wanted from an e-reader.

    Interlude: The pros of using an e-reader

    I’ve always used Kindle for my e-books because I use all platforms, and Amazon is the most open among the big ones. I’ve tried Apple, Google, Barnes and Noble Nook, and even Microsoft’s short stint in e-book sales. Amazon also has the best hardware. But ultimately, the services I use tend to be the ones that are most accessible in the most places, and for e-books, that’s Kindle.

    Kindle Oasis with comic book open

    There are lots of benefits to digital books, and I want to outline that before talking about the Kindle Oasis.

    1. They don’t take up space: I don’t have to carry an extra item in my bag, nor do I have to keep books on a shelf. All of my books are stored on devices.
    2. There’s no more need for bookmarks: Amazon’s Kindle books sync to your account, so no matter if you’re picking up your Kindle device, the Kindle app on your iPad, the web reader online, or the Kindle app on your phone, or anything else, it picks up where you left off. Amazon also owns Audible, which is for audiobooks, and assuming that the title is WhisperSync for Voice-ready, it will even sync your place between the Kindle book and the Audible audiobook.
    3. You don’t have to think about lighting: With e-books, you can read in bed and not have to worry about getting the right lighting that preserves your ambiance and is still bright enough to not hurt your eyes. Kindles have their own lighting, as do tablets and phones.
    4. All of the content is at your fingertips: Just like we can do today with music, movies, and TV shows, you can instantly access any book you want thanks to the Kindle store. This sometimes includes that out-of-print book that you’ve always wanted to get your hands on.

    There are also specific benefits to an e-ink e-reader:

    1. Battery life goes from days to weeks: With an E Ink e-reader, battery life simply isn’t something that you think about anymore.
    2. There’s no more glare: If you’re in direct sunlight, an E Ink screen is super-easy to use. You don’t have to worry about adjusting brightness.
    3. Cellular connectivity changes the game: I wasn’t sure which section to include this in, but I mentioned it specifically in reference to e-ink e-readers because Amazon actually offers free cellular service on Kindles, as long as you pay the premium when you buy the device. And why shouldn’t it? You’re using the service to buy its products. Of course, this also means that if you’re reading on a train or somewhere else that doesn’t have Wi-Fi, it’s going to sync your place in the book you’re reading, and you can buy new books on the go.

    Introducing the Amazon Kindle Oasis

    After I returned my $119 Kindle Paperwhite, I just used a tablet for my reading. The $199 Kindle Voyage didn’t seem like something that would solve my pain points, and if it did, I didn’t think it was worth trying.

    Soon after, Amazon announced a new device that I had previously covered in leaks: the Kindle Oasis. I had seen the leaked design, and it seemed like a radical, weird, and frankly dumb idea. But when it was formally announced, it all made sense, and I wanted one.

    Hand holding Kindle Oasis

    The Kindle Oasis (from the eighth-gen Kindle family) was designed for one-handed use. In fact, it didn’t appear symmetrical, one of the things that made the design seem too radical. One side, referred to as the spine, was thicker, making it easier to grip with one hand. On top of that side were two buttons for turning pages. Moreover, the Oasis was the first Kindle to have an accelerometer, so if one hand got tired, you could move it to the other hand and the screen would know to flip over. Immediately, the right-handed device could become a left-handed device.

    That’s not all though, because it weighed just 4.6oz (4.7oz for the 3G model). Since the guts of the device were in the thicker spine, the rest of it – the part that included the 300ppi display – was ultra-thin. It was 0.07-0.18 inches thick, and it was amazing.

    Battery cover pins on Kindle Oasis

    Considering that this was the thinnest and lightest Kindle ever, Amazon made battery compromises to get there. It came with a battery cover, which would keep it charged for months, according to Amazon.

    It was also the most expensive Kindle ever, starting at $289.99. It wasn’t enough for me though. I spent $359.99 on the 3G model. Like I said above, spending the extra for cellular on a Kindle is a no-brainer. Why would I shell out so much money for an e-reader, only to not solve the pain point of connectivity on-the-go?

    I absolutely loved this product. It’s the perfect e-reader when I’m out and about, and when I’m lying on my back in bed. This thing was designed mostly without flaws, and I use it to this day.

    The one flaw came in the way of the battery case. I always had issues connecting it, and I even had mine replaced at one point. It turned out that I wasn’t the only one.

    Along came the second Kindle Oasis…and the compromises

    When Amazon announced its second-generation Kindle Oasis, from the ninth generation of Kindle products, I was instantly on board. The first-gen model was what I’d referred to as game-changing tech. It was something that I wasn’t sure I actually needed, and then fit into my life as something that I couldn’t live without. At the time, I’d have been willing to upgrade every year if the improvements were good enough; after all, I belong to the group of people who already have regular upgrade cycles for phones, tablets, and smartwatches.

    First and second gen Kindle Oasis models side by side

    Still 300ppi, the new Kindle Oasis boasted a bigger screen at seven inches. That sounded nice. Unfortunately, it was also heavier at 6.8oz, and thicker at 0.13-.33 inches. At that point, it wasn’t that much lighter than my 7.6oz Kindle Paperwhite that I had returned. Still, I figured the weight distribution would be mostly in the spine. I bought the 4G LTE model for $349.99.

    The big change that made it thicker and heavier wasn’t just the bigger screen; it had a bigger battery, no longer using pins to connect to a battery case. I kept the product, and I enjoyed it, but eventually, I just gravitated back to the first-gen model.

    Second gen Kindle Oasis face down

    Amazon stuck with this design for the third iteration of the Kindle Oasis (10th-gen), which is the current one. It’s still the best e-reader you can buy. It now has USB Type-C and has light temperature adjustments. If you buy one, you’ll absolutely love it. However, that’s also because you probably haven’t experienced the first-gen model.

    How Amazon could get me to spend $350 on another Kindle Oasis

    All I really want is a Kindle Oasis with the design of the first one and the upgrades that the other models have received. I’d love USB Type-C and for it to be waterproof, maybe with a spec bump for better responsiveness.

    I’d also love to see 4G LTE. My original Kindle Oasis came with 3G, and as of 2021 when carriers started shutting down 3G, it doesn’t work anymore. The only way it can access the internet is via Wi-Fi.

    One thing that I really don’t care about is battery life, and Amazon needs to stop fighting that battle as well. One of the big selling points of the E Ink e-reader is weeks of battery life, and I’m more than happy to sacrifice the four weeks that I’d get with a regular Kindle and turn it into one or two weeks with something that’s as thin and light as the first one. I think most would feel the same way.

    Kindle Oasis stood up displaying The Fall of the Prophets

    When it comes to battery life, your usage and your thought process adjusts to what the capabilities of the device are. As I write this, I’m on a train and my phone’s battery is somewhat low, and there’s a low level of anxiety that comes with that. Even with just a week of battery life, charging is still something that’s not a concern on an e-reader. If you get down to charging it once every day or two, that’s when it really becomes a concern. But as long as charging remains an afterthought, it’s fine. There’s no need to push it to months of battery life.

    I could be wrong. Everyone I know that has purchased the larger second- or third-gen models absolutely loves it. That’s fine too. Amazon could call this wishlist Kindle as the Kindle Oasis Mini, and I’d buy it in a heartbeat. After all, I spent $349 on the bigger and supposedly better second-gen Kindle Oasis, and the first-gen one is still the one I use.

      Amazon Kindle Oasis
      The Amazon Kindle Oasis has a seven-inch 300ppi display, it's waterproof, and it comes with a unique design that's made for one-handed use.

    The post Why I spent $350 on an Amazon Kindle e-reader twice, and would do so a third time appeared first on XDA.


    from XDA https://ift.tt/nGe7tR6
    via IFTTT

    These are the best chargers for the Apple MacBook Pro 13 M2 (2022)

    Apple’s Mac lineup keeps on evolving with every passing year. Last year, the company revealed the MacBook Pro (2021) models — featuring a notch, a wide variety of ports, and the return of the MagSafe. You can even grab one of these refurbished MacBook Pro models if you find their regular prices too high. Following the chassis redesign, Apple introduced the MacBook Pro 13 (2022). It packs the all-new M2 chip in the classic Pro notebook body that includes a Touch Bar. While it might not appeal to the fan of the notched Macs, it still is a solid choice for plenty customers. The MacBook Pro M2 (2022) comes with one of the best chargers — a 67W one. However, you might find yourself needing a different unit. Whether you have lost it, would rather use another brand, or just have your own reasons, we have plenty of excellent options for you.

      Amazon Basics 65W Charger

      Affordable

      If you don't want to spend a fortunate on a MacBook Pro charger, then the Amazon Basics option is quite decent. It offers a maximum of 65W through one port.
      Belkin 68W Charger

      2 Ports

      This Belkin dual charger is my personal favorite. It offers two ports and maxes out at 68W (combined). It's ideal for those who want to charge their MacBooks and iPhones simultaneously.
      Anker PowerPort III 120W

      4 Ports

      This station from Anker offers up to 120W output at a time, with the main port supporting up to 100W. It's ideal for those with plenty of devices or accessories.
      Anker PowerPort III 100W

      2 Ports

      If 4 ports are too much, Anker also has a 2-port 100W charger. You can split the 100W between the two ports or utilize it all through one port.
      UGREEN Nexode 100W Charger

      2 Ports

      This 100W dual charger is similar to the previous one from Anker. It comes with a cheaper price tag, though. It's ideal for those on a relatively limited budget.
      Baseus 100W Charging Station

      4 Ports

      This Baseus 4-port charging station also has a 100W output. You can utilize it through a single port or distribute it between several of them.

    It’s not a bad idea to buy two chargers if you use your MacBook Pro (2022) in two different locations — like home and office — frequently. This way you can just leave a charger in each place and avoid carrying the accessories on a daily basis. It’s also a good idea to keep one as a spare unit in case the included one suddenly dies or breaks for whatever reason. You wouldn’t want your workflow to suddenly stop one day — when you least expect it.

    If I had to pick one of these chargers for my MacBook Pro (2022), I would surely go for the Belkin 68W Charger. It is simple, comes from a reputable company, and offers a second port in case I want to charge another device simultaneously. Ultimately, all of these MacBook Pro (2022) chargers are excellent and should last you for a long time.

    Which of these MacBook Pro (2022) chargers are you buying, and why? Let us know in the comments section below.

    The post These are the best chargers for the Apple MacBook Pro 13 M2 (2022) appeared first on XDA.


    from XDA https://ift.tt/vNIJZuQ
    via IFTTT

    Asus Vivobook S 14X OLED review: OLED never looked this good

    The Asus Vivobook S 14X OLED is among the first on the market to have a 120Hz OLED display, which is pretty sweet. After all, OLED laptops are delightful to begin with, and Asus absolutely invests in using the technology in its screens. Adding the high refresh rate on top of that is a chef’s kiss.

    Unfortunately, there are some drawbacks in the product. It still uses a 720p webcam, and the 45W Intel 12th-gen processor isn’t paired with any dedicated graphics. In fact, performance wasn’t even on par with units I’ve tested with less powerful processors.

    Overall, however, the Asus Vivobook 14X OLED has the best display that you’ll find on a laptop right now, so it offers a pretty great experience.

      Asus Vivobook S 14X S5402
      The Asus Vivobook S 14X S5402 packs some premium features at a reasonable price, with a 120Hz OLED display, a powerful CPU, and more.

        Features:

        Pros:

        Cons:

    Navigate this review:

    Asus Vivobook S 14X OLED pricing and availability

    • The Asus Vivobook S 14X OLED costs $1,099.99
    • The model that Asus sent for review is a Costco exclusive, and it’s a better deal than the other configuration

    The Asus Vivobook S 14X OLED S5402 model is available now, and the model that the company sent me for review is exclusive to Costco. It includes an Intel Core i7-12700H, 12GB DDR4 memory, a 512GB SSD, and of course, a 14.5-inch 2.8K 120Hz OLED display.

    There are other configurations, of course. In fact, while the model that Asus sent me comes in Midnight Black, it also comes in colors like Solar Silver and Sandy Grey. However, if you’re not a Costco member, there’s some bad news. There’s a Core i5 SKU, which will be available from vendors like Amazon, Best Buy, and B&H, it’s actually the same price as the Core i7 SKU that comes from Costco at $1,099.99.

    Asus Vivobook S 14X OLED: Specs

    Processor Intel Core i7-12700H Processor 2.3 GHz (24M Cache, up to 4.7 GHz, 6P+8E cores)
    Graphics Intel Iris Xe
    Body 32.23 x 23.09 x 1.79 ~ 1.79 cm (12.69″ x 9.09″ x 0.70″ ~ 0.70″), 1.63 kg (3.59 lbs)
    Display Screen-to-body ratio: 87 %
    14.5-inch, 2.8K (2880 x 1800) OLED 16:10 aspect ratio, LED Backlit, 0.2ms response time, 120Hz refresh rate, 550nits peak brightness, 100% DCI-P3 color gamut, 1,000,000:1, VESA CERTIFIED Display HDR True Black 500, 1.07 billion colors, Anti-glare display, 70% less harmful blue light, SGS Eye Care Display, Screen-to-body ratio: 87 %
    Memory 12GB DDR4
    Storage 512GB M.2 NVMe PCIe 4.0 SSD
    Ports 1x USB 2.0 Type-A
    1x USB 3.2 Gen 1 Type-A
    2x Thunderbolt 4 supports display / power delivery
    1x HDMI 2.0a
    1x 3.5mm Combo Audio Jack
    Keyboard Backlit Chiclet Keyboard, 1.4mm Key-travel
    Camera 720p HD camera
    With privacy shutter
    Audio Smart Amp Technology
    Built-in speaker
    Built-in array microphone
    harman/kardon (Mainstream)
    with Cortana and Alexa voice-recognition support
    Battery 70WHrs, 3S1P, 3-cell Li-ion
    Power supply TYPE-C, 90W AC Adapter, Output 20V DC, 4.5A, 90W, Input: 100~240V AC 50/60Hz universal
    Colors Midnight Black
    Solar Silver
    Sandy Grey
    OS Windows 11 Home
    Price $1,099.99

    Design: It’s made of aluminum with a subtle design

    • It comes in Midnight Black, Solar Silver, and Sandy Grey
    • There are two USB Type-A ports, but one of them is USB 2.0

    The model that Asus sent me for review is Midnight Black, but it also comes in Solar Silver and Sandy Grey. You can really just think of it as a black laptop. Unlike other OEMs, Asus didn’t use any shiny branding on the exterior design. Indeed, there’s Asus Vivobook branding that’s embossed on the lid with black text.

    Top-down view of Asus Vivobook S 14X

    It’s made out of aluminum, weighing in at 3.59 pounds. This is lighter than laptops that have dedicated graphics, but heavier than ultrabooks. After all, the Asus Vivobook S 14X does sort of sit in its own class between being an ultrabook and being a powerful creator laptop. It’s got the 45W H-series CPU, but it doesn’t have dedicated graphics.

    Side view of Asus Vivobook S 14X

    As far as ports go, Asus makes a critical mistake in my opinion. On the left side, there’s a USB 2.0 Type-A port. Personally, I think USB 2.0 should have died a fiery death by now, but unfortunately, it hasn’t. The right side has a USB 3.2 Gen 1 port, so that means that as an end user, you have to know the difference between the two USB Type-A ports on the device.

    For example, if you go to plug in a 4K webcam, you’ll absolutely need to use the one on the right side, but if you don’t know the difference between the two, it’s going to take a little while to figure out what’s wrong. You might even think that one port is broken before realizing the difference between USB 2.0 and USB 3.2 Gen 1.

    Side view of Asus Vivobook S 14X

    Also on the right side is an HDMI 2.0 port and dual Thunderbolt 4 ports, both of which can be used for charging. Obviously, Thunderbolt 4 also gets you goodies like 40Gbps data transfer speed, the ability to connect an external GPU, and the ability to connect two 4K monitors or one 8K monitor on a single port. What’s neat about the ability to connect an external GPU is that since this has an H-series processor already, it can be a work laptop on the go, but when you get home, you can use that single-cable solution to connect a powerful graphics card and turn this into a gaming laptop.

    Display: The Asus Vivobook S 14X has a best-in-class display

    • The 14.5-inch screen is 2,880×1,800 OLED with a 120Hz refresh rate
    • The webcam is unfortunately 720p

    One of the really cool things that we’re starting to see on the PC market is high refresh rate displays. As tends to be the case with anything that’s actually useful and new in PC hardware, it originated with the mobile market. Prior to that, high refresh rates were targeted exclusively at gamers, and the problem with gaming displays is that they’re usually not actually good for anything but gaming. Now, we’re actually seeing some really nice consumer displays that have high refresh rates and are also pleasant to look at.

    Close up of Asus Vivobook S 14X display

    We’ve seen 120Hz displays, and we’ve seen 90Hz OLED displays, but Asus is giving us a 2.8K 120Hz OLED display, which is the best display I’ve seen on a laptop so far. When you turn on the high refresh rate in Settings, it’s a delightful experience.

    The only problem with these high refresh rate displays on Windows laptops is that they absolutely drain battery life. Intel’s processors just can’t do the same things on laptops that Qualcomm’s processors can do in phones. And on top of that, this laptop has a power-hungry processor.

    ASUS Vivobook S 14X display test

    From my testing, the Asus Vivobook S 14X supports 100% sRGB, 95% NTSC, 97% Adobe RGB, and 100% P3, which is really impressive. The point is, you don’t even need to turn it up to 120Hz for this to be one of the best displays on a laptop. It’s just great.

    ASUS Vivobook S 14X display test

    The display test above shows what you’d expect from an OLED display, with the black level staying the same from 0% brightness to 100%, and a high contrast ratio at 13,240:1.

    Close up of Asus Vivobook S webcam

    The webcam has a physical privacy guard, but the bad news is that the camera is still 720p. FHD webcams are becoming more and more popular, and if you take a lot of video calls and meetings, you’ll probably want a higher quality webcam.

    Keyboard: It’s average, which is fine

    • The Chiclet-style keyboard is fine, but that’s it

    One thing that I’ll say about the keyboard is that it’s accurate, which is probably the most important thing. There weren’t any missed keystrokes or double keystrokes. Other than that though, it feels pretty average. In general, the keyboard is pretty loud, and it doesn’t have the same solid feel that you’d get from a Lenovo ThinkPad or an HP EliteBook.

    Top down view of Asus Vivobook S 14X keyboard

    As you can see, it has standard Chiclet-style keys, and of course, it is backlit. It has some unique bits, such as an orange Esc key and markings on the Enter key, which might be helpful visual enhancements for some.

    The touchpad is fairly large, which is nice. I’d love to see it get even larger in a future iteration of the product, but that’s fine for now.

    Close up of power button

    The power button doubles as a fingerprint sensor, and since there’s no IR camera, that’s your only method of biometric authentication on this device. It works well, scanning your fingerprint when you press it rather than after it boots up.

    Performance: H-series processors without dedicated graphics isn’t too impressive

    • The Intel 12th-gen processor is 45W, but it doesn’t benchmark well

    The Vivobook S 14X S5402 unit that Asus sent me includes a Core i7-12700H, 12GB RAM, and no dedicated graphics. Unfortunately, that’s not very good. I feel like it’s becoming more common for certain brands to use H-series processors without a dGPU, and I don’t like it. I’ve spoken with major OEMs like HP that have done it in the past, and they always end up rolling it back in the next generation of the product.

    The 45W CPUs that I’m talking about are traditionally found in gaming laptops and mobile workstations. They’re for people that need all of the power that they can get, and they tend to be paired with powerful dedicated graphics. Laptops that are made for productivity usually have U-series processors, which are 15W, although some of them are now coming with 28W chips.

    Front view of Asus Vivobook S

    The additional CPU power obviously comes with a cost to the battery, but it’s without a significant gain in performance. If you’re doing creative work, you probably want to look for something with dedicated graphics, and that can be a lower-tier dGPU like an Nvidia GeForce RTX 3050 for things like Photoshop and Lightroom. For productivity, you won’t see any meaningful gains from a 45W CPU.

    The integrated Iris Xe graphics are exactly the same as the ones found in a Core i7-1260P, with 96 execution units and clocked at 1.4GHz. The clock speed is a bit higher than what’s found in the graphics in the Core i7-1255U.

    The Core i7-12700H in the Asus Vivobook S 14X S5402 also doesn’t benchmark well. Shockingly, the scores were lower than what I got on a laptop with a Core i7-1255U, a 15W processor with integrated graphics. To be clear, these units were plugged in with the power slider set to best performance. I even did a factory reset on the Vivobook and ran the tests again, trying to find a way for it to do better. It didn’t.

    Asus Vivobook S 14X
    Core i7-12700H
    Dell Inspiron 14 2-in-1
    Core i7-1255U
    Dell XPS 15 9520
    Core i7-12700H, RTX 3050 Ti
    Lenovo Yoga 9i 14
    Core i7-1260P
    PCMark 10 5,233 5,305 6,640 5,616
    3DMark: Time Spy 1,202 1,507 4,535 1,678
    Geekbench 1,510 / 6,014 1,711 / 6,700 1,774 / 11,580 1,736 / 9,525
    Cinebench 1,629 / 9,015 1,724 / 6,797 1,797 / 11,695 1,638 / 7,757
    CrossMark (overall / productivity / creativity / response time) 1,356 / 1,389 / 1,342 / 1,300 1,428 / 1,450 / 1,464 / 1,265 1,855 / 1,735 / 2,052 / 1,671

    You can see how it compares to the rest of Intel’s lineup, with the latest U-series Core i7 and the new P-series Core i7, but I also wanted to show the difference in scores when compared with a laptop that has the same processor and some lower-tier dedicated graphics. However, please note that both Geekbench and Cinebench are exclusively CPU tests, so the Vivobook should, in theory, match up with the Dell XPS 15 9520 on those two tests. I was unable to get it to do so.

    Battery life was around three hours with the screen set to 120Hz, and around five hours with the screen set to 60Hz, which is about what I’d expect. Lots of companies quote big battery life numbers, but this is what it usually ends up being when you actually plug in a realistic use case.

    I also have to say that I did less battery testing with this laptop than I do with others. The method is always to set the power slider to balanced and the screen brightness to a comfortable level, but performance really ended up being such a pain point here that I just got frustrated with not having it plugged in.

    Should you buy the Asus Vivobook S 14X OLED?

    The big feature with the Asus Vivobook S 14X is the display, of course, and it’s not for everyone.

    Who should buy the Asus Vivobook S 14X S5402:

    • People that want the absolute best in display quality
    • Gamers that want productivity on the go and have an external GPU to connect when at home
    • Customers that want a lot of value for the price

    Who should NOT buy the Asus Vivobook S 14X S5402:

    • Creators that need dedicated graphics
    • People that want a general productivity laptop
    • People that attend a lot of virtual meetings

    The problem with the Asus Vivobook S 14X is that I have a hard time figuring out exactly what category this fits in. I wouldn’t call it a creator laptop; after all, I edited all of these photos on it and frankly, it was lacking when it was on battery life. And at the same time, people that want a productivity laptop would be better served with a U- or P-series processor. Still, you do get a 2.8K 120Hz screen for $1,100, so there’s a lot of value there.

    The post Asus Vivobook S 14X OLED review: OLED never looked this good appeared first on XDA.


    from XDA https://ift.tt/kgDpl8v
    via IFTTT

    How to change the Wi-Fi network on an Amazon Echo and Echo Show

    A working Wi-Fi connection is an essential part of owning an Amazon Echo. Without it you can’t really do, well, anything. So when it comes to the time you get a new wireless router, for example, it’s important to get moved over as quickly as possible. Especially if your Echo and Alexa are central to your smart home setup.

    Fortunately, changing to a new Wi-Fi network is straightforward and all you need is your phone and the Alexa app. Detailed below are the steps that apply to all Amazon Echo smart speakers as well as the Echo Show and Echo Spot devices with displays.

    How to change the Wi-Fi network on an Amazon Echo

    • Enable Bluetooth on your phone and open the Alexa App.

    Amazon Alexa (Free, Google Play) →

    ‎Amazon Alexa (Free, App Store) →

    • Trigger in the settings under Wi-Fi Network and follow on-screen prompts.
    • For Echo Show and Echo Spot, use the built-in display to access the Settings menu.

    Amazon Echo

    For this, you’ll want to make sure that you’re in the same room as the Echo and that Bluetooth is enabled on your phone. Then, open up the Alexa app and follow these steps.

    1. Select Devices.
    2. Select Echo & Alexa.
    3. Select your device.
    4. Select Settings.
    5. Select Wi-Fi Network and follow the on-screen instructions.

    These may vary from device to device, but the basic steps involve holding down the action button on the speaker for around 15 seconds. From here you’re going to be waiting for the light to go orange before continuing.

    The Alexa app puts your Amazon Echo into its setup mode and then pairs it to your new Wi-Fi network. Once complete, you’ll hear a message from your Amazon Echo and the orange light will have been replaced by a blue one.

    How to change the Wi-Fi network on an Amazon Echo Show or Echo Spot

    Amazon Echo Show 8

    If you’re using an Amazon Echo device with a display then the process is a whole lot simpler. All you will need to do is to open the settings, usually by swiping down from the top and tapping the cog on the display.

    Next, find the Network menu, open it and then simply select the Wi-Fi network you want to connect to. Since you have an on-screen keyboard, you’ll enter passwords here, too.

      Amazon Echo (4th Gen)
      The Amazon Echo is the best all-around smart speaker for most people with a nice design, great sound and the immense power of the Alexa ecosystem at its disposal.

    The post How to change the Wi-Fi network on an Amazon Echo and Echo Show appeared first on XDA.


    from XDA https://ift.tt/hvXZ1oW
    via IFTTT